What you’ll accomplish
By the end of this guide, you’ll have a fully configured scheduler that athletes can book. This is where your availability templates become actual bookable services that generate revenue.Before you begin
Preparation makes creation faster and reduces errors: Have ready:- Clear idea of what service you’re offering
- Decided on duration (30, 45, 60 minutes, or custom)
- Decided on price (free, direct payment, or credits)
- Availability already set up (or ready to create during this process)
- 15-20 minutes of uninterrupted time
The scheduler builder sections overview
Before diving in, understand what you’ll configure: Required sections (must complete):- Basic Details - Name, description, duration
- Availability - When this scheduler can be booked
- Payment - Free, paid, or credit-based
- Capacity - How many athletes per session
- Booking Rules - Limits, permissions, cancellation policies
- Buffer Time - Breaks between sessions
- Scheduling Windows - Minimum notice, maximum future booking
- Reminders - Automated notifications
- Location - Where sessions take place
- Connected Coaches - Who delivers this service
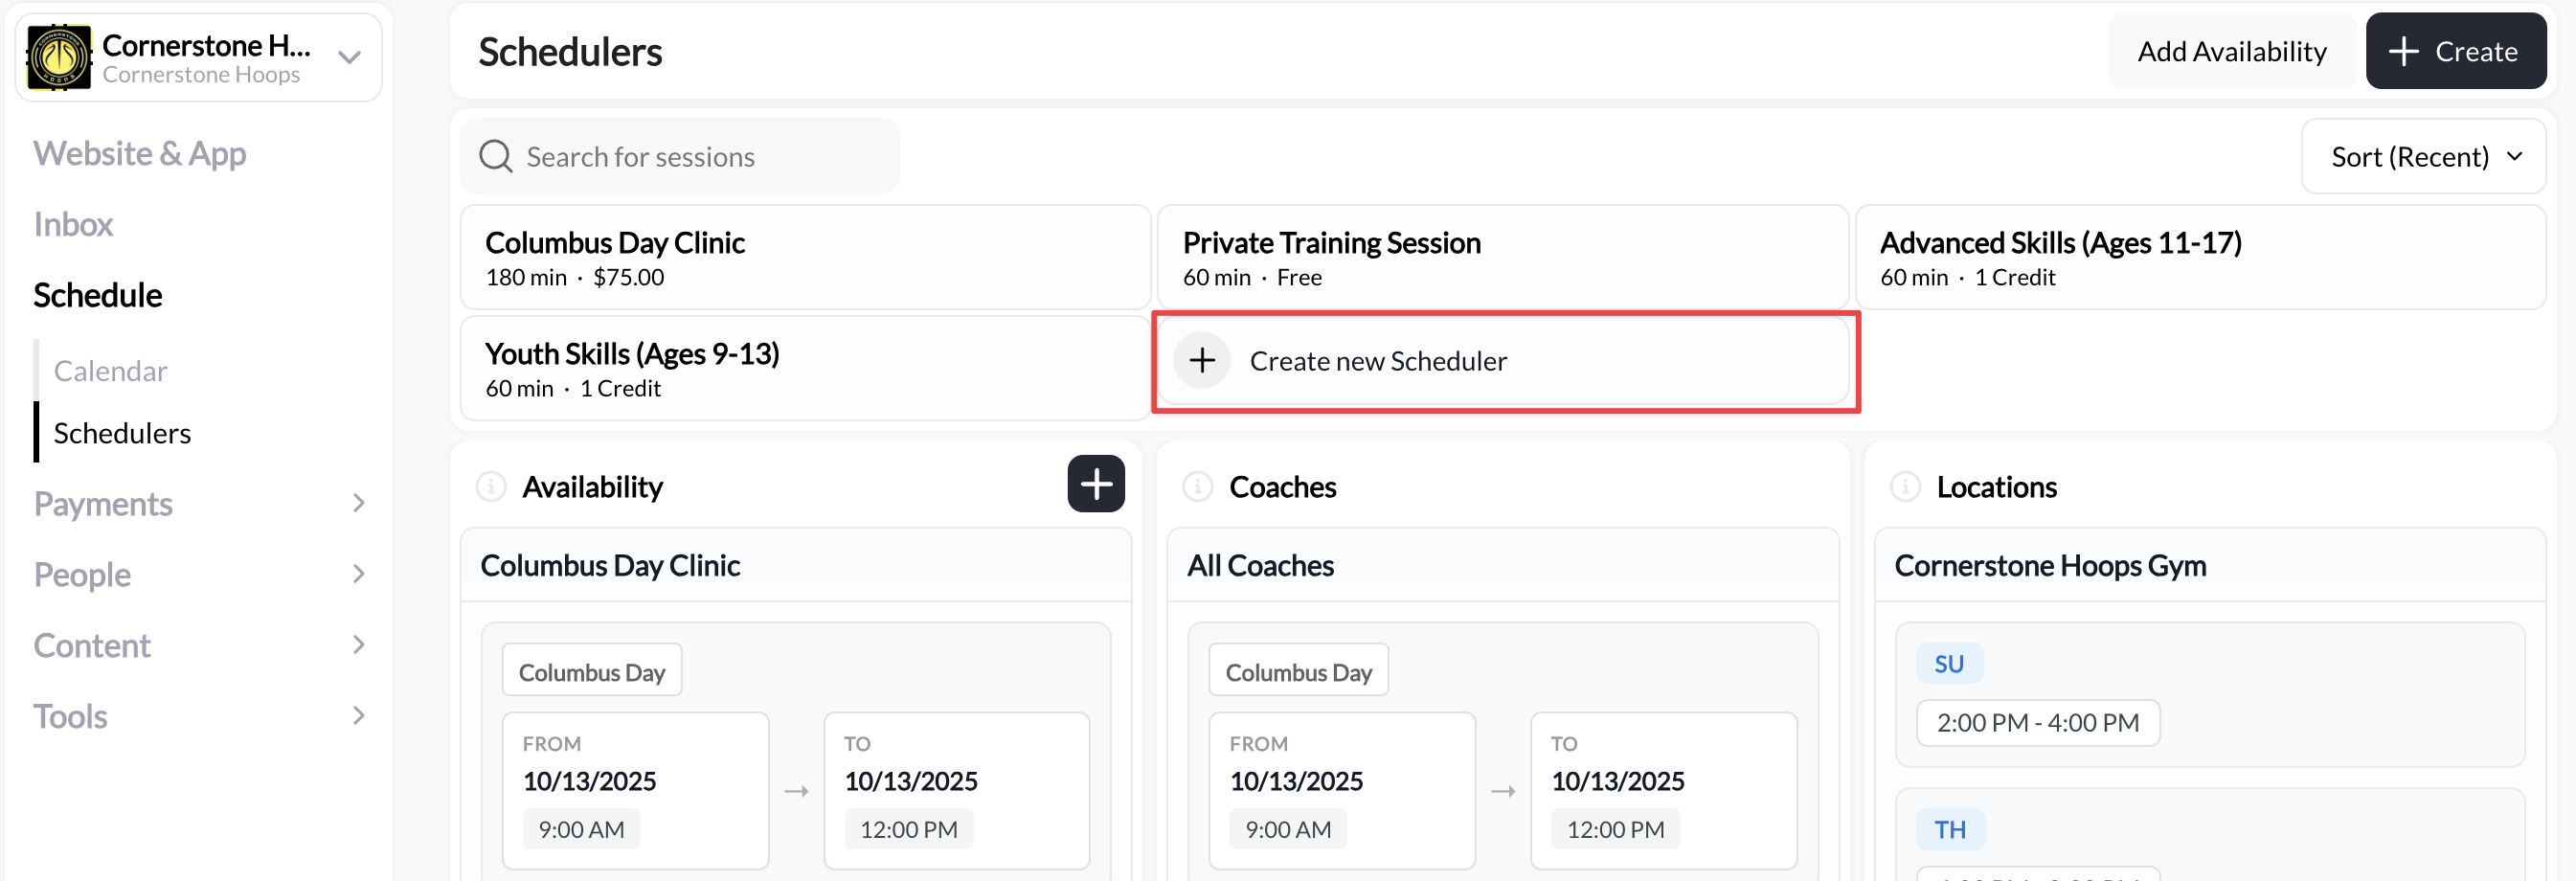
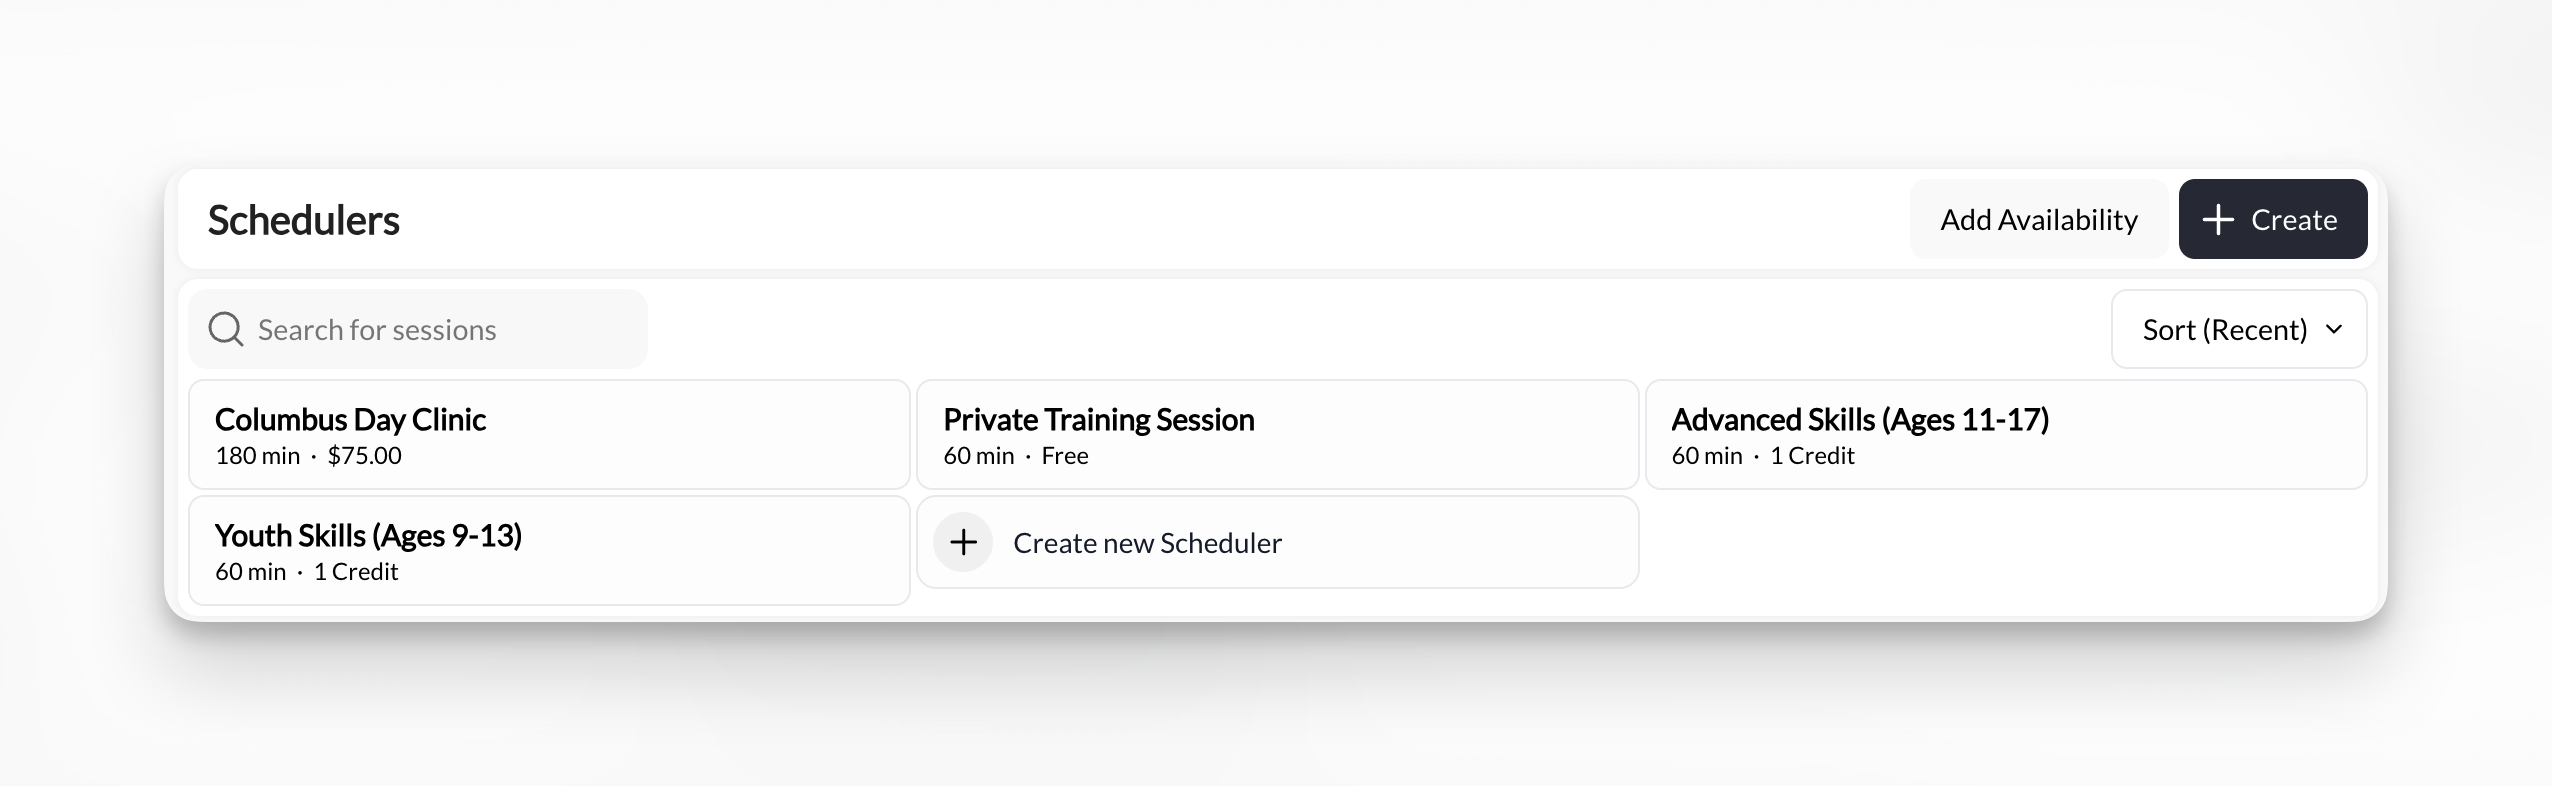
Step 1: Navigate to scheduler creation
Access the Schedule section
- Click Schedule, then Schedulers in the main left navigation menu
Step 2: Configure basic session details
Start with the fundamentals that define what athletes are booking.Enter scheduler name
- “60-Minute Private Training”
- “Small Group Strength Class”
- “Free Initial Assessment”
- “45-Minute Speed & Agility Session”
- ✅ Format (ex: Private, Group, Semi-Private)
- ✅ Key differentiator (ex: Skill Level)
- ✅ Location
- ❌ Internal codes (PT-60-A)
- ❌ Overly generic (“Training Session”)
- ❌ Too long (save details for description)
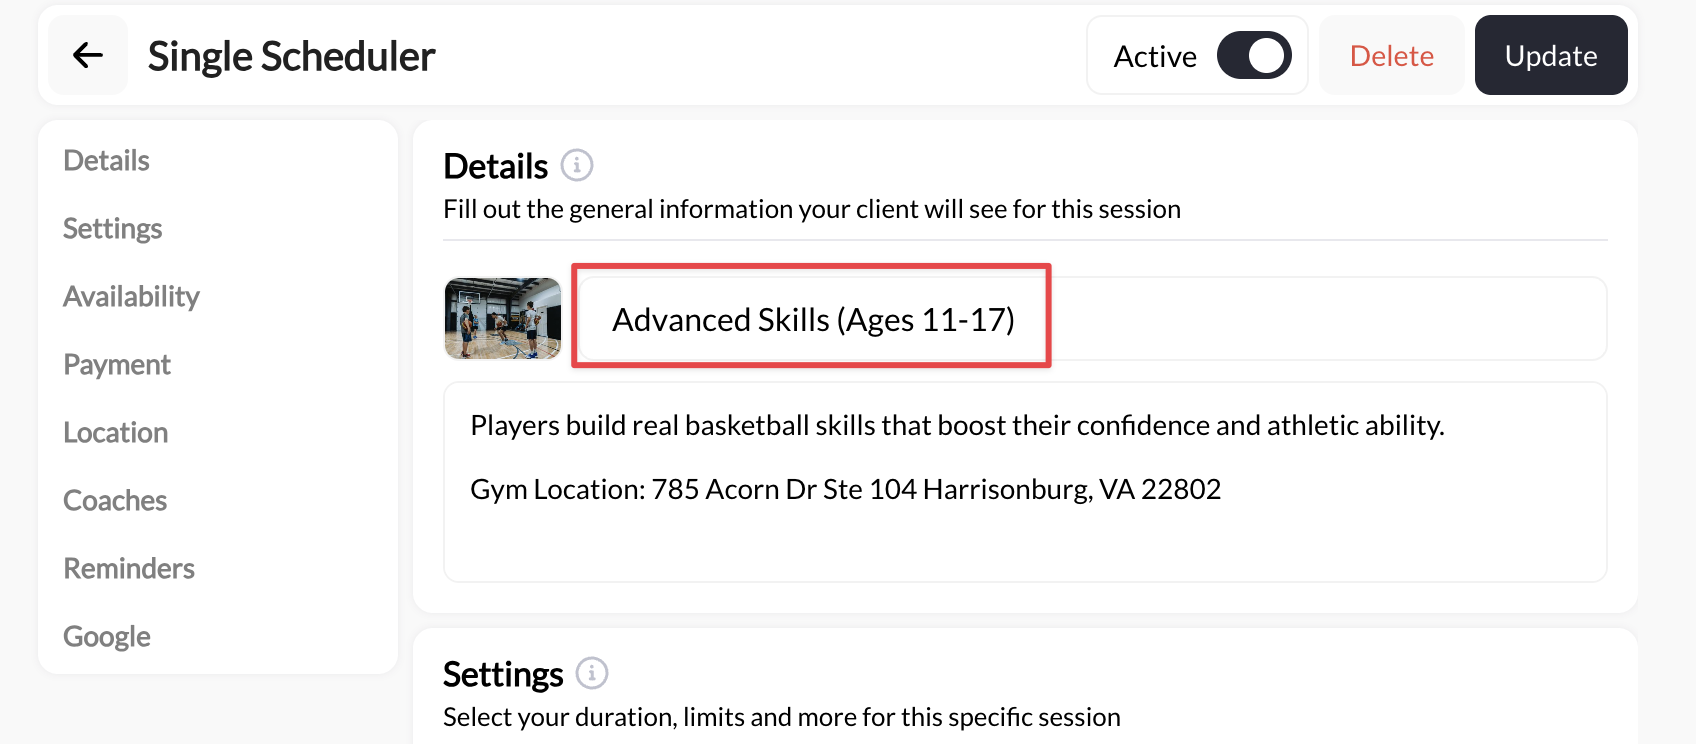
Add scheduler description
- What happens during the session
- Who this session is for (skill level, age, goals)
- What athletes should bring or wear
- What makes this valuable
- Any prerequisites or requirements
“One-on-one personalized training focused on your specific goals. We’ll work on technique, strength, conditioning, and sport-specific skills. Perfect for athletes of all levels looking to improve performance. Bring athletic shoes, water bottle, and workout clothes. Each session includes video analysis and personalized homework.”
Set session duration
- 60 minutes (standard training, most common)
- 90 minutes (extended training)
- 120+ minutes (one day clinics)
- Custom (enter any duration)
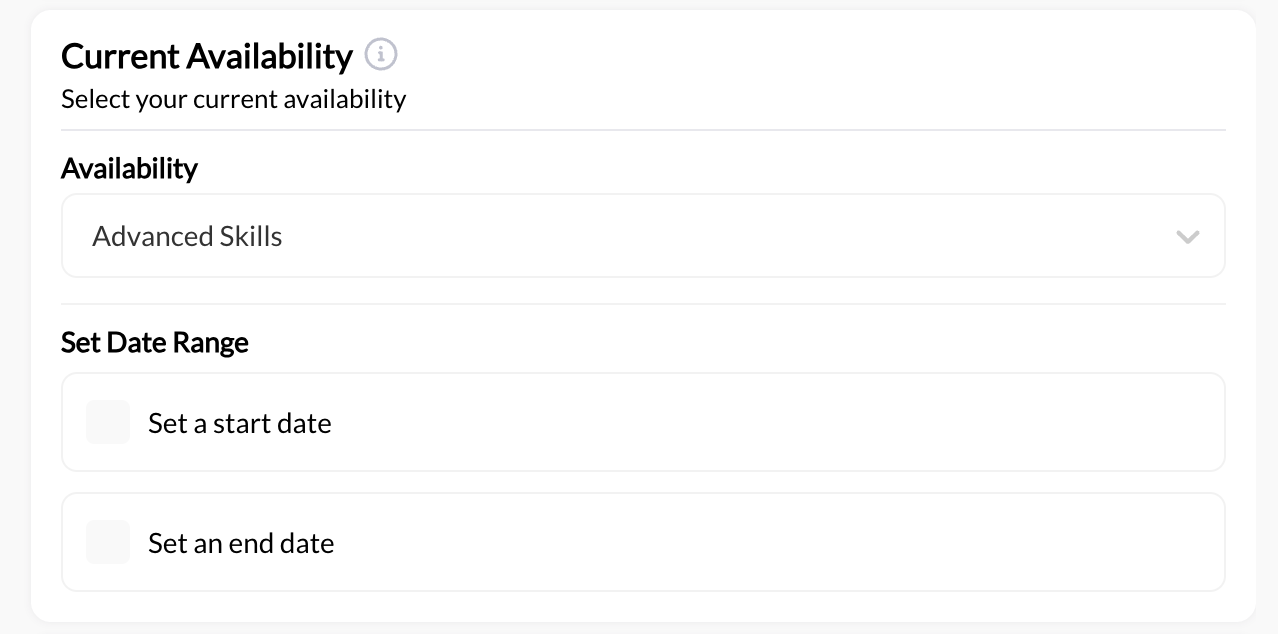
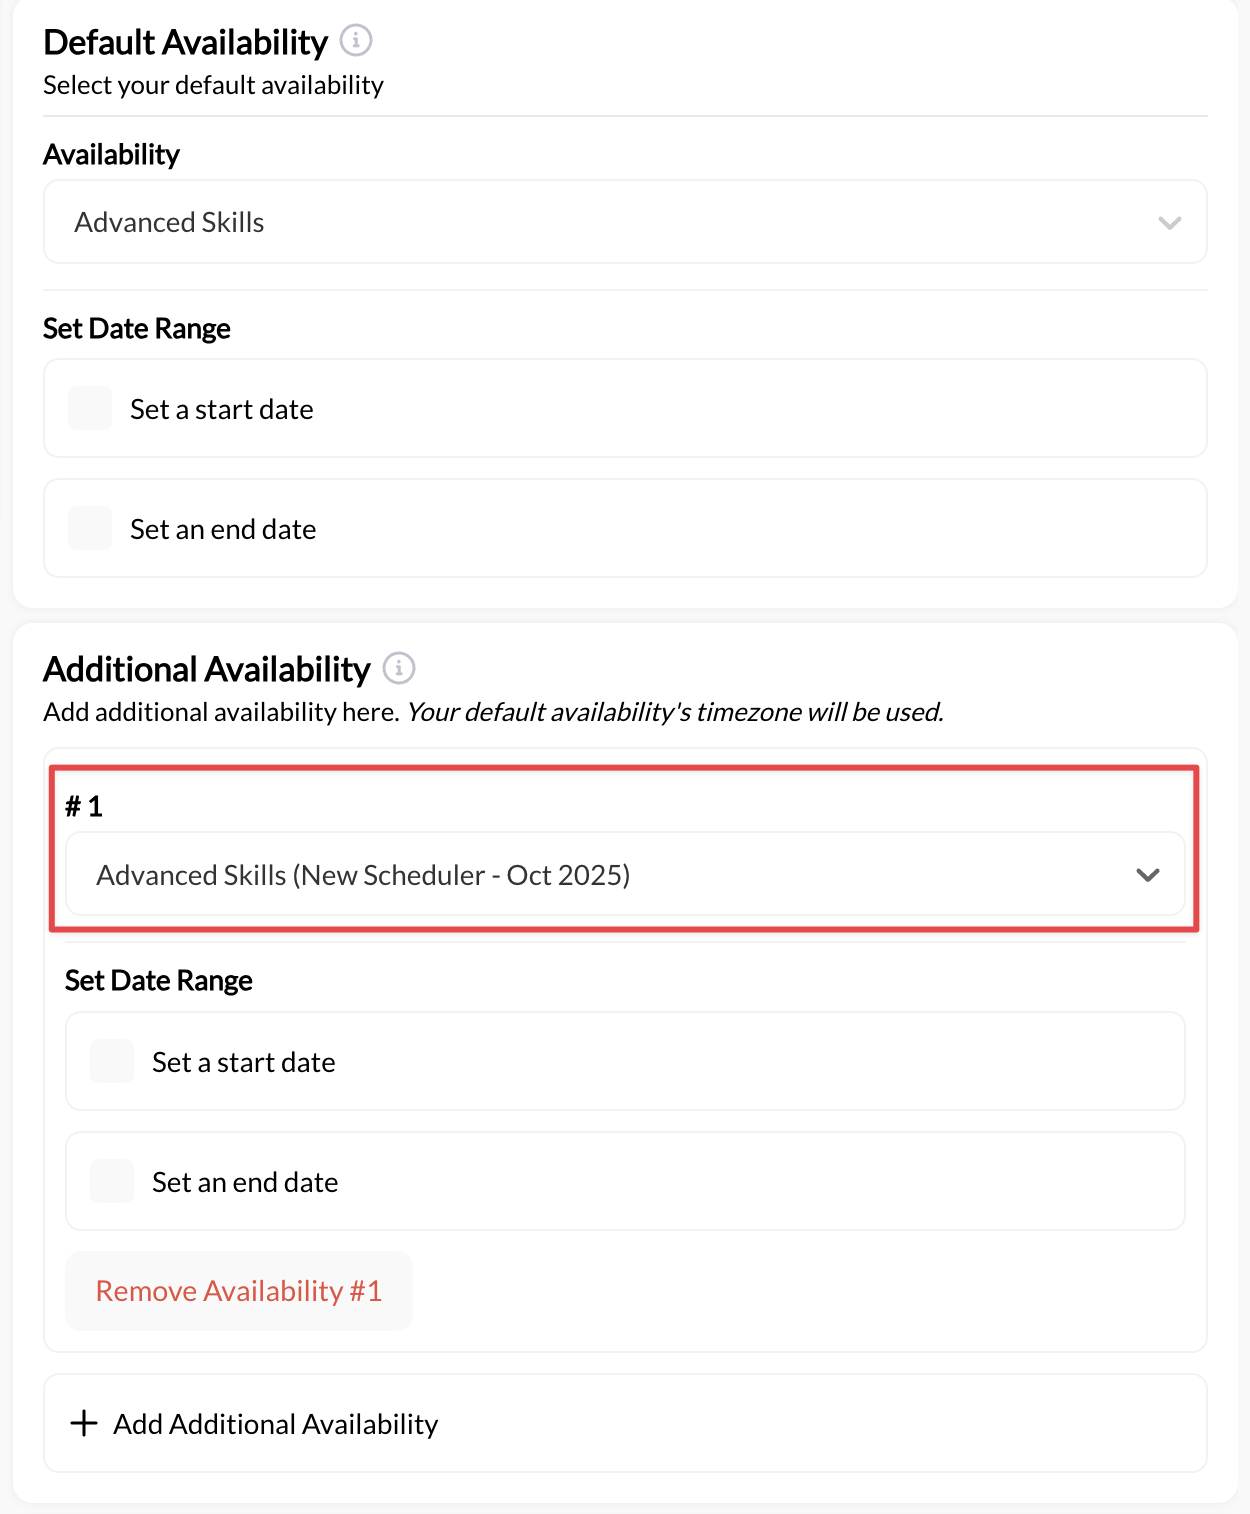
Step 3: Connect availability
This is where you define WHEN this scheduler can be booked.Locate the Availability section
- Availability
- Schedule
- When You’re Available
- Or similar section heading
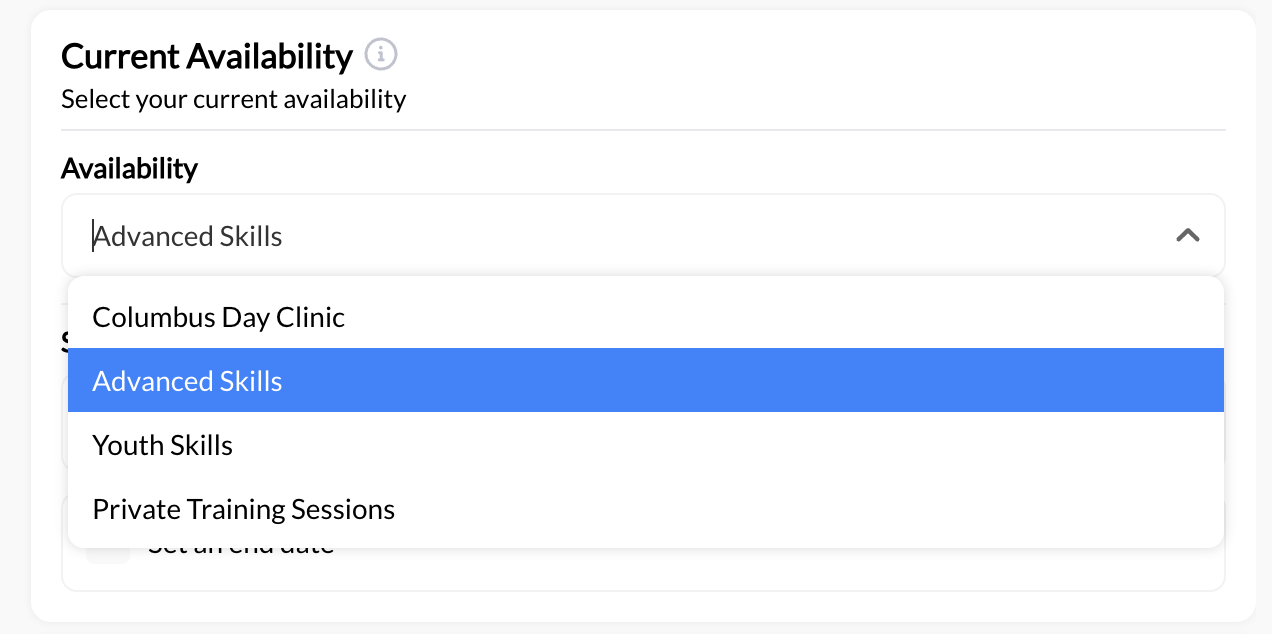
Choose availability
Set Start and End Dates (optional)
- Launching a new program
- Switching to a new schedule after a certain date
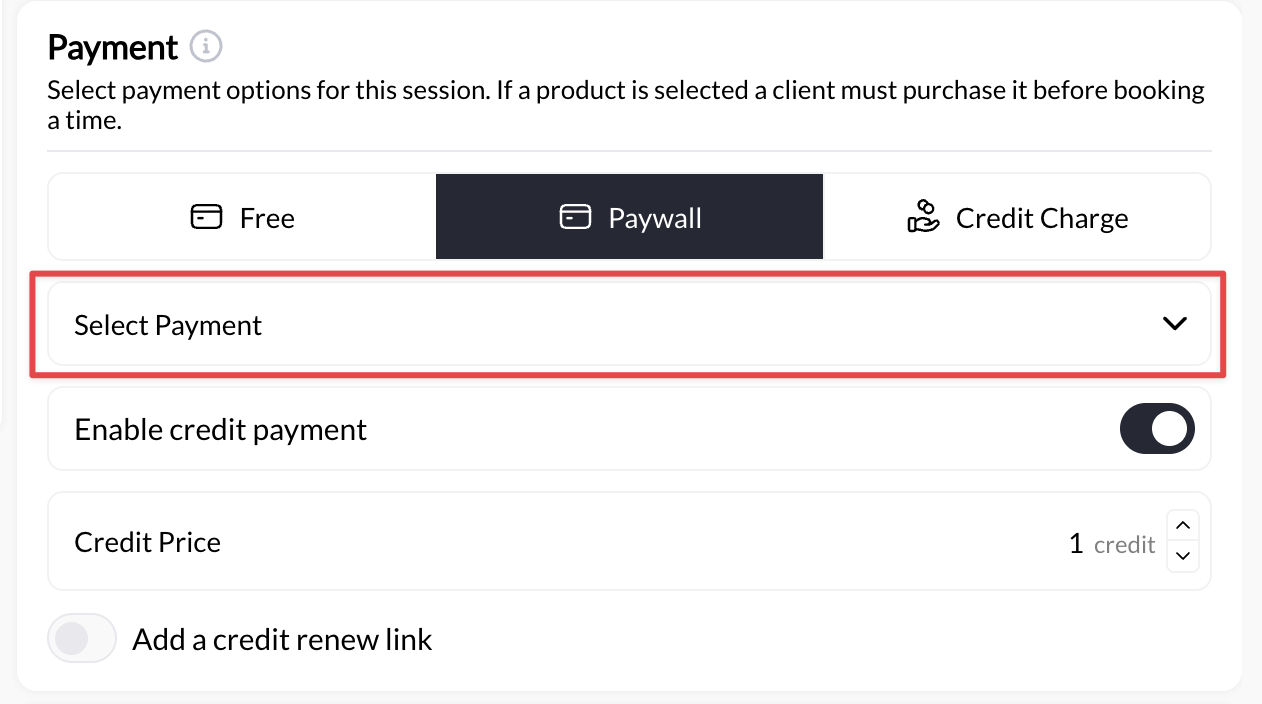
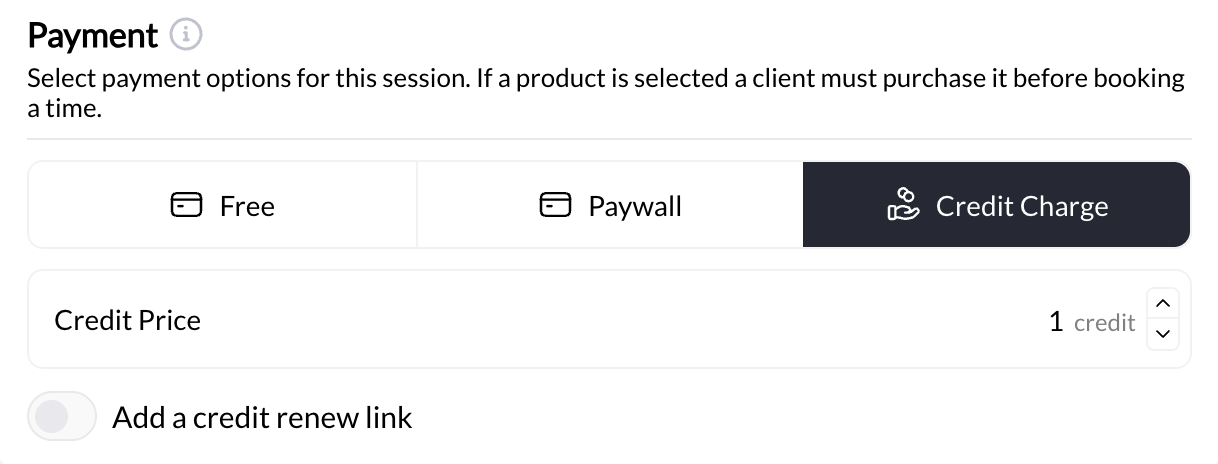
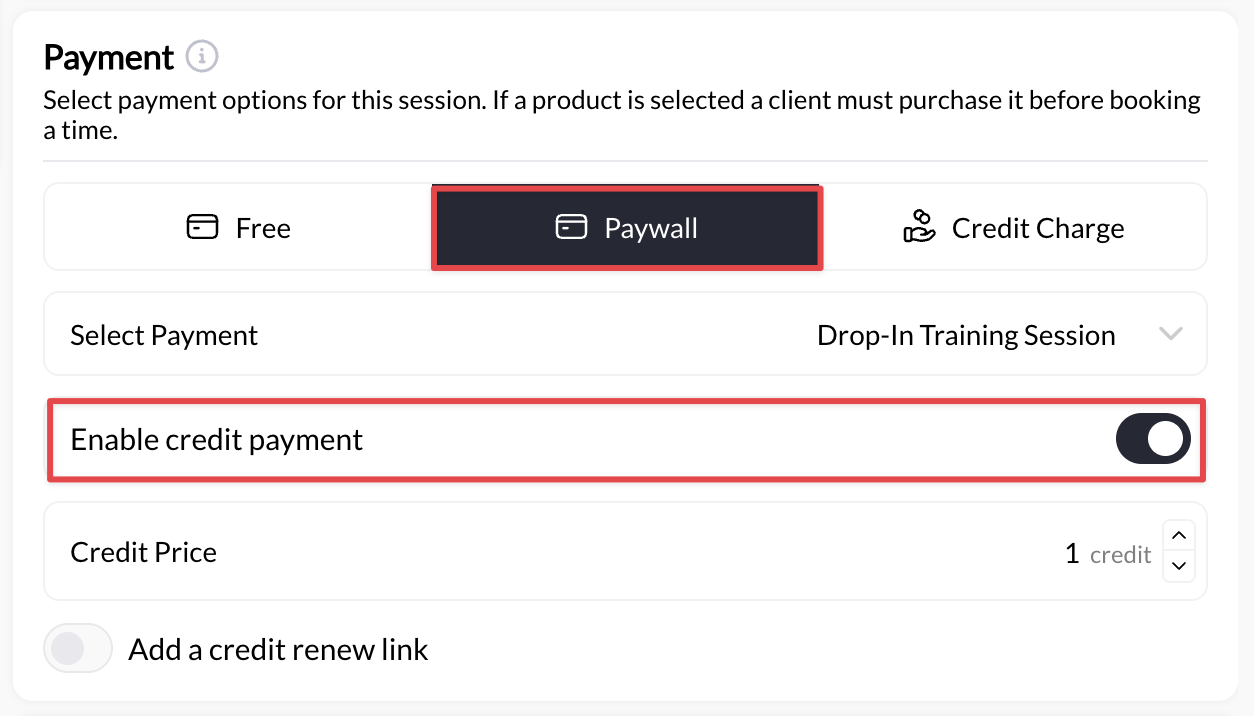
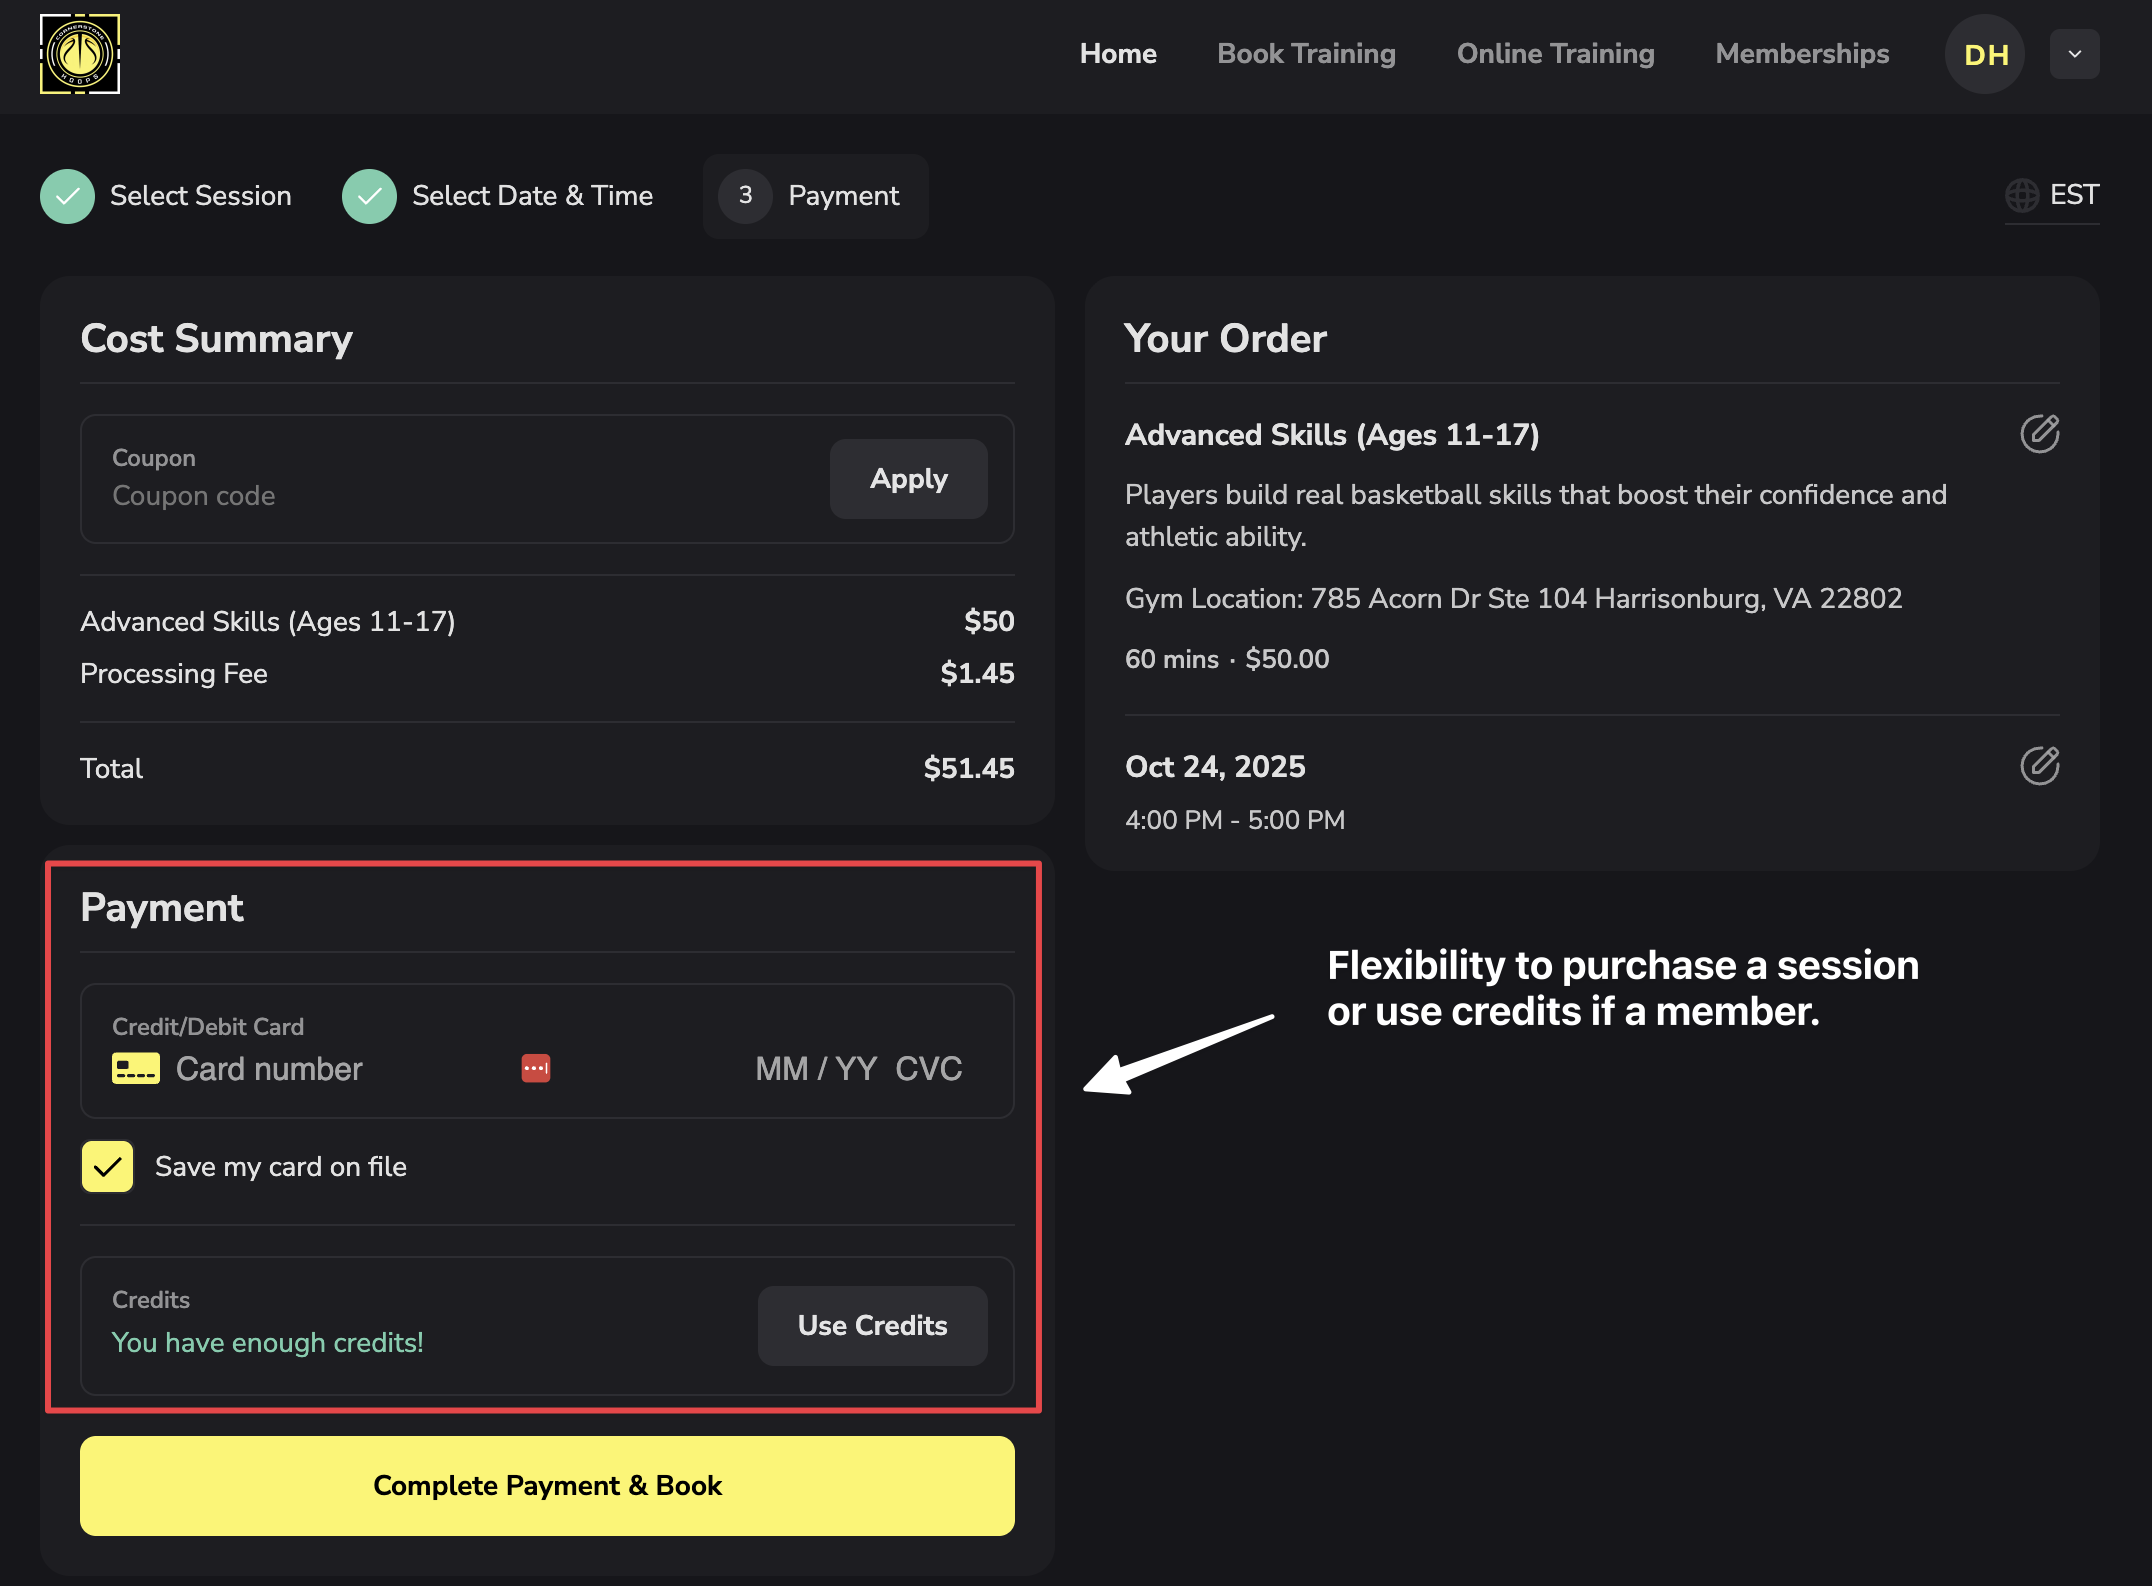
Step 4: Configure payment settings
Decide how athletes will pay for this scheduler.- Free Sessions
- Direct Payment (One-Time Purchase)
- Credit-Based
- Hybrid (Direct Payment OR Credits)
- Trial/assessment sessions
- Team practices
- Makeup sessions
- Building relationships
- Find payment section
- Select Free
Step 5: Set capacity and participant limits
Control how many athletes can book. Options:- Max booking per day: limit on the number of bookings in a day
- Max bookings per week: limit on the number of bookings in a week
- Max athletes per session (most common): limit on the number of athletes in a session
- 1 athlete = Private 1-on-1 sessions (most common for first scheduler)
- 2 athletes = Semi-private training
- 3-6 athletes = Small group sessions
- 8-12 athletes = Medium group classes
- 15-20+ athletes = Large group classes or team training
Step 6: Configure booking rules (optional but recommended)
These settings control how athletes can book and cancel.Cancellation Policy
Cancellation Policy
- Allow anytime - Athletes can cancel up until session start
- Require 24-hour notice - Can’t cancel within 24 hours
- Require 48-hour notice - Can’t cancel within 48 hours
- No cancellations allowed - Once booked, no cancellation
- Refund credits on cancellation - Credit returns to athlete balance
- No refund - Credit is consumed even if canceled
Booking Limits
Booking Limits
- Max bookings per day - Athlete can book max 1 (or 2, 3) per day
- Max bookings per week - Athlete can book max 2 (or 3, 4, 5) per week
- No limits - Athletes can book as many as they want
- High-demand schedulers with limited slots
- Preventing single athlete from monopolizing schedule
- Encouraging distribution across athlete base

Allow Multiple Bookings
Allow Multiple Bookings
- Yes - Athlete can book Monday, Wednesday, Friday all at once
- No - Athlete must book one session at a time
Rescheduling
Rescheduling
Permissions & Access
Permissions & Access
- All athletes - Anyone with account can book
- Specific groups - Only athletes in certain programs
- Invite only - You must enable access per athlete
- Access codes - Athlete needs code to book
Step 7: Add buffer time
Buffer time creates breathing room between back-to-back sessions.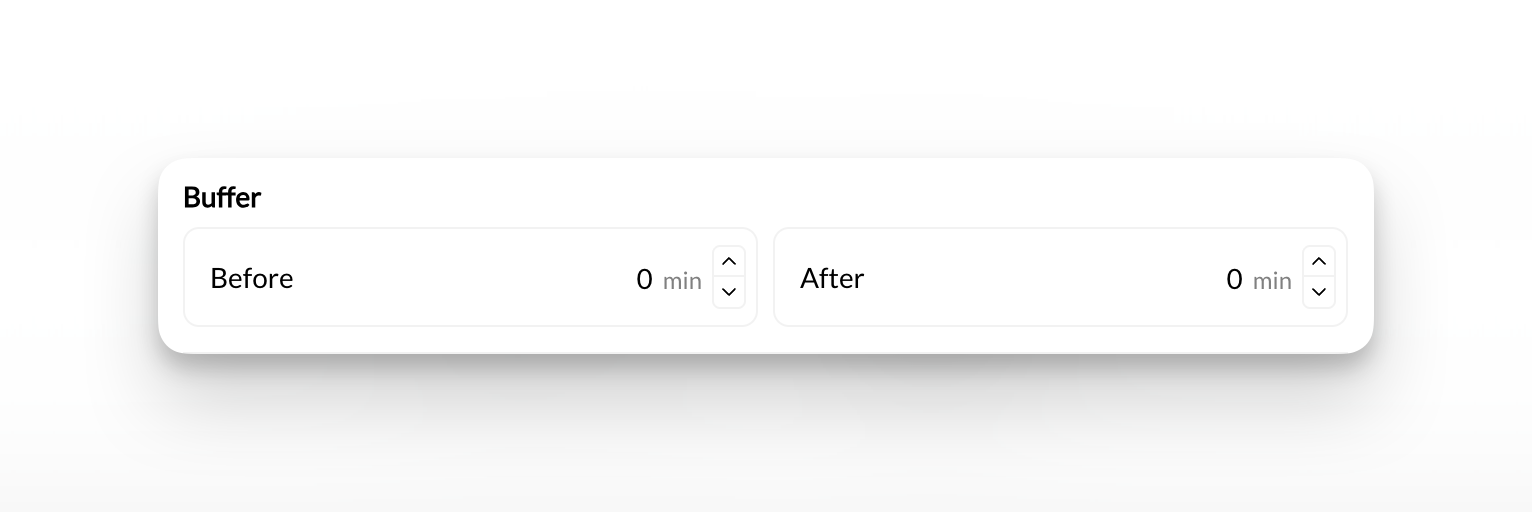
Set buffer before session (optional)
- Setup time (equipment, training area)
- Review athlete notes
- Personal prep time
Set buffer after session (highly recommended)
- Cleanup time
- Bathroom break
- Notes and documentation
- Transition between athletes
- Sessions running slightly over
Understand buffer impact
- 3:00-4:00 PM (Session 1)
- 4:00-5:00 PM (Session 2)
- 5:00-6:00 PM (Session 3)
- 3:00-4:00 PM (Session 1)
- 4:15-5:15 PM (Session 2)
- 5:30-6:30 PM (Session 3)
Step 8: Set scheduling windows (optional)
Control how far in advance (or how last-minute) athletes can book.Minimum Booking Notice
Minimum Booking Notice
- No minimum - Can book right up to start time
- 1 hour - Must book at least 1 hour before
- 4 hours - Must book at least 4 hours before
- 24 hours - Must book at least 24 hours before
- 48 hours - Must book at least 48 hours before
- Prevents last-minute bookings when you can’t prepare
- Ensures you see bookings before they happen
- Reduces stress of surprise bookings
- Maximizes booking flexibility
- Good for urgent/emergency sessions
- Simpler for athletes
Maximum Future Booking Window
Maximum Future Booking Window
- No limit - Can book months/years ahead
- 30 days - Can only book within next month
- 60 days - Can book up to 2 months ahead
- 90 days - Can book up to 3 months ahead
- Prevents schedule from filling too far out
- Allows flexibility to adjust pricing/availability
- Keeps bookings manageable
- Accommodates athletes who plan far ahead
- Good for seasonal businesses
- Maximizes booking opportunities
Step 9: Configure reminders (optional but valuable)
Set up automated notifications before sessions to reduce no-shows.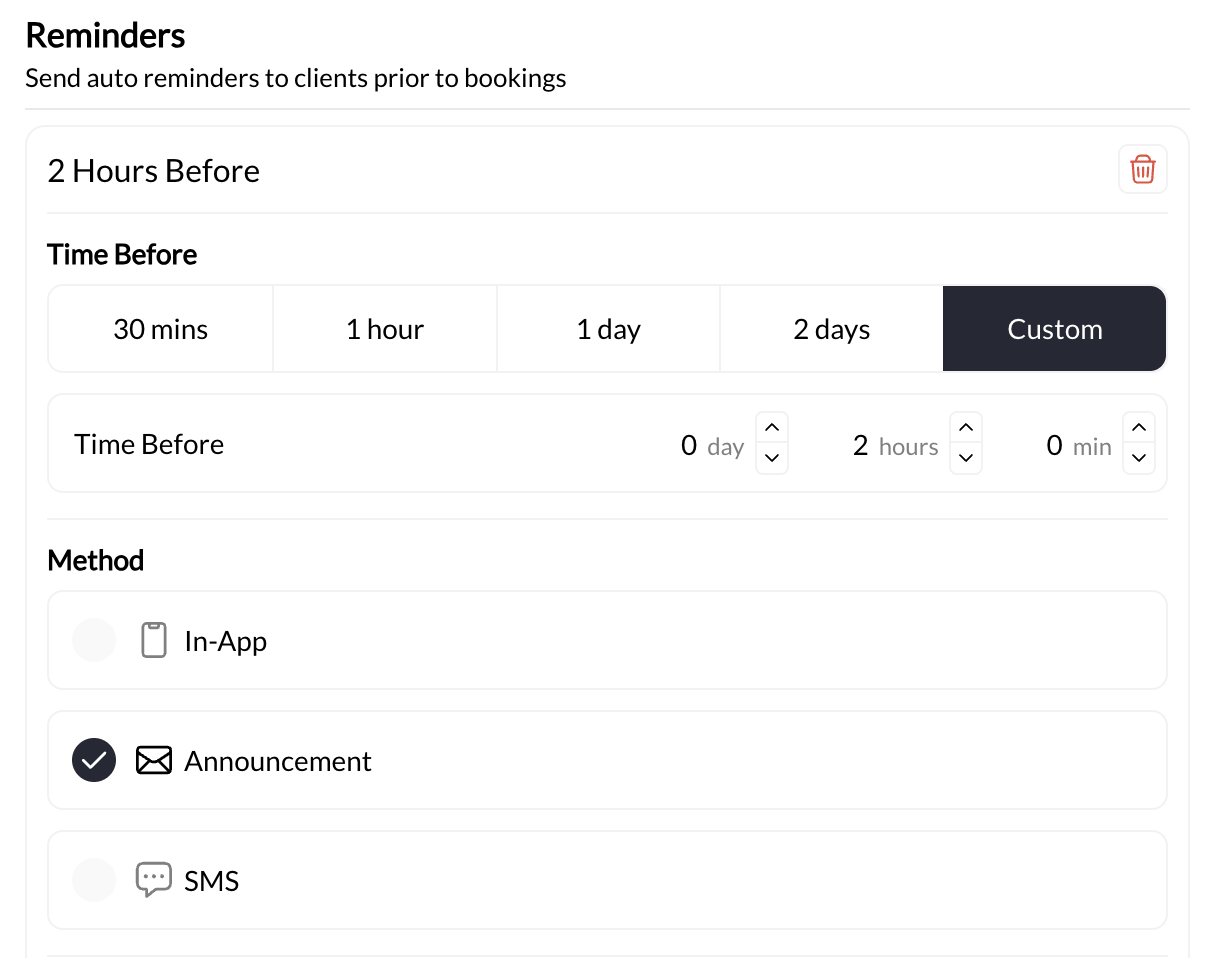
Set reminder timing
- 30 minutes - Last-minute reminder
- 1 hour - Short-notice reminder
- 2 hours - Moderate notice
- 1 day - Day-before reminder (most common)
- 2 days - Advance notice
- Custom - Any timing you specify
Choose delivery method
- In-App - Notification in CoachIQ app/portal and inbox
- Announcement/Email - Sent to athlete’s email and in-app announcement feed
- SMS - Text message to athlete’s phone (SMS rates apply)
Customize reminder message (optional)
“Reminder: You have a session tomorrow at 3:00 PM with Coach Mike”Custom message example:
“Your training session is tomorrow at 3:00 PM! Please bring your workout gear, water bottle, and be ready to work. See you soon!”
Step 10: Add location (optional)
Specify where this session takes place.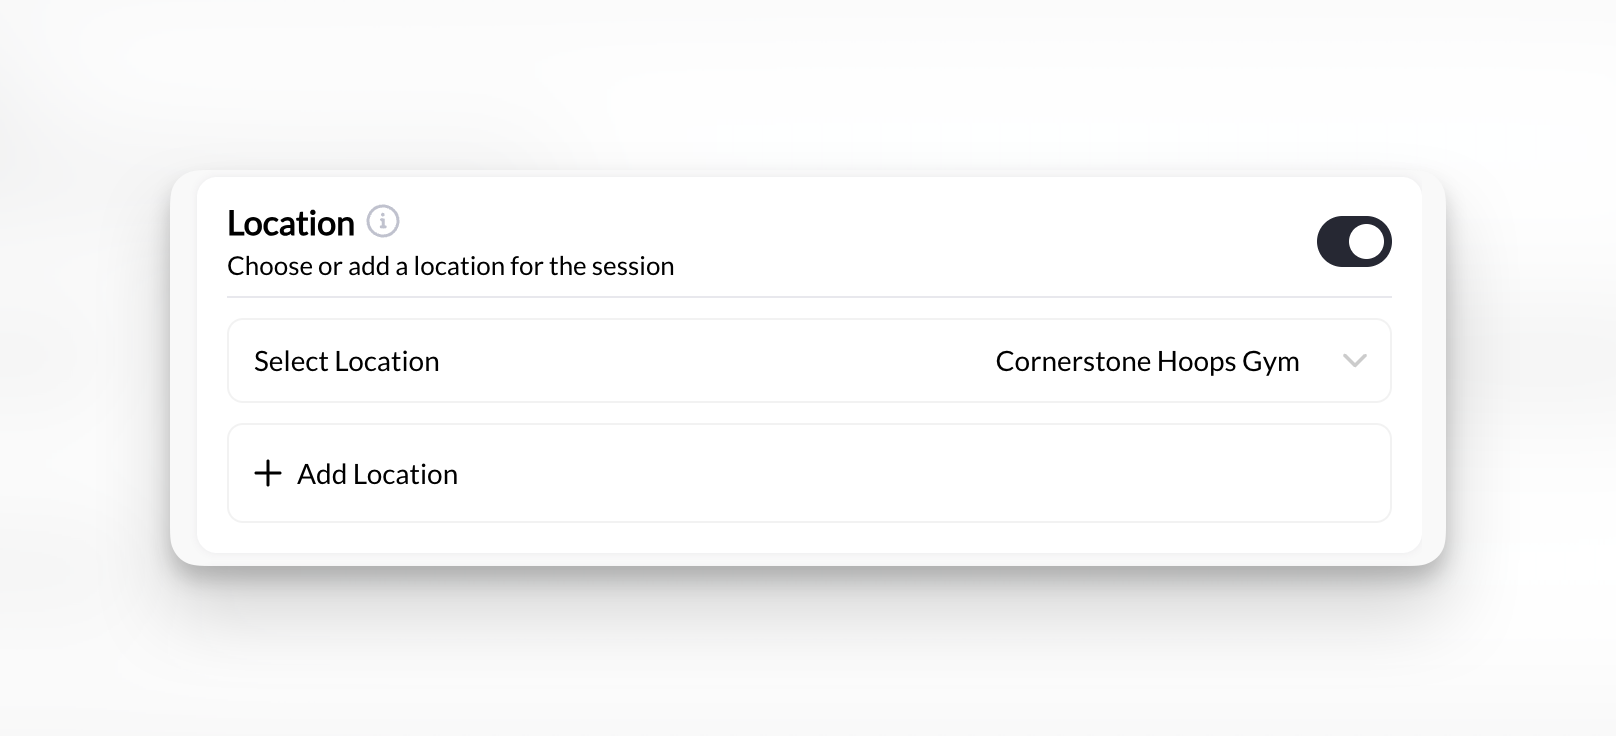
Select or create location
- Select from dropdown of existing locations
- Click Add New Location
- Enter location name (ex: “Main Training Facility”)
- Enter address (optional but helpful for athletes)
- Add notes (ex: “Use side entrance, check in at front desk”)
- Save location
Step 11: Assign coaches (if applicable)
Specify which coach(es) deliver this scheduler.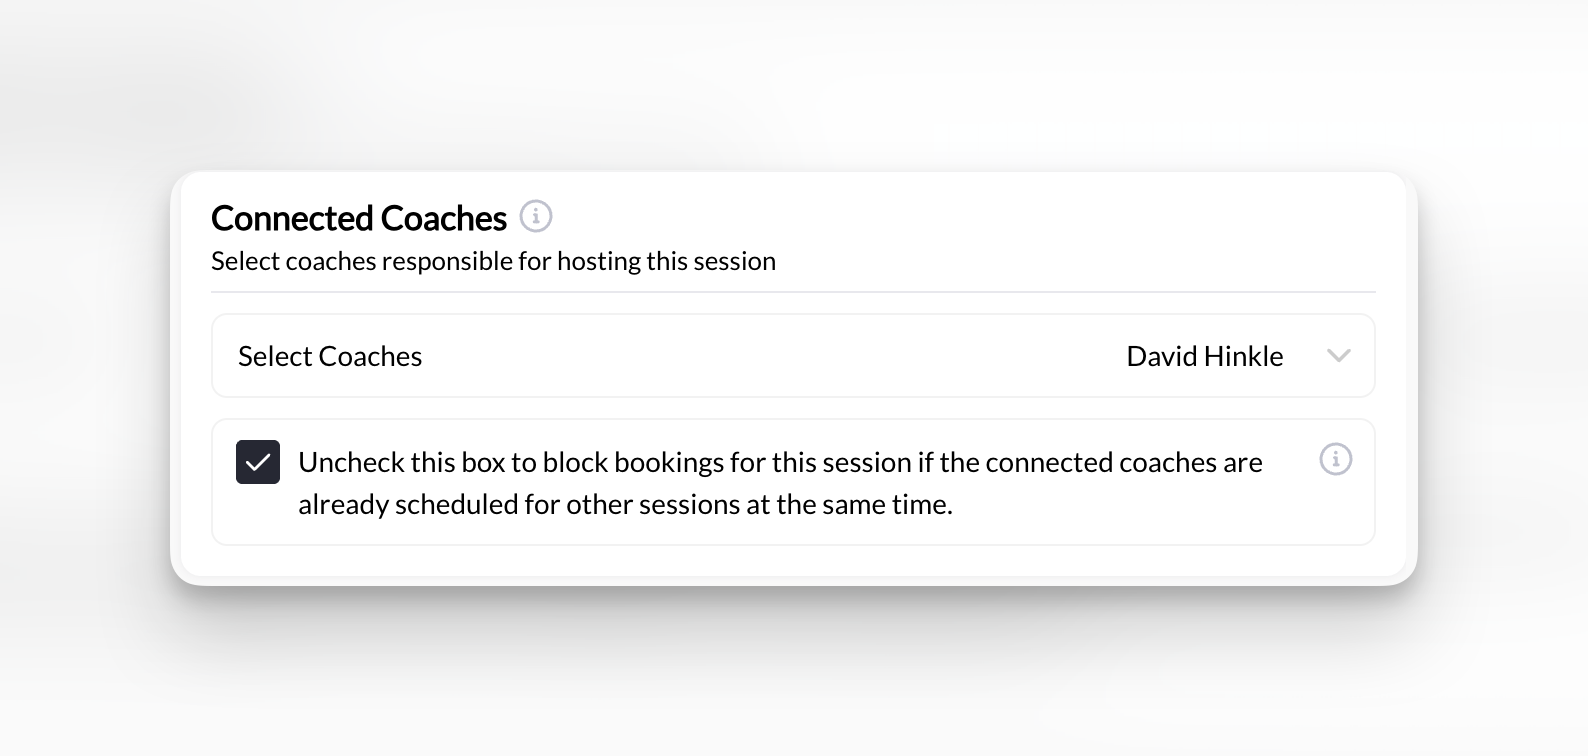
Select coach(es)
- Select specific coach if this scheduler is coach-specific
- Select multiple coaches if any can deliver this session
Set overlapping booking permission
- No - Prevent double-booking (recommended)
- Yes - Allow overlapping bookings (only for group sessions where coach leads multiple)
Step 12: Review and save
Final checks before activating your scheduler.Review all configuration
- ✅ Name is clear and descriptive
- ✅ Description is compelling
- ✅ Duration is correct
- ✅ Days and times match your schedule
- ✅ Blackout days added for known time off
- ✅ End time accounts for buffer after last session
- ✅ Payment type matches intent (free/paid/credits)
- ✅ Price is correct
- ✅ Product connected (if direct payment)
- ✅ Max athletes setting matches session format
- ✅ Group vs private is correct
- ✅ Buffer time set (15 min recommended)
- ✅ Booking rules configured (if needed)
- ✅ Reminders enabled (1 day before recommended)
- ✅ Location added (if needed)
Save your scheduler
Step 13: Test your scheduler
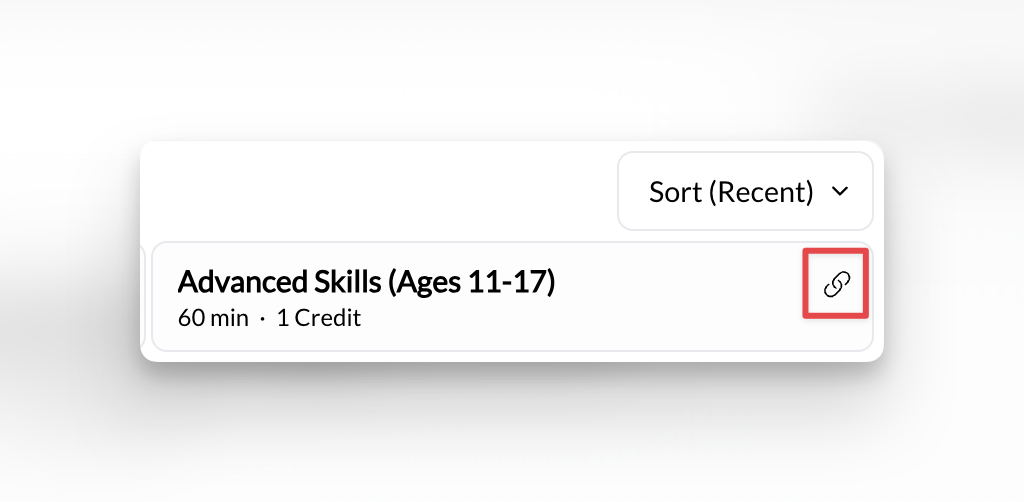
Get your booking link
- Hover over your new scheduler
- Look for Copy Link button
- Copy the link
Open booking link as athlete would
- Scheduler name and description
- Price or credit cost
- Duration clearly stated
- Available time slots listed
- Booking button or time selection
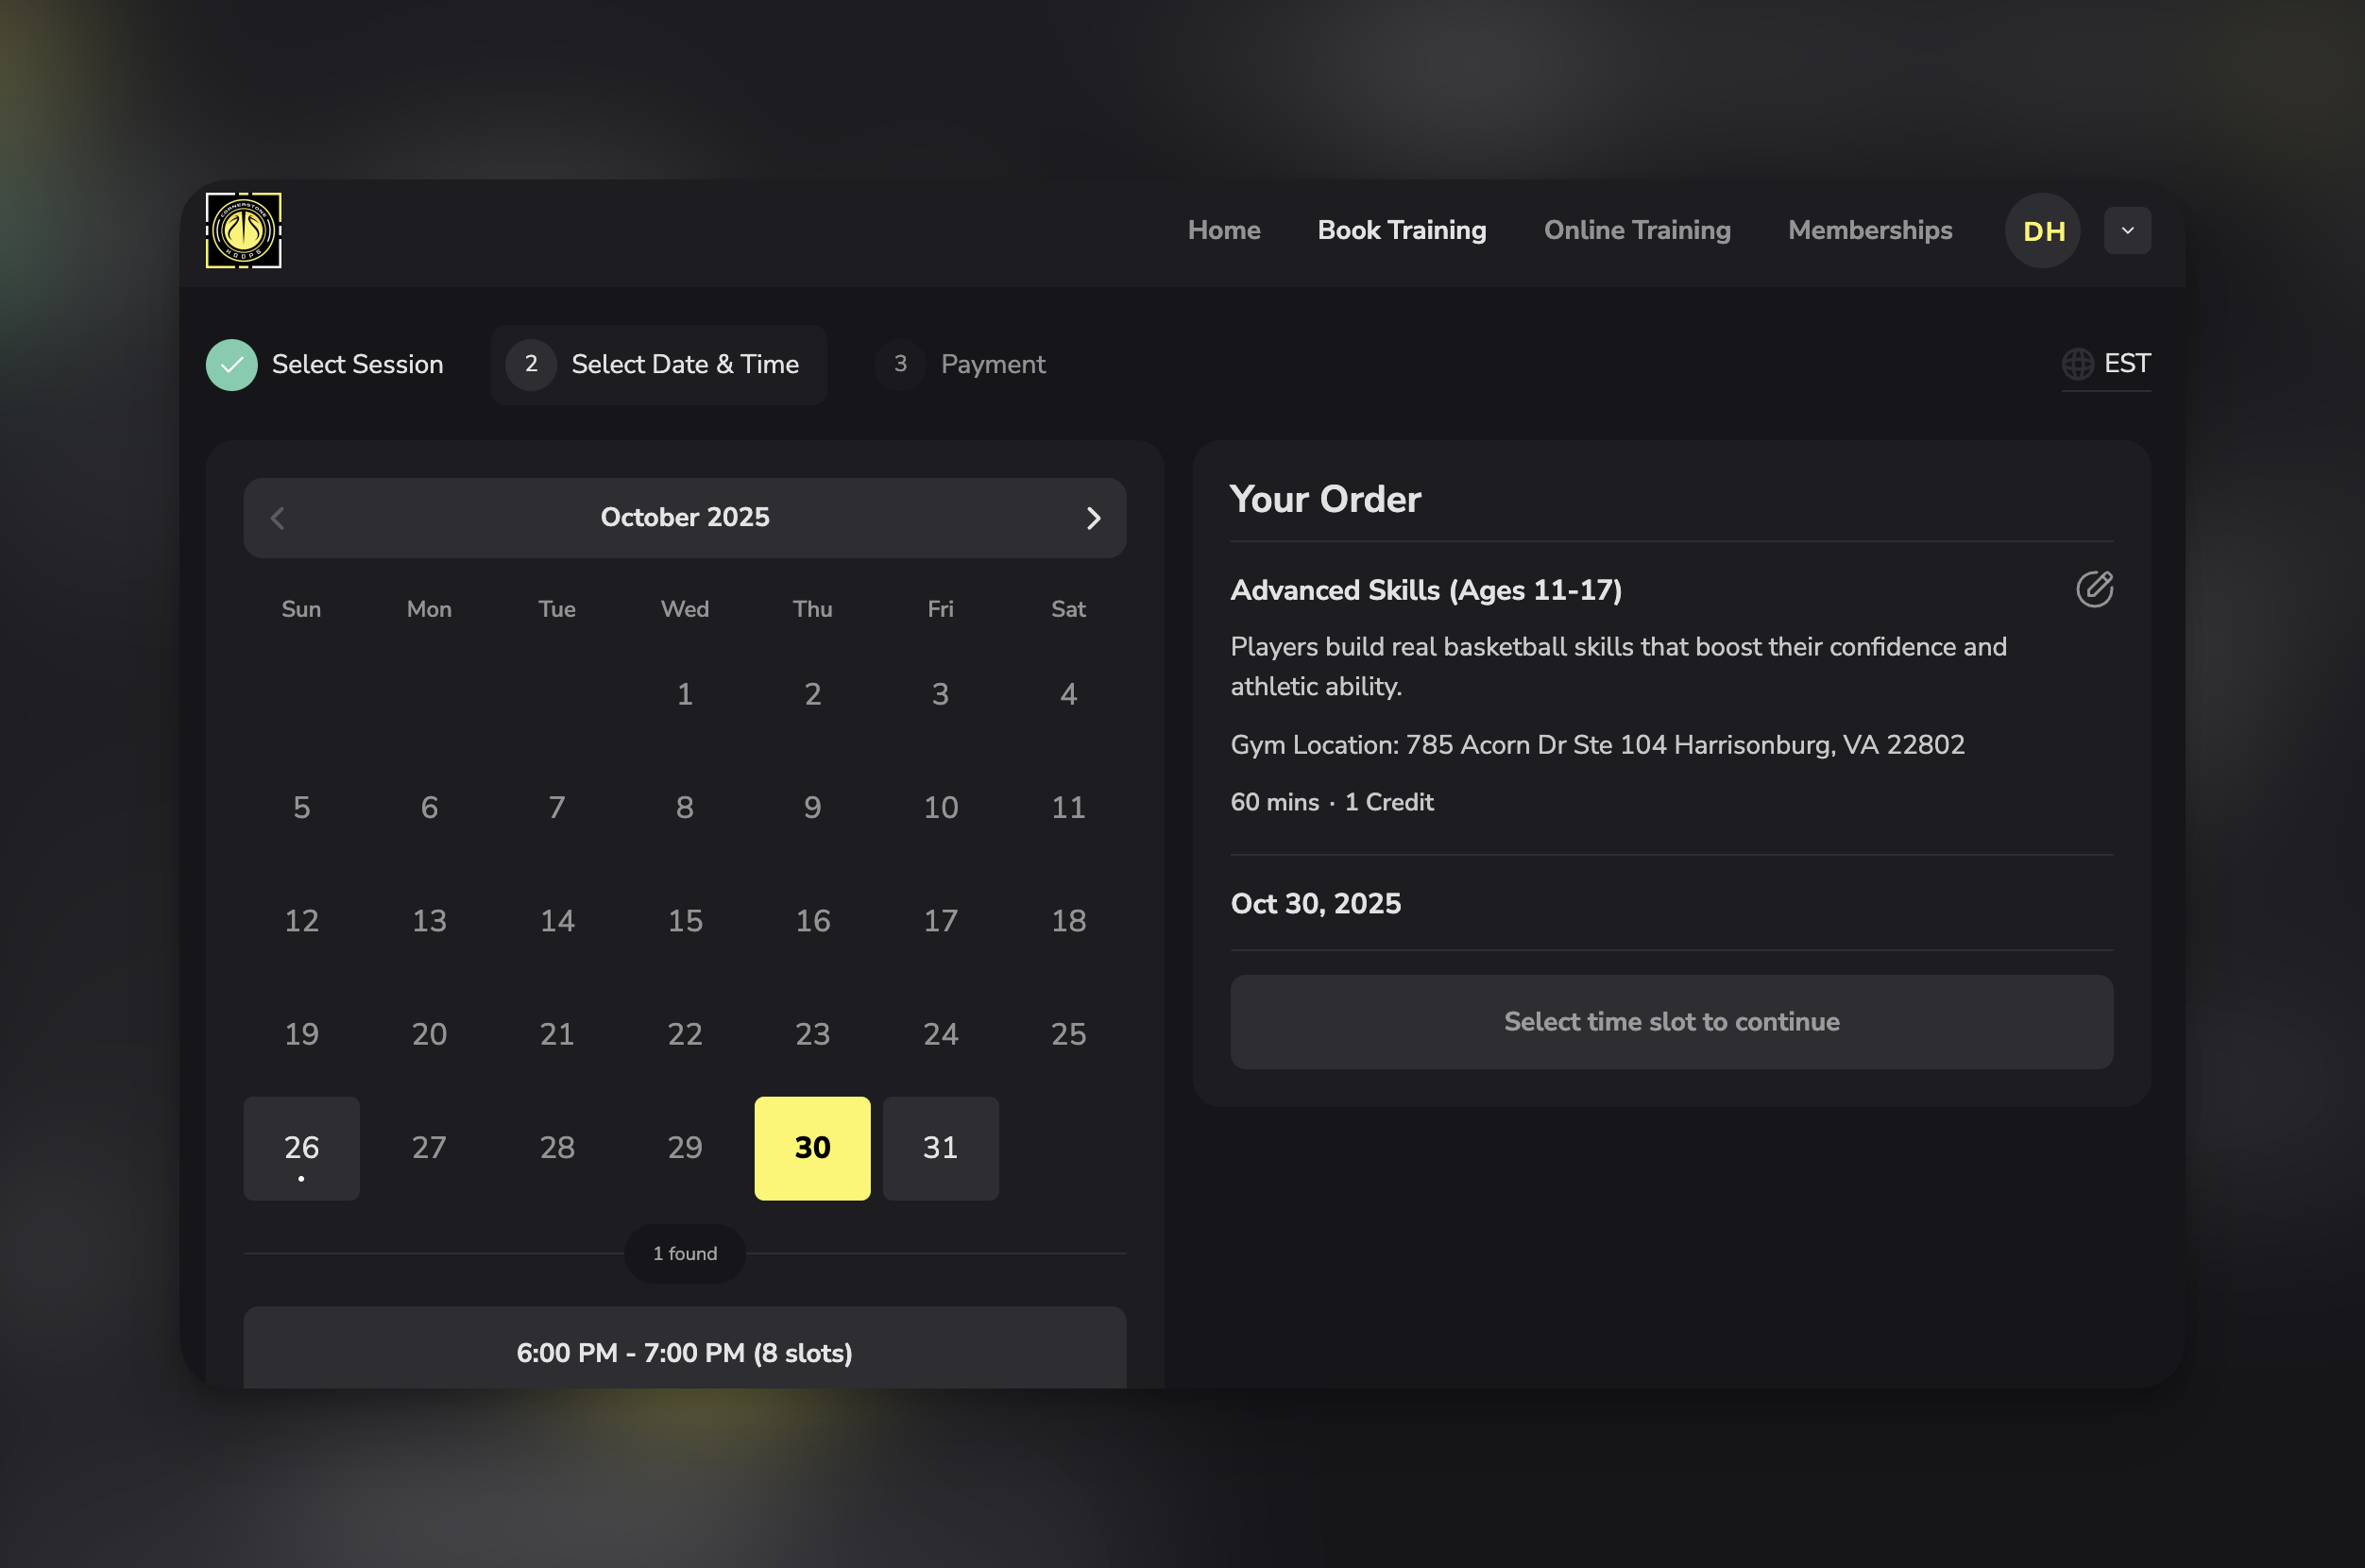
Verify available time slots appear
- ✅ Days match your availability configuration
- ✅ Times are correct (not AM when you meant PM)
- ✅ Proper number of slots appear
- ✅ Slots are spaced correctly (accounting for buffer time)
- ✅ No inappropriate times showing
Test booking a session (if possible)
- Select an available time slot
- Go through the booking process
- Complete payment or credit redemption
- Verify booking confirmation appears
- Check that session appears on your calendar
- At minimum, verify slot selection works
- Check that booking button appears
- Verify payment/credit information displays correctly
Troubleshooting common creation issues
No available slots showing when I test
No available slots showing when I test
- Connected coach already booked elsewhere - If the coach assigned to this scheduler has sessions booked through other schedulers at those times, slots won’t appear (this is double-booking prevention working correctly)
- No availability set - Forgot to add days/times
- Availability in past - End date already passed
- All dates blocked - Blackout days covering everything
- Buffer time too long - Consuming entire availability window
- Check for coach conflicts first: Go to Schedule → Calendar and check if the connected coach has existing sessions during the times you expect to see availability
- Edit scheduler → Availability section
- Verify days are checked
- Verify time ranges are set
- Verify date range includes future dates
- Check blackout days aren’t blocking everything
- Calculate: (Availability hours) ÷ (Duration + Buffer) = Expected slots
- Example: 5 hours ÷ 1.25 hours (60 min + 15 min) = 4 slots expected
Wrong times showing (AM vs PM confusion)
Wrong times showing (AM vs PM confusion)
- Edit scheduler → Availability
- Check all time fields
- Verify AM/PM selections
- Or switch to 24-hour format (15:00 instead of 3:00 PM) if available
- Save and re-test
Can't connect payment product
Can't connect payment product
- No products exist yet
- Product type mismatch (looking for one-time, only subscriptions exist)
- Payment processor not connected
- Go to Payments → Products
- Verify products exist
- Create new product if needed:
- Name: Match your scheduler name
- Type: One-time purchase (for direct payment)
- Price: Match your intended rate
- Return to scheduler builder
- Select newly created product
Athlete sees scheduler but can't book
Athlete sees scheduler but can't book
- Insufficient credits (if credit-based)
- Payment processing error (if direct payment)
- Capacity full (unlikely for brand new scheduler)
- Booking limits reached (if configured)
- Test as athlete (what error message appears?)
- Verify payment processing is set up
- Check if test athlete has credits (if credit-based)
- Review booking limit settings
- Check scheduler status (Active/Published?)
What to do after creating your first scheduler
Share with Athletes
- Email to current athletes
- Social media
- Website embedding
- SMS/messaging apps
Create More Schedulers
- Different durations (30 min, 90 min)
- Different formats (group sessions vs private sessions)
- Different services (assessments, consultations)
Set Up Payment
- Edit your scheduler
- Change to direct payment or credits
- Connect products
- Test purchase flow
Organize Schedulers
- Use program groupings
- Create logical categories
- Improve athlete booking experience by keeping things simple and clean