> ## Documentation Index
> Fetch the complete documentation index at: https://help.coachiq.io/llms.txt
> Use this file to discover all available pages before exploring further.
# Website Settings, Design & Text Display
> Configure your website's global settings including design theme, fonts, colors, blog setup, and domain management.
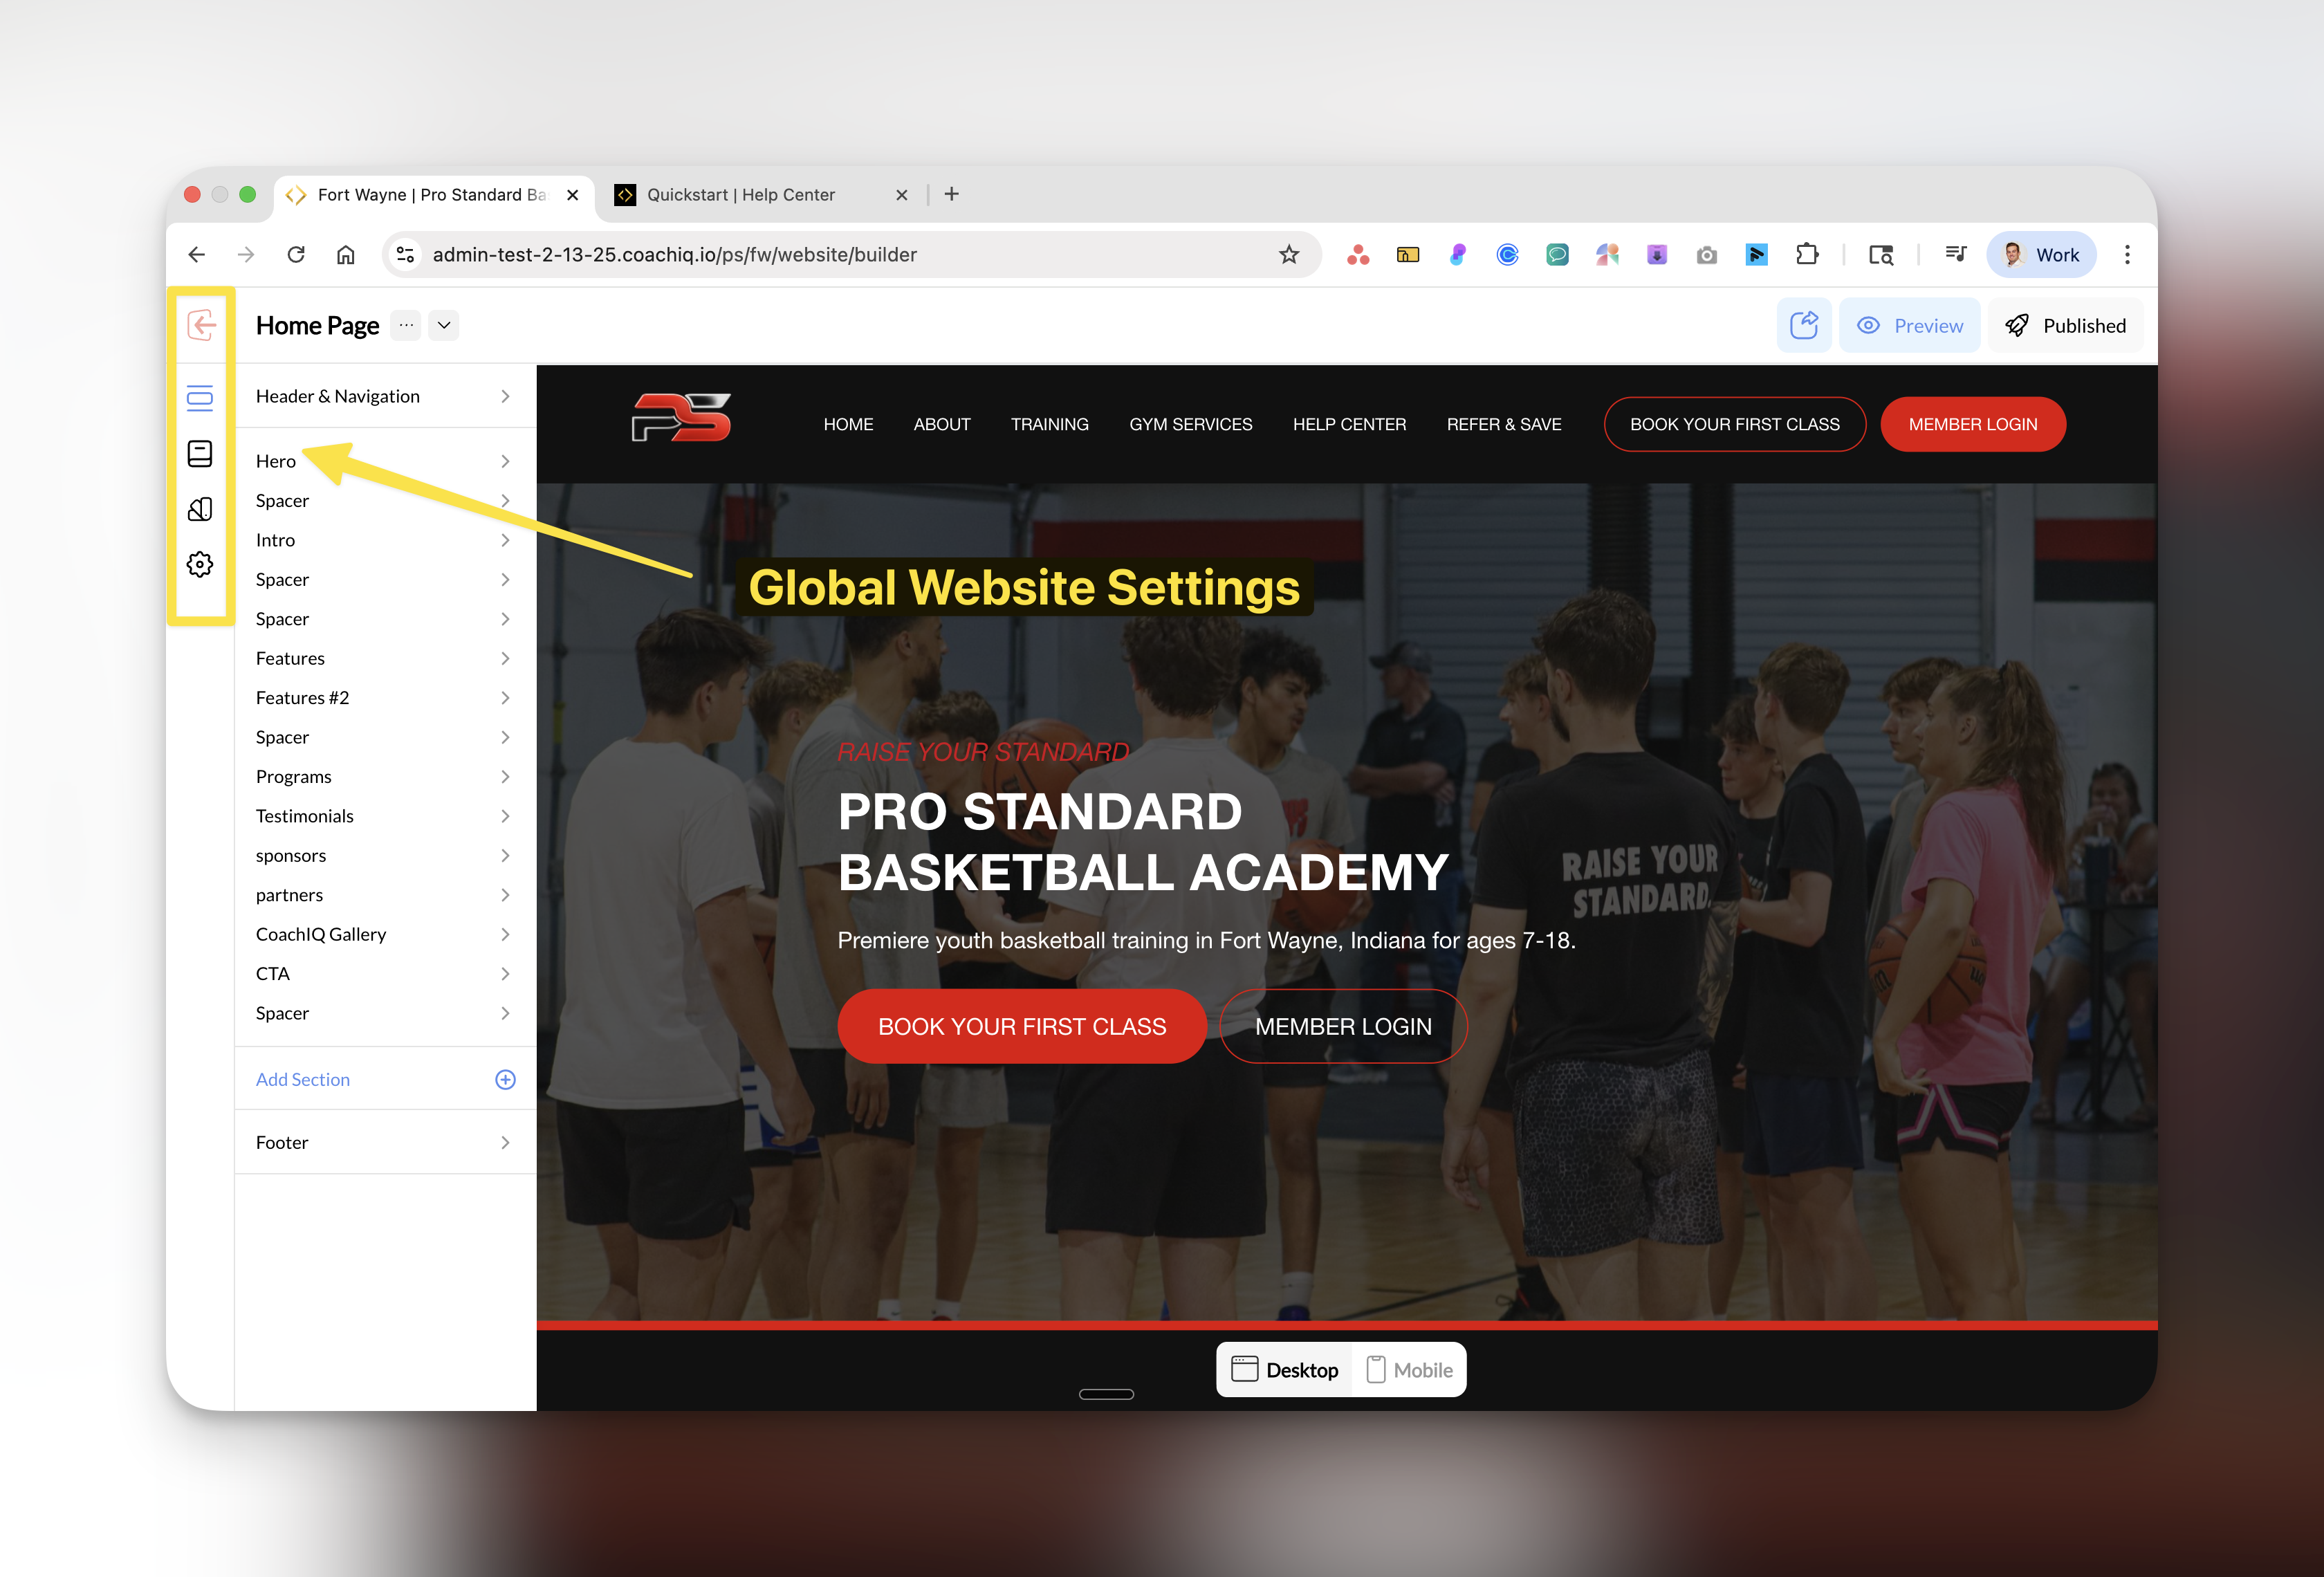
**Where to find this**: Dashboard → Website Builder → Settings (left sidebar)
 ## What you'll accomplish
Learn how to configure your website's global settings including custom fonts, text colors, blog pages, domain management, and troubleshoot common text display issues to create a professional coaching website.
## Design settings
### Theme selection
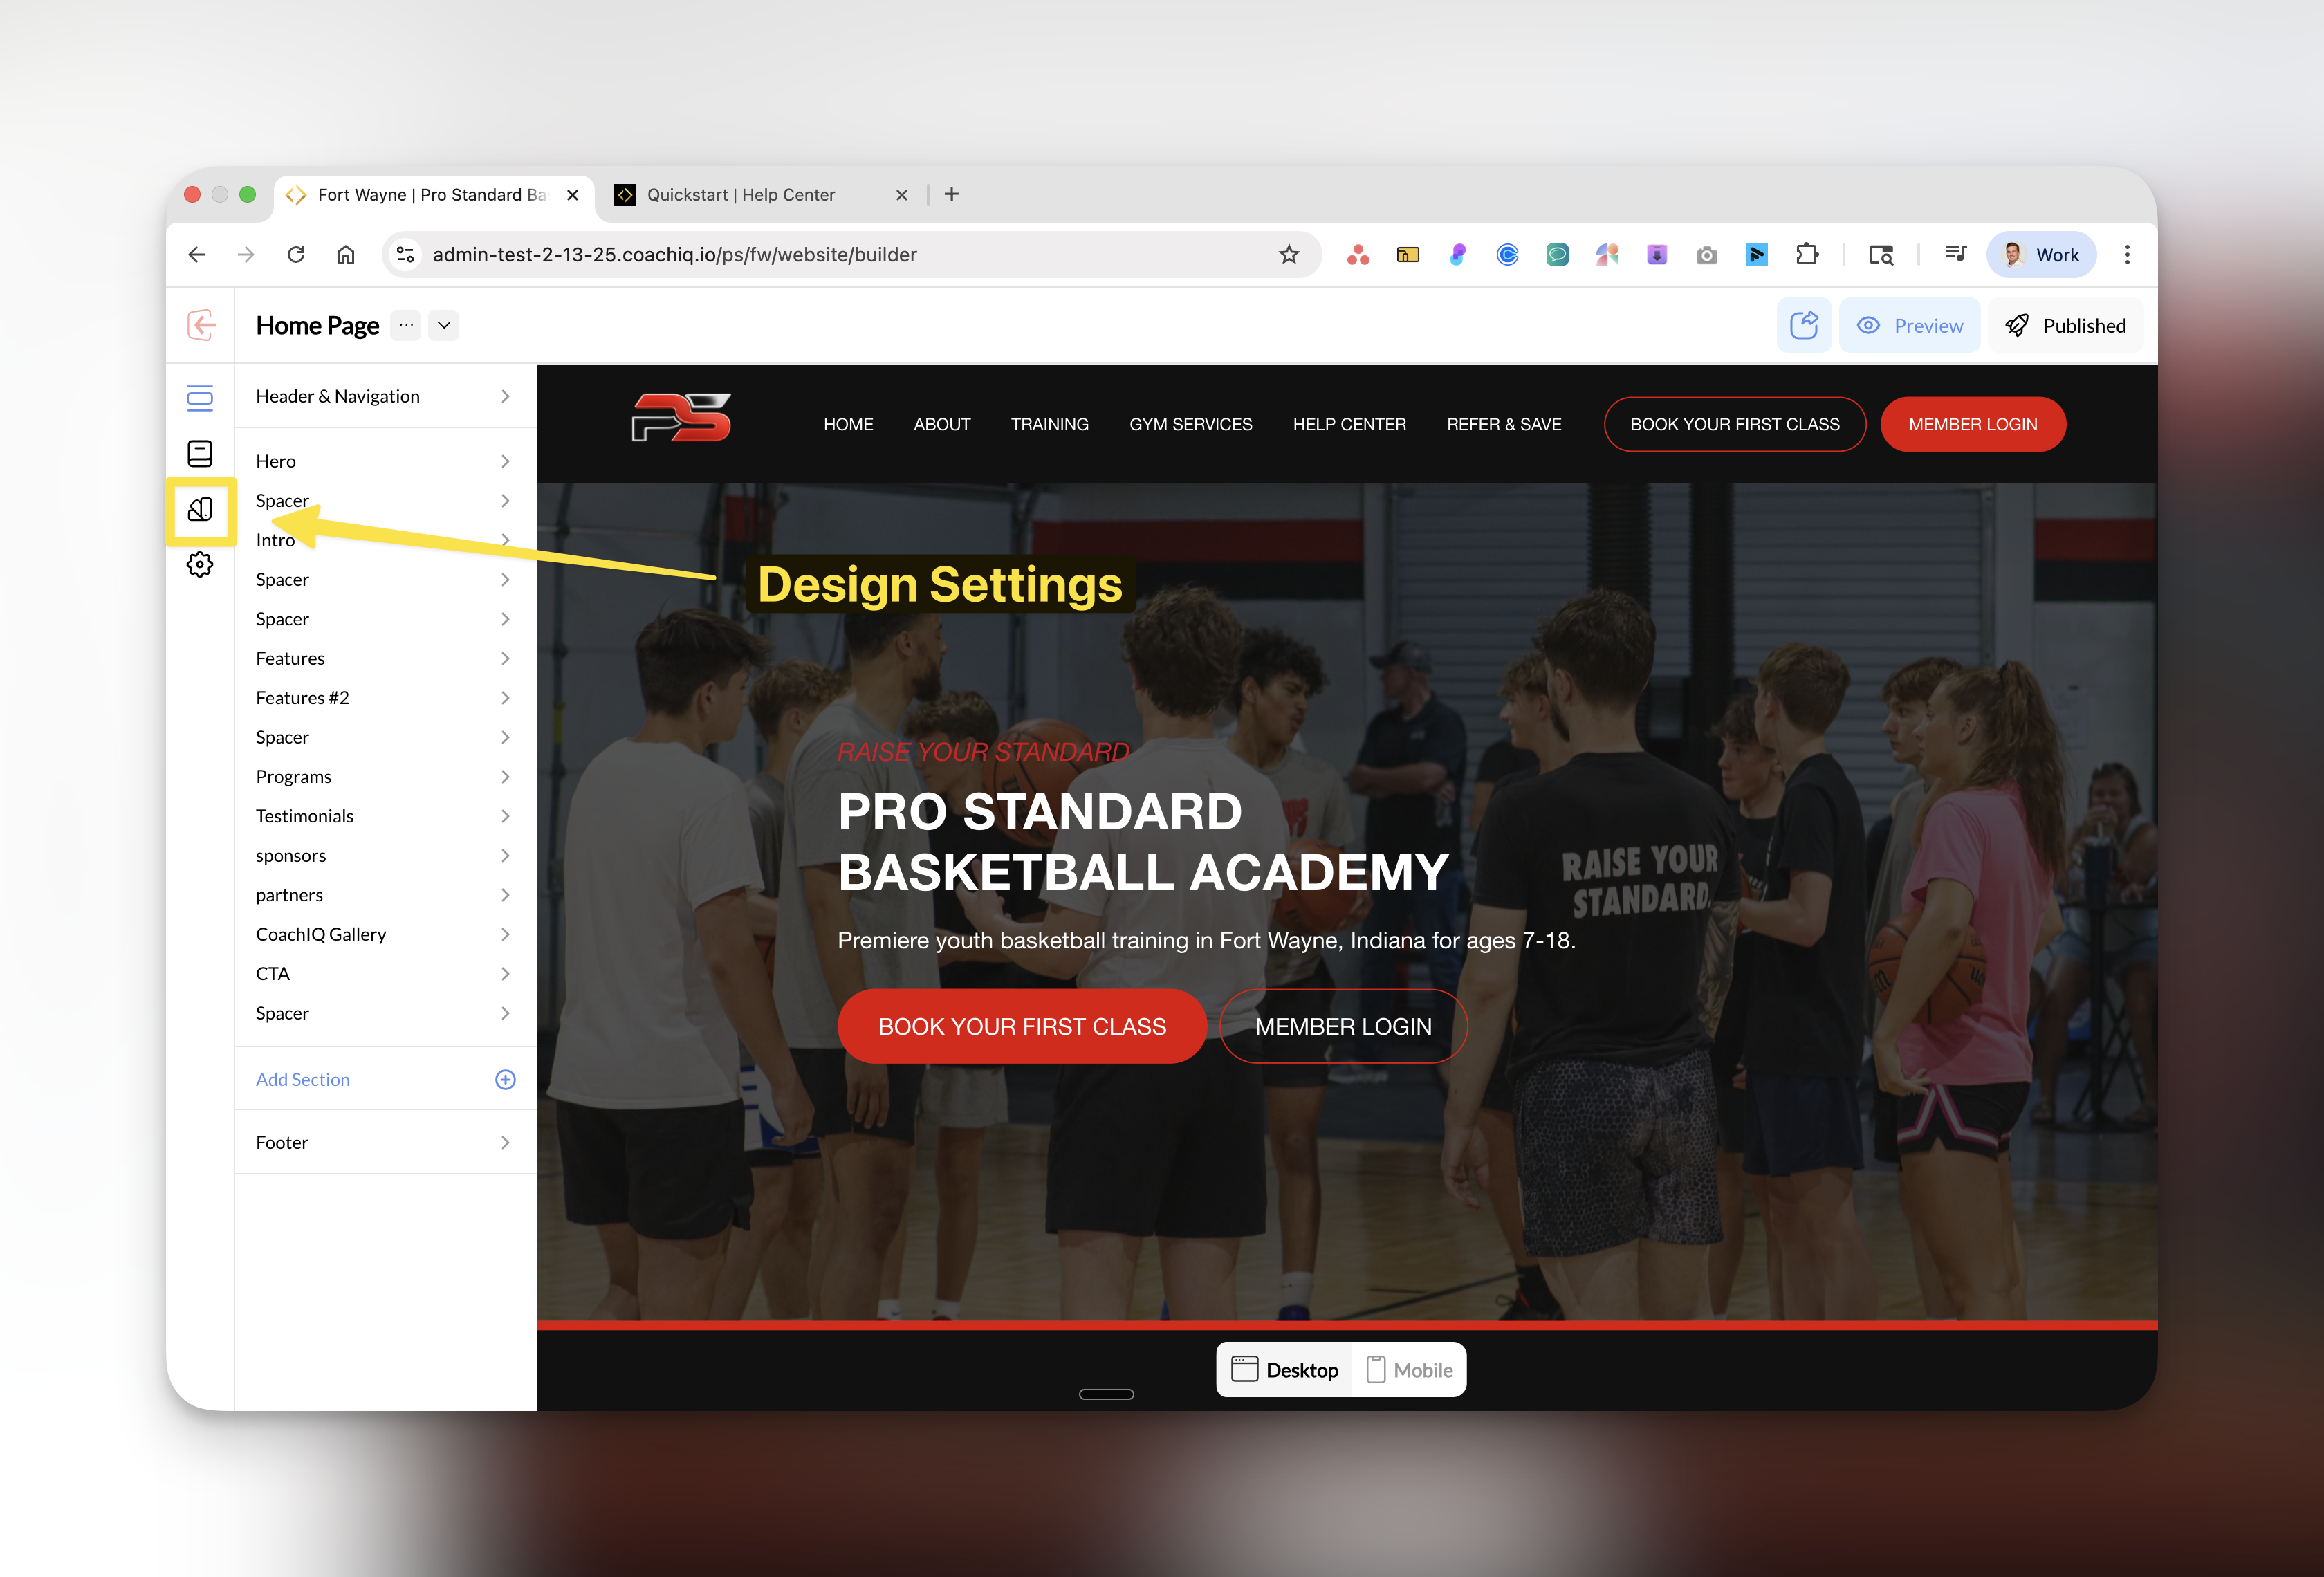
Navigate to **Website Builder** and click on **Design** in the left sidebar.
## What you'll accomplish
Learn how to configure your website's global settings including custom fonts, text colors, blog pages, domain management, and troubleshoot common text display issues to create a professional coaching website.
## Design settings
### Theme selection
Navigate to **Website Builder** and click on **Design** in the left sidebar.
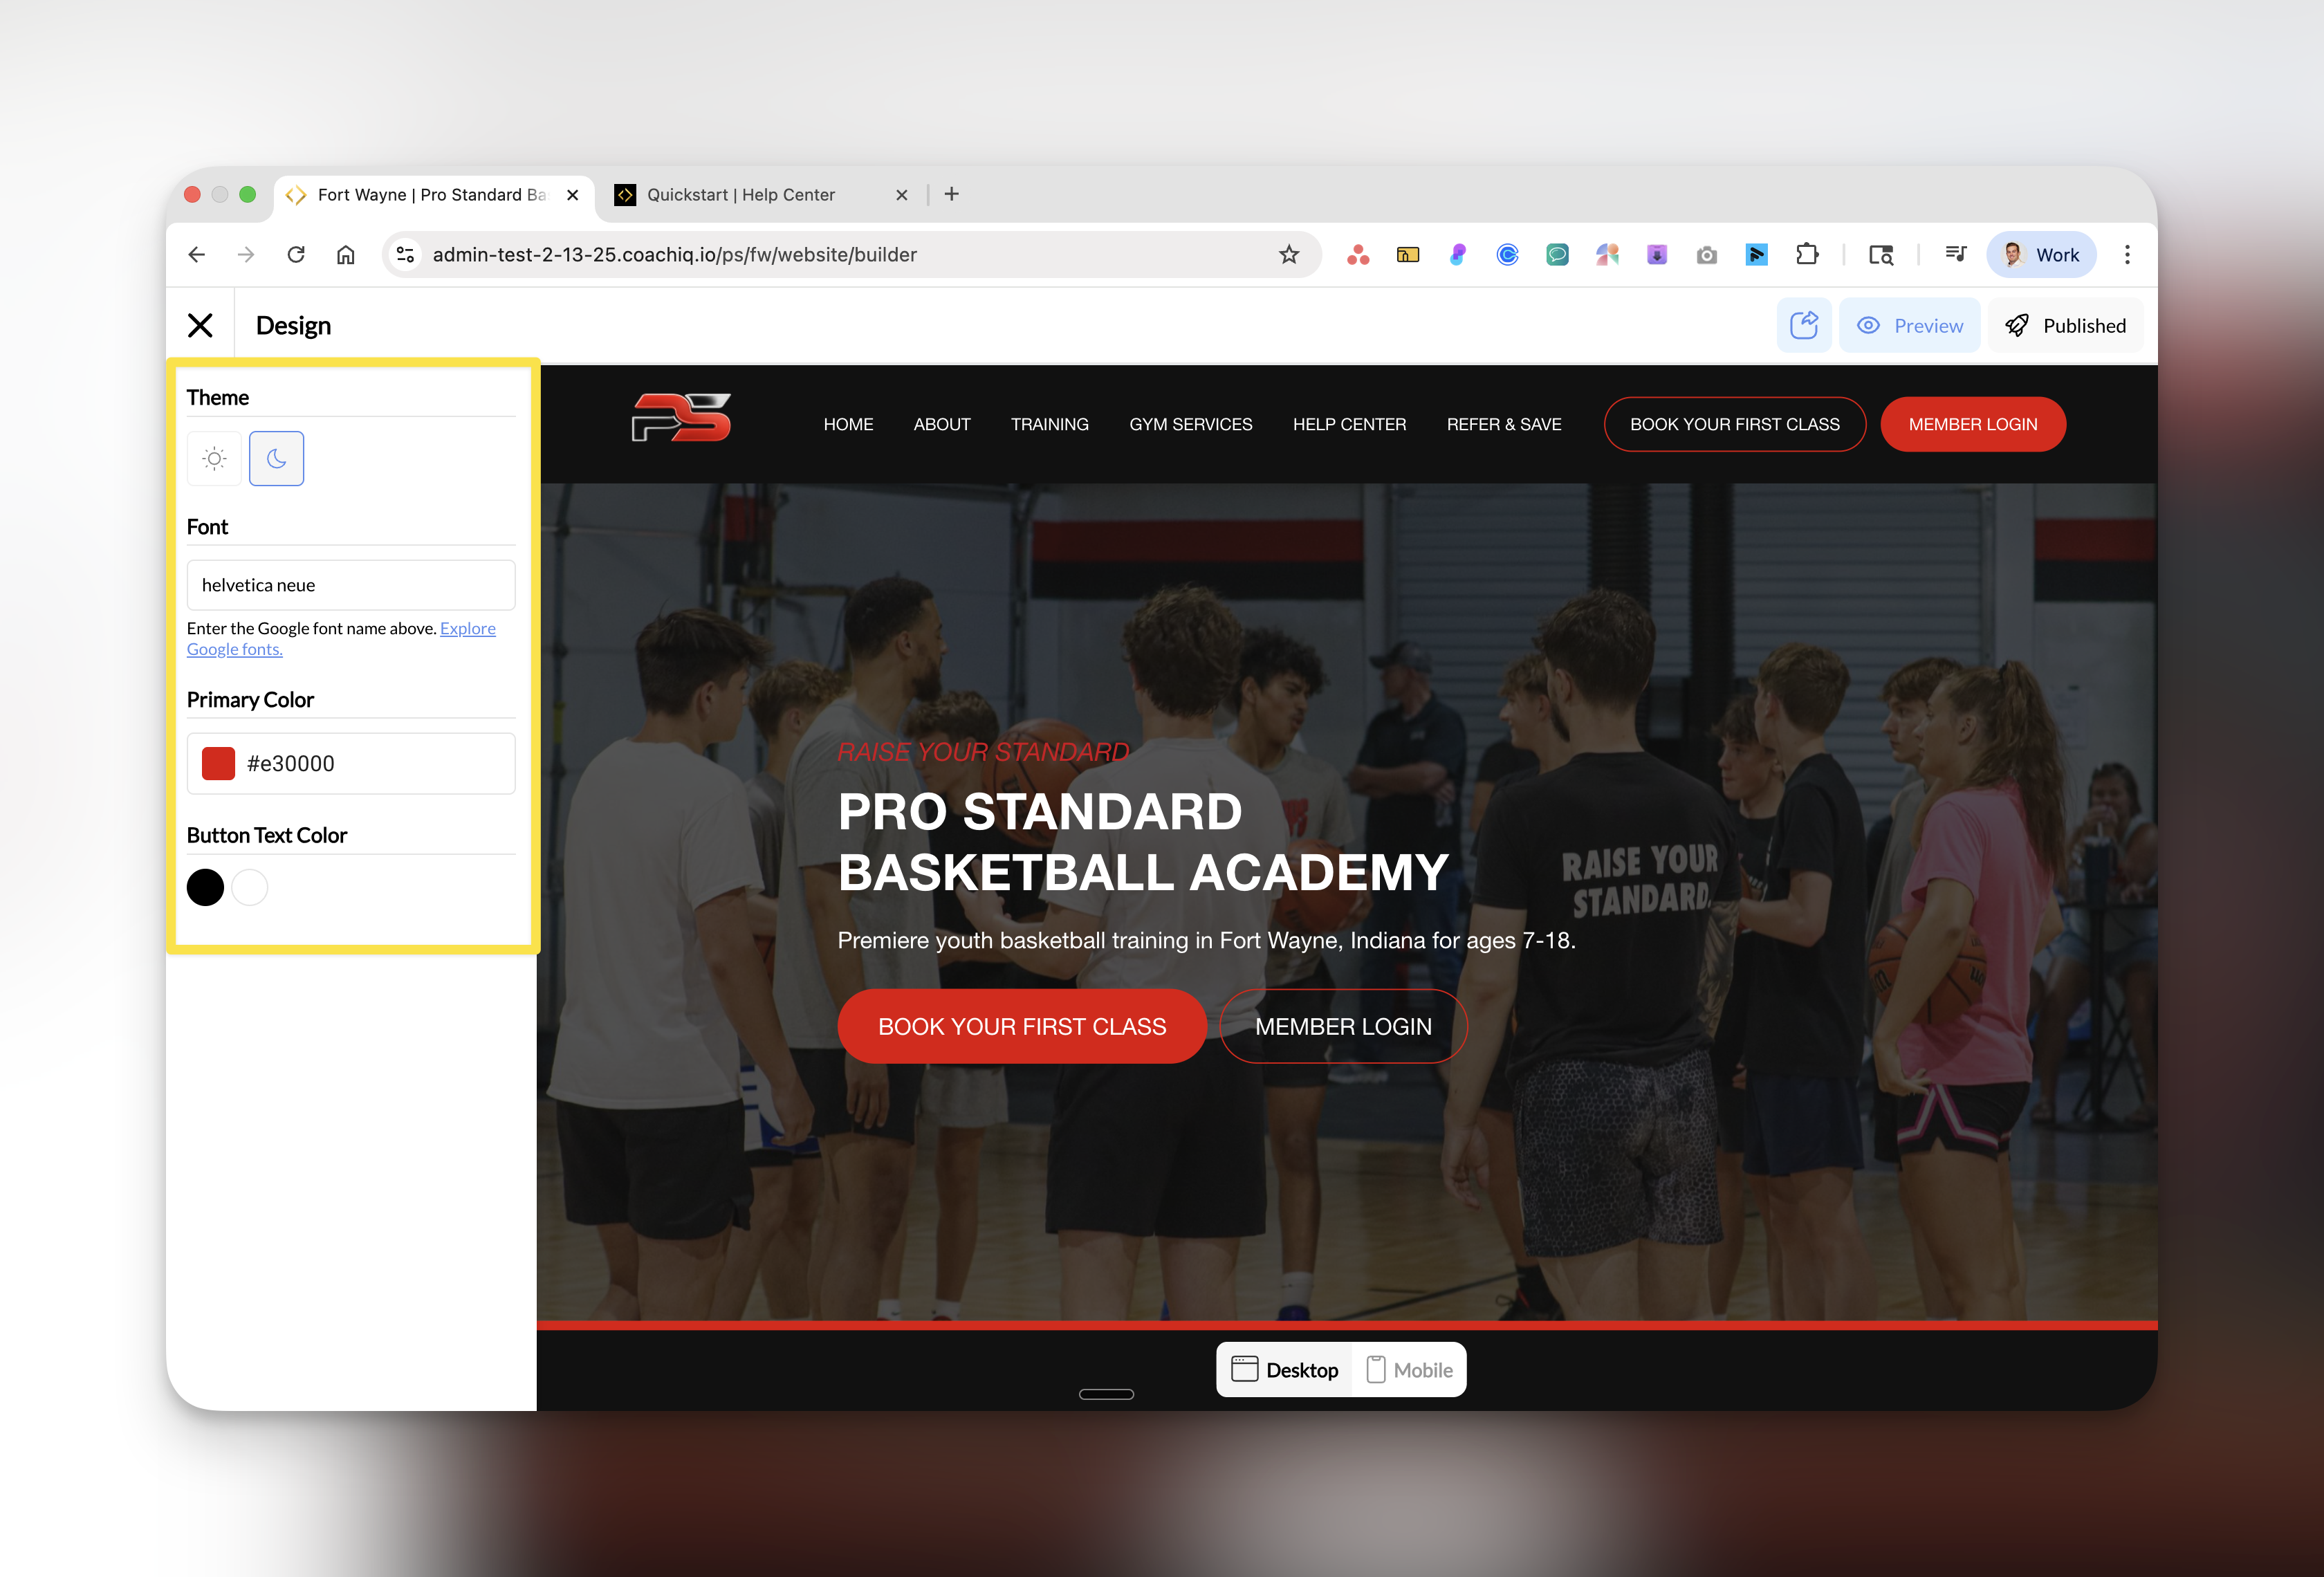
 Select between Light and Dark themes using the theme selector.
 **Important**: Your theme choice affects default text colors. Dark themes use white text by default, which can become invisible on white section backgrounds.
Enter a Google Font name in the font field to customize your site's typography.
**Popular coaching website fonts**: Montserrat, Open Sans, Roboto, Lato, or Raleway provide clean, professional looks.
To use a Google Font:
1. Visit [Google Fonts](https://fonts.google.com)
2. Choose your font
3. Enter the exact font name (e.g., "Helvetica Neue")
4. Click outside the field to save
* **Primary Color**: Set your brand's main color using the color picker
* **Button Text Color**: Choose a contrasting color for button text visibility
Your design changes save automatically and apply site-wide.
## Troubleshooting text display issues
### Common text visibility problems
If your published site has missing or invisible text that appears in the editor, you likely have one of these issues:
**Most common causes**:
1. White text on white background
2. Text color set to transparent
3. Theme/section color conflicts
### How to fix invisible text
Check if your text is visible in the editor but not on the published site. This indicates a color conflict.
This commonly happens when:
* You're using dark mode (which defaults to white text)
* Your section background is set to white
**To fix**:
1. Copy your heading text
2. Paste it back in place
3. Highlight the text
4. Click the text color tool
5. Select black or another dark color (not white)
6. Repeat for all affected text
**Important**: Your theme choice affects default text colors. Dark themes use white text by default, which can become invisible on white section backgrounds.
Enter a Google Font name in the font field to customize your site's typography.
**Popular coaching website fonts**: Montserrat, Open Sans, Roboto, Lato, or Raleway provide clean, professional looks.
To use a Google Font:
1. Visit [Google Fonts](https://fonts.google.com)
2. Choose your font
3. Enter the exact font name (e.g., "Helvetica Neue")
4. Click outside the field to save
* **Primary Color**: Set your brand's main color using the color picker
* **Button Text Color**: Choose a contrasting color for button text visibility
Your design changes save automatically and apply site-wide.
## Troubleshooting text display issues
### Common text visibility problems
If your published site has missing or invisible text that appears in the editor, you likely have one of these issues:
**Most common causes**:
1. White text on white background
2. Text color set to transparent
3. Theme/section color conflicts
### How to fix invisible text
Check if your text is visible in the editor but not on the published site. This indicates a color conflict.
This commonly happens when:
* You're using dark mode (which defaults to white text)
* Your section background is set to white
**To fix**:
1. Copy your heading text
2. Paste it back in place
3. Highlight the text
4. Click the text color tool
5. Select black or another dark color (not white)
6. Repeat for all affected text
 If your text color shows "transparent" in the hex code field:
1. Highlight the affected text
2. Click the color picker
3. Choose any visible color (black, dark gray, etc.)
4. Ensure the hex code field does NOT say "transparent"
5. Apply to all affected text elements
**Quick check**: Look for "transparent" in the hex code field - this means your text has no color and won't be visible.
After fixing text colors:
1. Click **Publish**
2. Check your live site
3. Text should now appear as it does in the editor
**Success**: Your text is now visible on both the editor and live site!
### Best practices for text visibility
**Color contrast rules**:
* Light backgrounds → Dark text (black, dark gray)
* Dark backgrounds → Light text (white, light gray)
* Avoid transparent text unless intentionally hiding content
* Test all sections after theme changes
## Favicon
Your favicon is the small icon that appears in browser tabs, bookmarks, and mobile home screens. Set it up in the Settings panel under **Add Favicon**.
**Recommended**: Upload a 50x50 pixel PNG of your logo or a simplified version that's recognizable at small sizes.
For complete setup instructions including social share images (Open Graph), see the [Favicon & Share Images guide](/website/seo-marketing/favicon-share-images).
## Site configuration
### Blog archive setup
In the Settings panel, find **Blog Archive Page** and select which page will display your blog posts.
You must create a page first before you can designate it as your blog archive.
### Scripts & analytics
Configure tracking and custom scripts:
Add your Google Analytics tracking ID to monitor visitor behavior.
[See full guide →](/website/analytics-tracking/google-analytics)
Install Facebook Pixel for ad tracking and retargeting.
[See full guide →](/website/analytics-tracking/facebook-pixel)
Add custom JavaScript for third-party integrations or advanced functionality.
## Domain management
### Active domains
View and manage all domains connected to your website:
Check the **Active Domains** section to see all connected domains with their status indicators.
Click **Need another domain?** to:
* Purchase a new domain
* Connect an existing domain
[Complete domain setup guide →](/website/domain-setup/purchasing-domain)
### Domain status indicators
* ✅ **Active**: Domain is live and working
* ⏳ **Pending**: DNS propagation in progress (can take 24-48 hours)
* ❌ **Error**: Check DNS settings
## Advanced settings
### Sitemap builder
Control which pages appear in search engine results. You can hide pages from Google (like thank you pages or drafts) while keeping them accessible via direct link.
[Complete Sitemap Builder guide →](/website/seo-marketing/sitemap-builder)
### URL redirects
Prevent broken links when you rename or delete pages. Supports wildcards for bulk redirects.
[Complete URL Redirects guide →](/website/seo-marketing/url-redirects)
### Site cache
Manage your website's cache for optimal performance:
Use **Purge Cache** button when:
* Design changes aren't showing
* Content updates aren't visible
* Text color fixes aren't appearing
* After major site updates
* Cache automatically refreshes every 24 hours
* Only purge manually when necessary
* Allow 5-10 minutes for full cache clear
## Troubleshooting
* Check if text is white on white background
* Look for "transparent" in hex code field
* Switch themes may require text color updates
* Always test after theme changes
* Verify exact font name from Google Fonts
* Check for typos in font name
* Some fonts require specific weights (e.g., "Roboto:400,700")
* Clear browser cache after font changes
* Ensure you're using valid hex codes (#000000 format)
* Some sections may override global colors
* Check that text isn't set to transparent
* Purge site cache if changes don't appear
* Confirm you've selected a valid page as blog archive
* Ensure you have at least one published blog post
* Check that blog sections are added to your pages
## Pro tips
**Prevent text issues**: When switching themes, always review all sections for text visibility before publishing.
**Design consistency**: Choose fonts and colors that match your existing brand materials for a cohesive professional appearance.
**Performance optimization**: Limit custom scripts and use built-in features when possible for fastest page load times.
**Mobile preview**: Always check how your font and color choices look on mobile devices using the preview toggle.
## Related articles
* [Favicon & Share Images](/website/seo-marketing/favicon-share-images)
* [Sitemap Builder](/website/seo-marketing/sitemap-builder)
* [URL Redirects](/website/seo-marketing/url-redirects)
* [Domain Setup Guide](/website/domain-setup/purchasing-domain)
* [Google Analytics Setup](/website/analytics-tracking/google-analytics)
* [Working with Sections](/website/sections/working-with-sections)
If your text color shows "transparent" in the hex code field:
1. Highlight the affected text
2. Click the color picker
3. Choose any visible color (black, dark gray, etc.)
4. Ensure the hex code field does NOT say "transparent"
5. Apply to all affected text elements
**Quick check**: Look for "transparent" in the hex code field - this means your text has no color and won't be visible.
After fixing text colors:
1. Click **Publish**
2. Check your live site
3. Text should now appear as it does in the editor
**Success**: Your text is now visible on both the editor and live site!
### Best practices for text visibility
**Color contrast rules**:
* Light backgrounds → Dark text (black, dark gray)
* Dark backgrounds → Light text (white, light gray)
* Avoid transparent text unless intentionally hiding content
* Test all sections after theme changes
## Favicon
Your favicon is the small icon that appears in browser tabs, bookmarks, and mobile home screens. Set it up in the Settings panel under **Add Favicon**.
**Recommended**: Upload a 50x50 pixel PNG of your logo or a simplified version that's recognizable at small sizes.
For complete setup instructions including social share images (Open Graph), see the [Favicon & Share Images guide](/website/seo-marketing/favicon-share-images).
## Site configuration
### Blog archive setup
In the Settings panel, find **Blog Archive Page** and select which page will display your blog posts.
You must create a page first before you can designate it as your blog archive.
### Scripts & analytics
Configure tracking and custom scripts:
Add your Google Analytics tracking ID to monitor visitor behavior.
[See full guide →](/website/analytics-tracking/google-analytics)
Install Facebook Pixel for ad tracking and retargeting.
[See full guide →](/website/analytics-tracking/facebook-pixel)
Add custom JavaScript for third-party integrations or advanced functionality.
## Domain management
### Active domains
View and manage all domains connected to your website:
Check the **Active Domains** section to see all connected domains with their status indicators.
Click **Need another domain?** to:
* Purchase a new domain
* Connect an existing domain
[Complete domain setup guide →](/website/domain-setup/purchasing-domain)
### Domain status indicators
* ✅ **Active**: Domain is live and working
* ⏳ **Pending**: DNS propagation in progress (can take 24-48 hours)
* ❌ **Error**: Check DNS settings
## Advanced settings
### Sitemap builder
Control which pages appear in search engine results. You can hide pages from Google (like thank you pages or drafts) while keeping them accessible via direct link.
[Complete Sitemap Builder guide →](/website/seo-marketing/sitemap-builder)
### URL redirects
Prevent broken links when you rename or delete pages. Supports wildcards for bulk redirects.
[Complete URL Redirects guide →](/website/seo-marketing/url-redirects)
### Site cache
Manage your website's cache for optimal performance:
Use **Purge Cache** button when:
* Design changes aren't showing
* Content updates aren't visible
* Text color fixes aren't appearing
* After major site updates
* Cache automatically refreshes every 24 hours
* Only purge manually when necessary
* Allow 5-10 minutes for full cache clear
## Troubleshooting
* Check if text is white on white background
* Look for "transparent" in hex code field
* Switch themes may require text color updates
* Always test after theme changes
* Verify exact font name from Google Fonts
* Check for typos in font name
* Some fonts require specific weights (e.g., "Roboto:400,700")
* Clear browser cache after font changes
* Ensure you're using valid hex codes (#000000 format)
* Some sections may override global colors
* Check that text isn't set to transparent
* Purge site cache if changes don't appear
* Confirm you've selected a valid page as blog archive
* Ensure you have at least one published blog post
* Check that blog sections are added to your pages
## Pro tips
**Prevent text issues**: When switching themes, always review all sections for text visibility before publishing.
**Design consistency**: Choose fonts and colors that match your existing brand materials for a cohesive professional appearance.
**Performance optimization**: Limit custom scripts and use built-in features when possible for fastest page load times.
**Mobile preview**: Always check how your font and color choices look on mobile devices using the preview toggle.
## Related articles
* [Favicon & Share Images](/website/seo-marketing/favicon-share-images)
* [Sitemap Builder](/website/seo-marketing/sitemap-builder)
* [URL Redirects](/website/seo-marketing/url-redirects)
* [Domain Setup Guide](/website/domain-setup/purchasing-domain)
* [Google Analytics Setup](/website/analytics-tracking/google-analytics)
* [Working with Sections](/website/sections/working-with-sections)