> ## Documentation Index
> Fetch the complete documentation index at: https://help.coachiq.io/llms.txt
> Use this file to discover all available pages before exploring further.
# Buttons and Call-to-Actions
> Learn how to add and customize buttons within website sections. Set up call-to-actions that drive bookings, signups, and engagement on your coaching site.
**Where to find this**: Dashboard → Website Builder → Select any page → Click on a section → Look for "Buttons" panel
## What you'll accomplish
Learn how to add, customize, and manage buttons within your website sections to guide visitors toward key actions like booking sessions, signing up for programs, or contacting you.
## Adding buttons to sections
Click on a section that supports buttons (like Hero, Content + Media, or Features sections).
In the section settings, scroll down to find the **Buttons** section in the left panel.
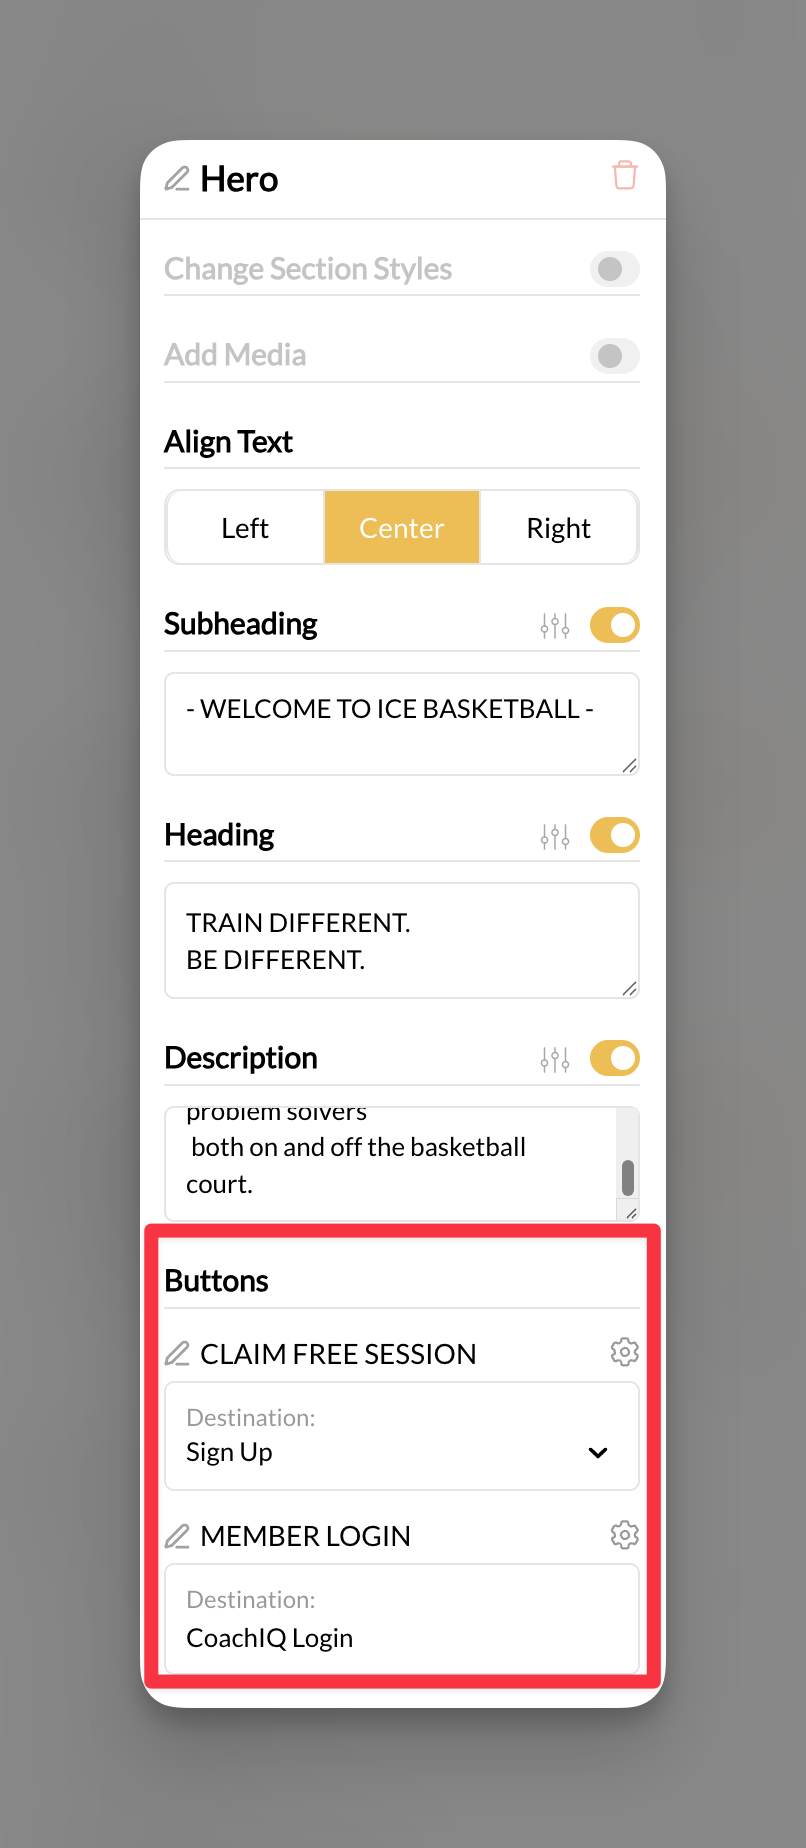 Click on an existing button to edit it, or look for an "Add Button" option to create a new one.
Your button will appear in both the settings panel and on your website preview.
## Setting button destinations
Choose where you want visitors to go when they click your buttons.
With a button selected, look for the destination or link settings.
Click on an existing button to edit it, or look for an "Add Button" option to create a new one.
Your button will appear in both the settings panel and on your website preview.
## Setting button destinations
Choose where you want visitors to go when they click your buttons.
With a button selected, look for the destination or link settings.
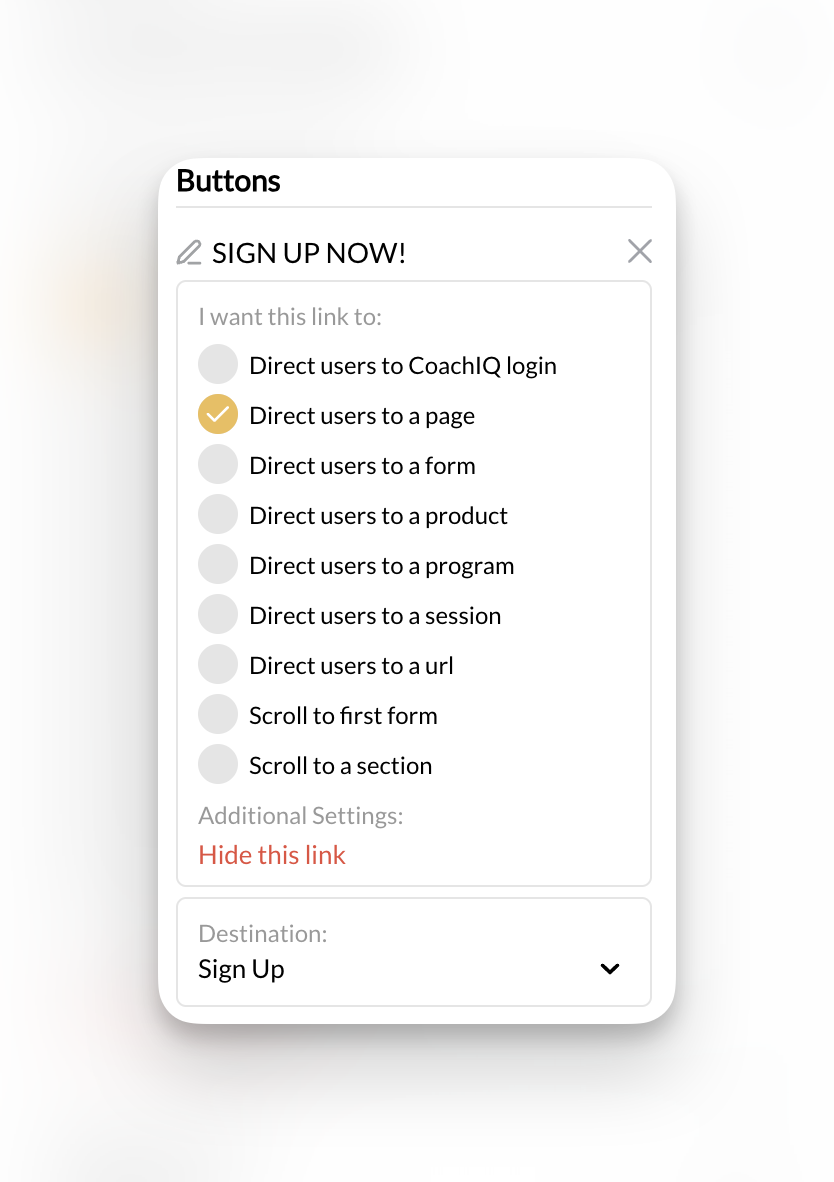 Select from the available destination options:
* **Direct users to CoachIQ login** - Send visitors to your member portal
* **Direct users to a page** - Link to another page on your website
* **Direct users to a form** - Send visitors to a contact or signup form
* **Direct users to a product** - Link directly to a service or product for purchase
* **Direct users to a program** - Connect to a training program or course
* **Direct users to a session** - Link to session booking or scheduler
* **Direct users to a url** - Link to any external website
* **Scroll to first form** - Automatically scroll to the first form on the page
* **Scroll to a section** - Jump to a specific section on the same page
**Conversion tip**: Use "Direct users to a session" for your primary booking buttons and "Scroll to first form" for lead capture buttons.
Depending on your choice, you may need to:
* Select a specific page, form, product, or session
* Enter a URL for external links
* Choose which section to scroll to
Your button now has a clear destination and purpose.
## Button display settings
Choose whether links open in the same window or a new window:
* **Same window**: Keeps visitors on your site (recommended for internal links)
* **New window**: Opens external links without losing your visitors
The "In a new window" toggle is especially useful for external links to maintain visitor engagement on your site.
Use the **Hide this link** option to temporarily remove a button without deleting it:
* **Visible**: Button appears to all visitors
* **Hidden**: Button is temporarily hidden but settings are preserved
## Button text and styling
Update the text that appears on your button to be clear and action-oriented:
* **Good examples**: "BOOK YOUR FIRST CLASS", "START TRAINING", "GET STARTED"
* **Avoid**: Generic text like "Click here" or "Learn more"
Button text should be short and clearly communicate the action:
* Use 1-4 words when possible
* Make the benefit clear
* Create urgency when appropriate
**Action-oriented language**: Use verbs that tell visitors exactly what will happen - "Book", "Start", "Join", "Download".
## Common questions
Most content sections support buttons, including Hero, Content + Media, Features, and Pricing sections. The button options will appear in the section settings if the section type supports them.
The number varies by section type. Most sections allow multiple buttons, but the layout may determine the optimal number for good user experience.
"Scroll to first form" moves visitors down to a form on the same page, while "Direct users to a form" can link to a form on a different page or a standalone form.
Yes, use "In a new window" for external links to keep visitors from leaving your site completely. Keep internal links in the same window for better user flow.
## Pro tips
**Primary vs secondary actions**: Use your most important call-to-action (like "Book Session") as the primary button, and secondary actions (like "Learn More") as less prominent buttons.
**Button placement strategy**: Put your strongest call-to-action buttons above the fold (visible without scrolling) and repeat key actions in multiple sections.
**Test your buttons**: Click through all your buttons regularly to ensure they're working correctly and leading to the right destinations.
**Mobile optimization**: Preview your buttons on mobile devices to ensure they're easily tappable and clearly visible on smaller screens.
## Related articles
* [Adding and Managing Sections](/website/sections/working-with-sections) - Learn how to add sections that support buttons
* [Section Styling and Layout](/website/sections/backgrounds-styling) - Customize the overall appearance of sections with buttons
* [Forms Integration](/forms/overview) - Set up forms to use as button destinations
Select from the available destination options:
* **Direct users to CoachIQ login** - Send visitors to your member portal
* **Direct users to a page** - Link to another page on your website
* **Direct users to a form** - Send visitors to a contact or signup form
* **Direct users to a product** - Link directly to a service or product for purchase
* **Direct users to a program** - Connect to a training program or course
* **Direct users to a session** - Link to session booking or scheduler
* **Direct users to a url** - Link to any external website
* **Scroll to first form** - Automatically scroll to the first form on the page
* **Scroll to a section** - Jump to a specific section on the same page
**Conversion tip**: Use "Direct users to a session" for your primary booking buttons and "Scroll to first form" for lead capture buttons.
Depending on your choice, you may need to:
* Select a specific page, form, product, or session
* Enter a URL for external links
* Choose which section to scroll to
Your button now has a clear destination and purpose.
## Button display settings
Choose whether links open in the same window or a new window:
* **Same window**: Keeps visitors on your site (recommended for internal links)
* **New window**: Opens external links without losing your visitors
The "In a new window" toggle is especially useful for external links to maintain visitor engagement on your site.
Use the **Hide this link** option to temporarily remove a button without deleting it:
* **Visible**: Button appears to all visitors
* **Hidden**: Button is temporarily hidden but settings are preserved
## Button text and styling
Update the text that appears on your button to be clear and action-oriented:
* **Good examples**: "BOOK YOUR FIRST CLASS", "START TRAINING", "GET STARTED"
* **Avoid**: Generic text like "Click here" or "Learn more"
Button text should be short and clearly communicate the action:
* Use 1-4 words when possible
* Make the benefit clear
* Create urgency when appropriate
**Action-oriented language**: Use verbs that tell visitors exactly what will happen - "Book", "Start", "Join", "Download".
## Common questions
Most content sections support buttons, including Hero, Content + Media, Features, and Pricing sections. The button options will appear in the section settings if the section type supports them.
The number varies by section type. Most sections allow multiple buttons, but the layout may determine the optimal number for good user experience.
"Scroll to first form" moves visitors down to a form on the same page, while "Direct users to a form" can link to a form on a different page or a standalone form.
Yes, use "In a new window" for external links to keep visitors from leaving your site completely. Keep internal links in the same window for better user flow.
## Pro tips
**Primary vs secondary actions**: Use your most important call-to-action (like "Book Session") as the primary button, and secondary actions (like "Learn More") as less prominent buttons.
**Button placement strategy**: Put your strongest call-to-action buttons above the fold (visible without scrolling) and repeat key actions in multiple sections.
**Test your buttons**: Click through all your buttons regularly to ensure they're working correctly and leading to the right destinations.
**Mobile optimization**: Preview your buttons on mobile devices to ensure they're easily tappable and clearly visible on smaller screens.
## Related articles
* [Adding and Managing Sections](/website/sections/working-with-sections) - Learn how to add sections that support buttons
* [Section Styling and Layout](/website/sections/backgrounds-styling) - Customize the overall appearance of sections with buttons
* [Forms Integration](/forms/overview) - Set up forms to use as button destinations