> ## Documentation Index
> Fetch the complete documentation index at: https://help.coachiq.io/llms.txt
> Use this file to discover all available pages before exploring further.
# Build Your First Automation
> Create a welcome email that sends automatically when someone joins—in under 5 minutes
**Where to find this**: Tools → Automations → Create Automation
By the end of this guide, every new member will automatically receive a welcome email with instructions to [book their first session](/scheduling/overview). You'll also [tag](/people/tags-filters) them as an "Active Member" so you can easily find them later.
No templates, no shortcuts—we're building from scratch so you understand how it works.
## What You're Building
| Trigger | Condition | Actions |
| ------------- | ----------------- | --------------------------------------- |
| Purchase Made | Is a subscription | 1. Send welcome email with booking link |
| | | 2. Add "Active Member" tag |
***
## Step-by-Step Instructions
Go to **Tools → Automations** and click **Create Automation**.
The builder is one long page with a section for each part of the automation—**Details**, **Triggers**, **Data Sources**, **Conditions**, **Actions**, **Logs**, and **Settings**—and a side menu that jumps between them. Nothing is saved until you click **Create** in the header. If a new automation opens with anything already filled in, replace or remove it as you follow the steps below.
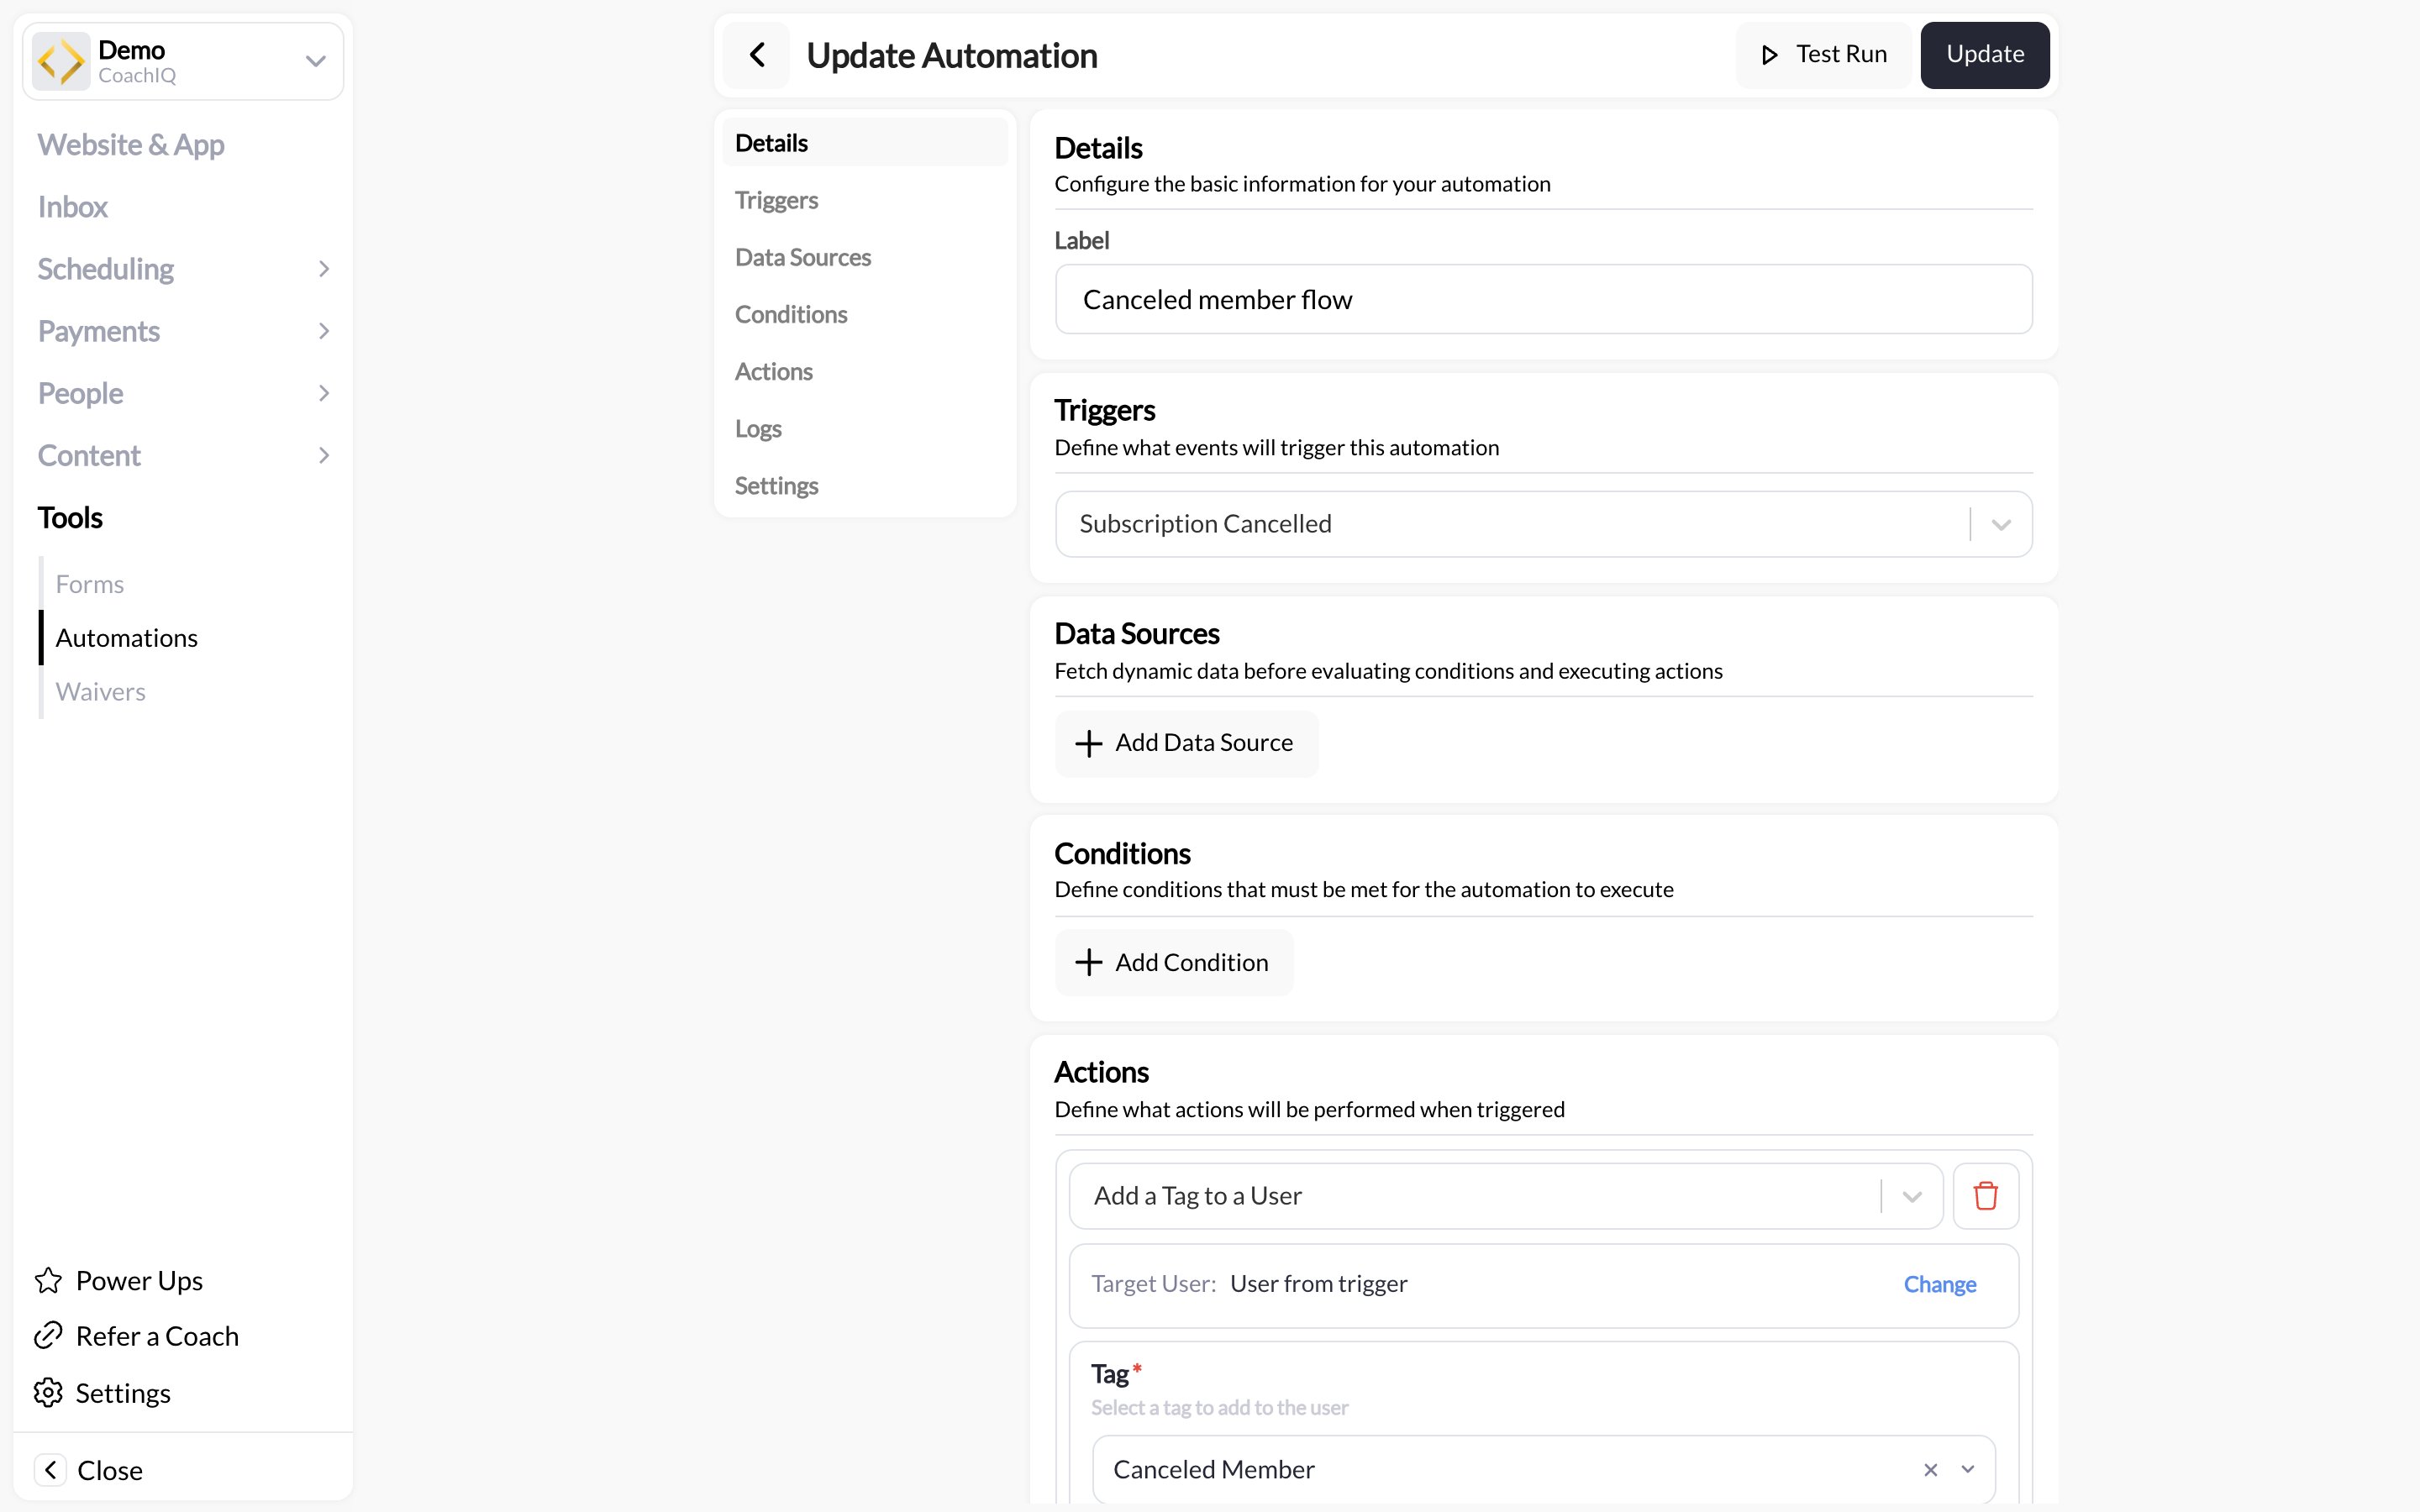 In **Details**, enter a label like **New Member Welcome**. This is the name you'll see in the Automations list and in Execution Logs, so make it specific.
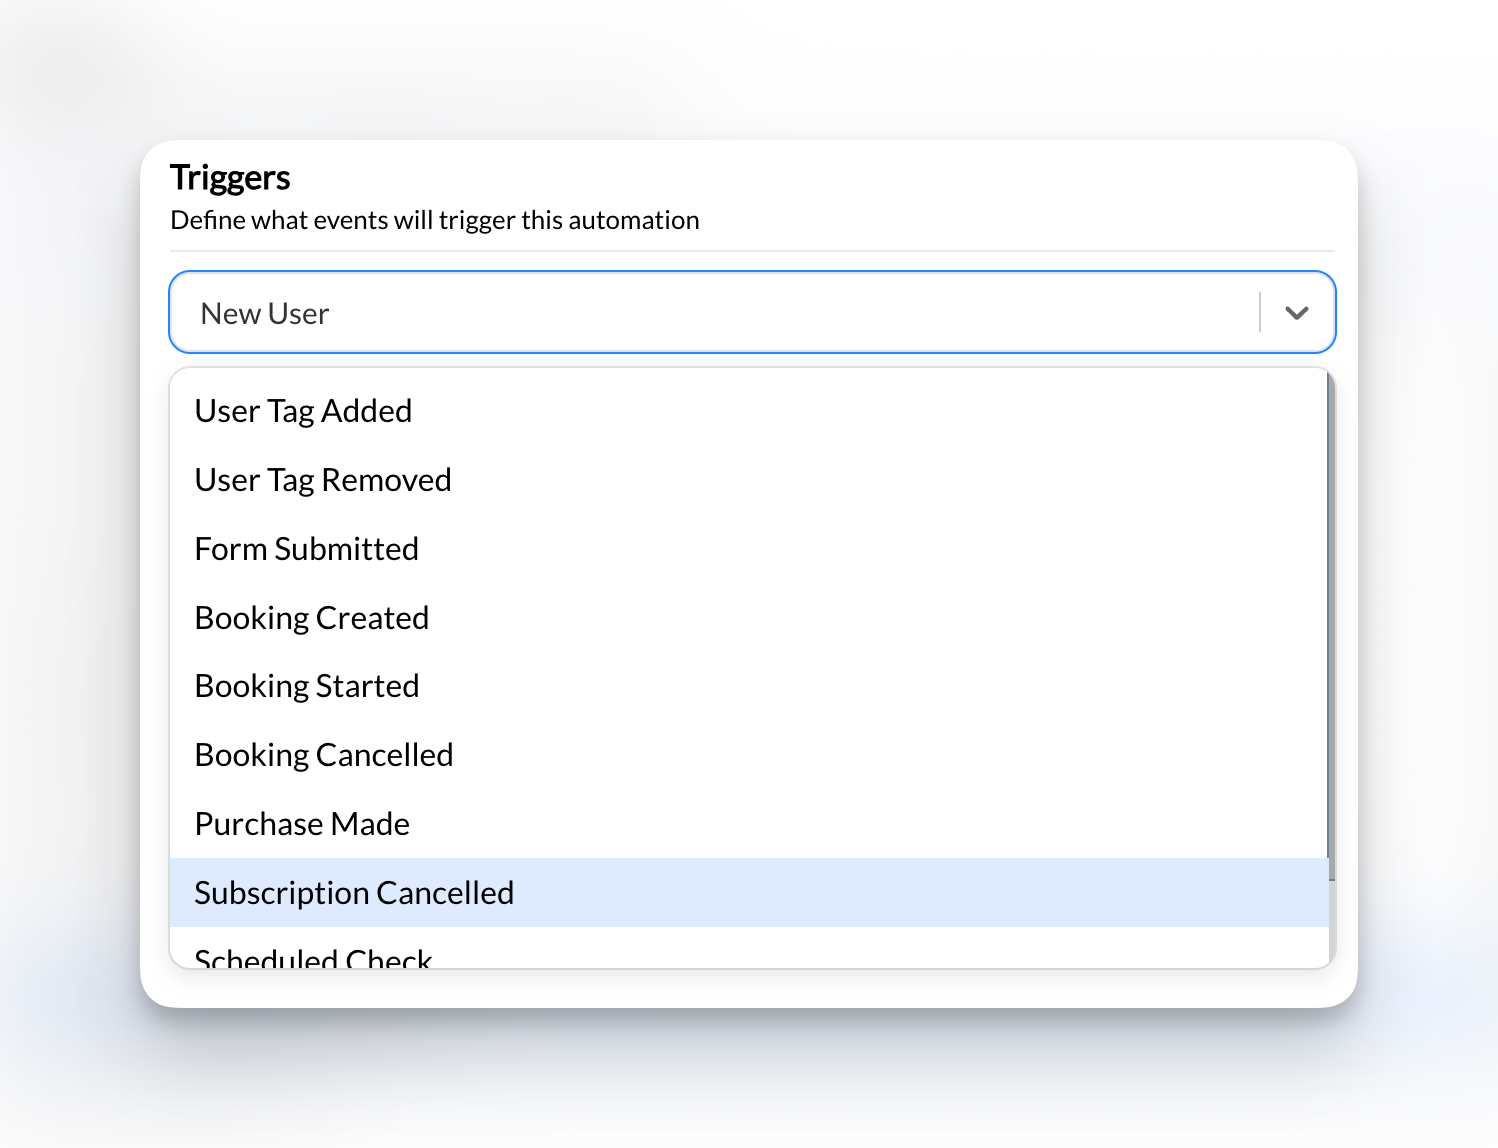
In **Triggers**, choose **Purchase Made**.
This trigger fires whenever someone buys any [product](/payments/product-overview)—memberships, credit packs, camps, or one-time sessions. The buyer becomes the **user** that every later section refers to.
In **Details**, enter a label like **New Member Welcome**. This is the name you'll see in the Automations list and in Execution Logs, so make it specific.
In **Triggers**, choose **Purchase Made**.
This trigger fires whenever someone buys any [product](/payments/product-overview)—memberships, credit packs, camps, or one-time sessions. The buyer becomes the **user** that every later section refers to.
 We only want this automation to run for new members, not every purchase. Let's add a filter.
In **Conditions**, click **Add Condition** to create your first rule group, then choose **Is a subscription** in the **Field** dropdown.
Now this automation will only fire when someone purchases a subscription product—not one-time buys like camps or drop-in sessions.
We only want this automation to run for new members, not every purchase. Let's add a filter.
In **Conditions**, click **Add Condition** to create your first rule group, then choose **Is a subscription** in the **Field** dropdown.
Now this automation will only fire when someone purchases a subscription product—not one-time buys like camps or drop-in sessions.
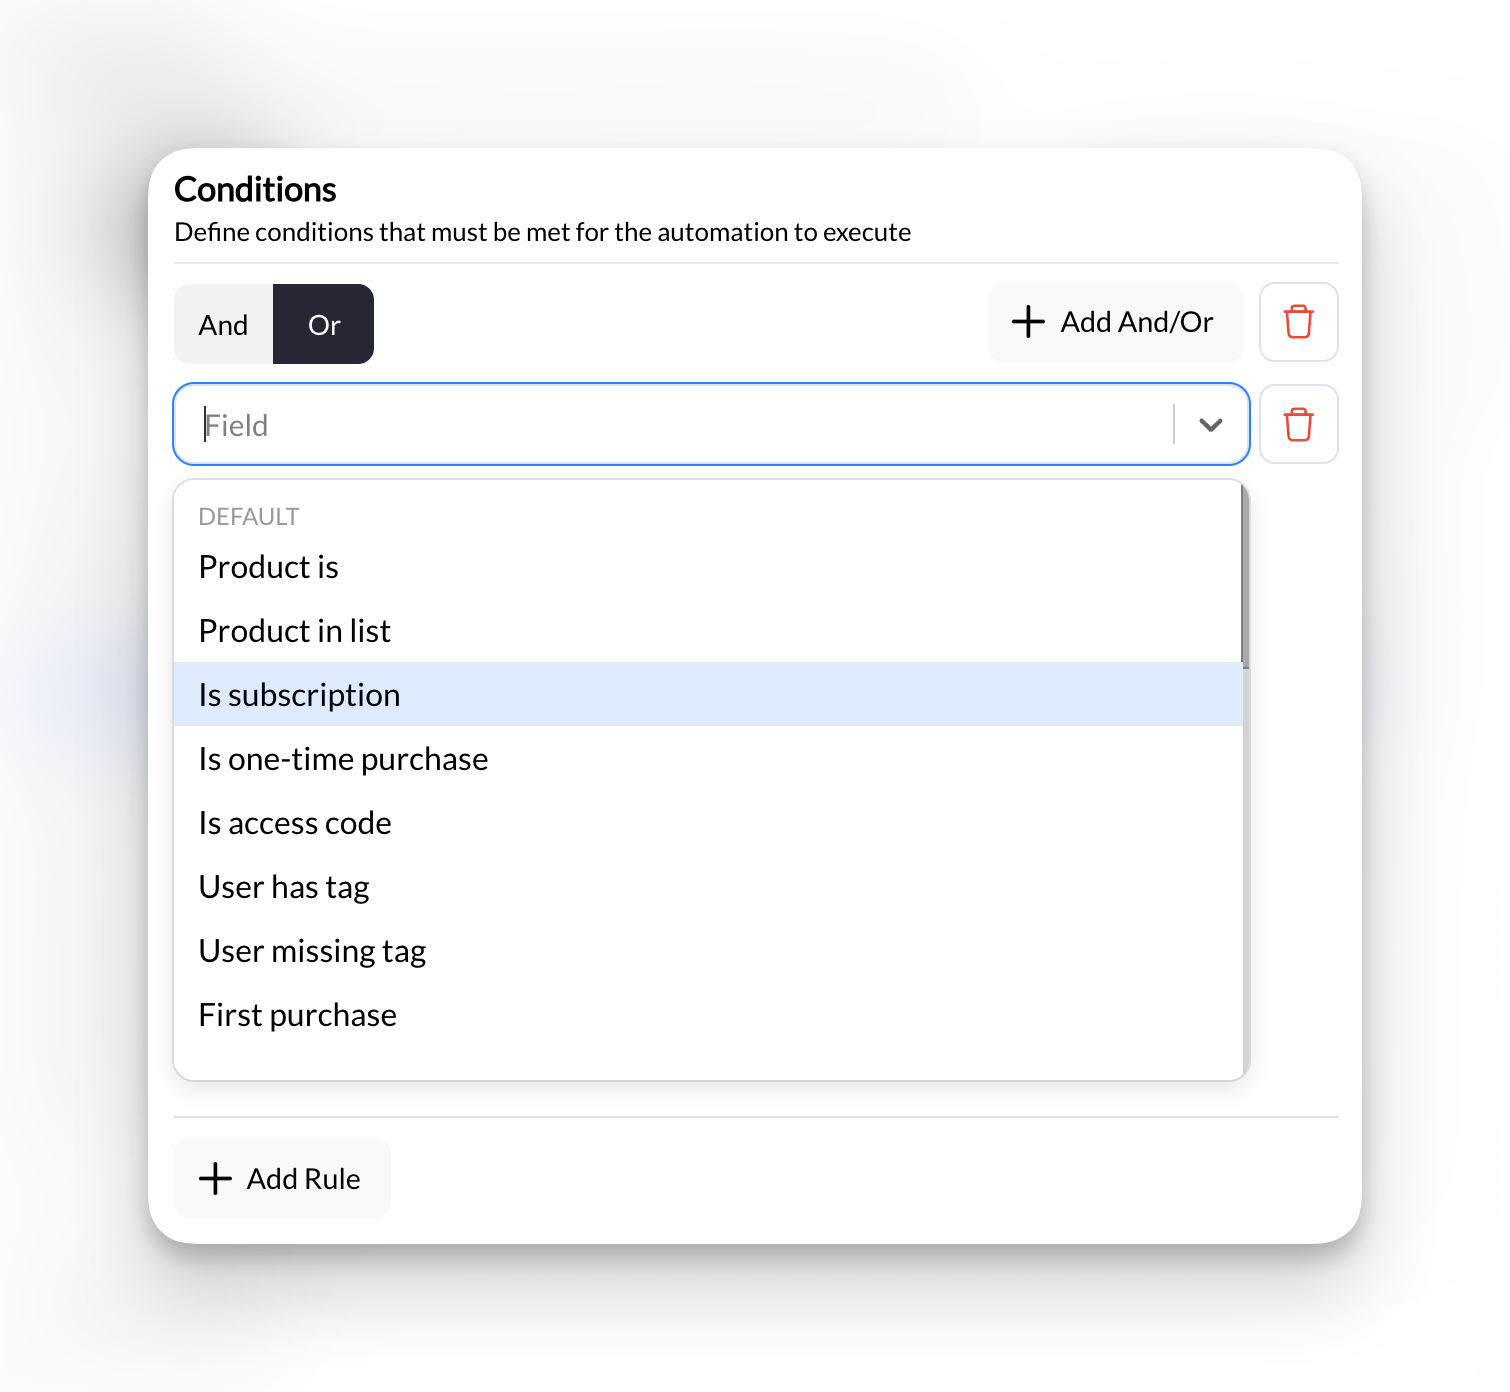 Conditions are optional, but they help you target the right people. Rules sit inside **And**/**Or** groups, so you can add several and choose whether all of them or any one of them must be true. Skip **Data Sources** for now—this automation doesn't need extra information.
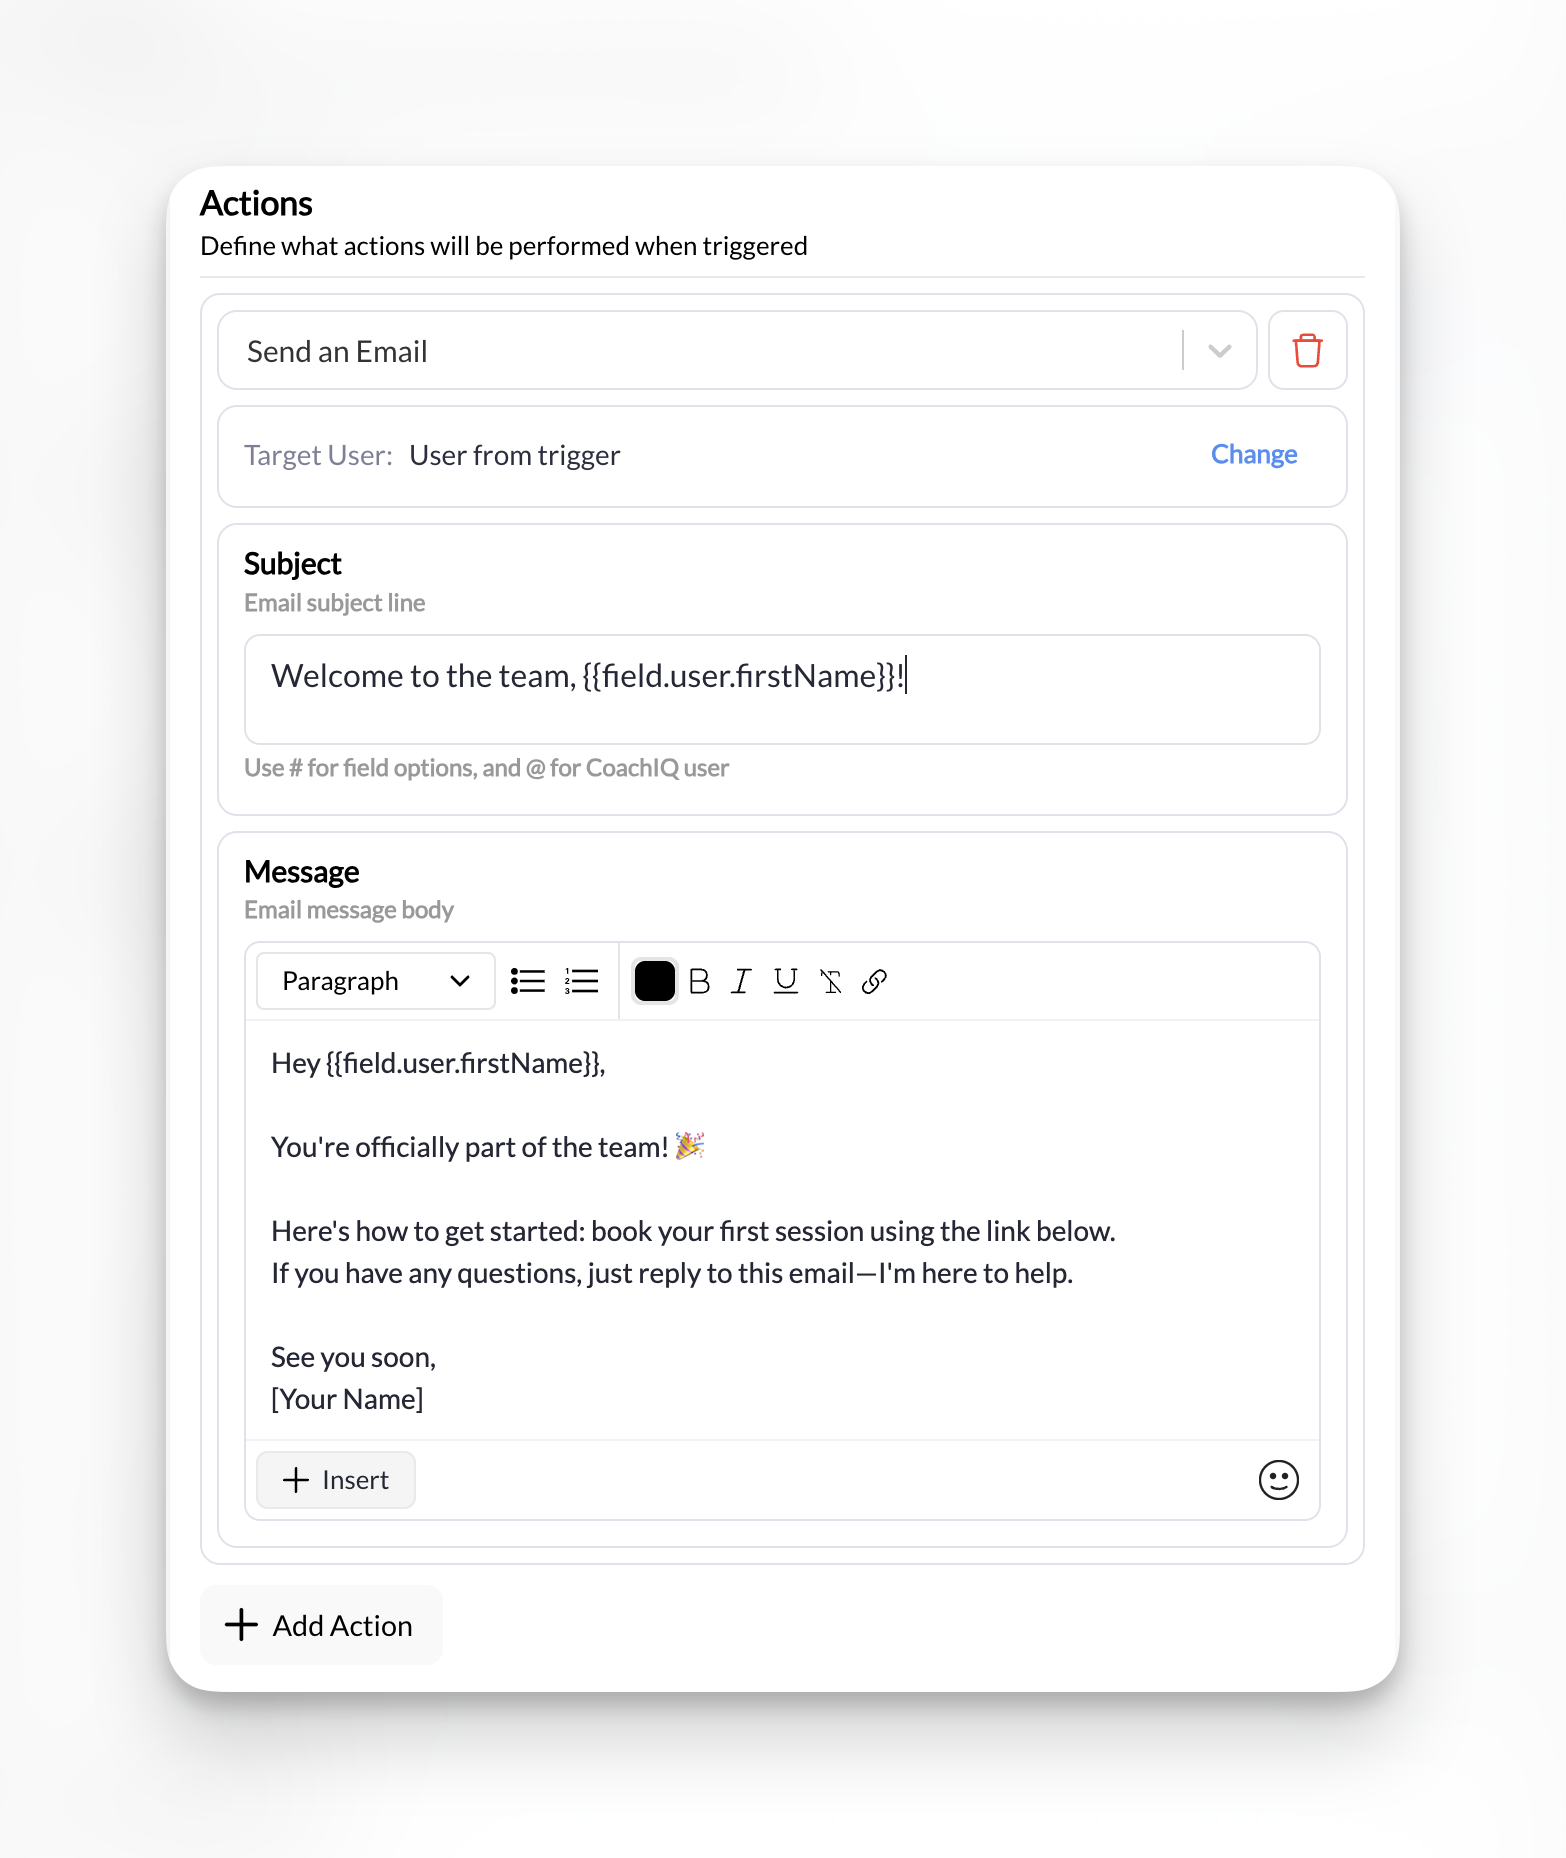
In **Actions**, click **Add Action** and select **Send an Email**.
Fill in the fields:
| Field | What to Enter |
| --------------- | ------------------------------------------------ |
| **Target User** | User from trigger (the default) |
| **Subject** | `Welcome to the team, {{field.user.firstName}}!` |
| **Message** | See template below |
Here's a welcome email you can copy and paste. Replace the bracketed line with the booking link for your main training session:
```
Hey {{field.user.firstName}},
You're officially part of the team! 🎉
Here's how to get started: book your first session here: [paste your session's booking link]
If you have any questions, just reply to this email—I'm here to help.
See you soon,
[Your Name]
```
**Dynamic fields** like `{{field.user.firstName}}` automatically insert each member's actual name. Type `@` in the subject or message to insert one from a list instead of typing it. Your email stays personal without extra work.
Conditions are optional, but they help you target the right people. Rules sit inside **And**/**Or** groups, so you can add several and choose whether all of them or any one of them must be true. Skip **Data Sources** for now—this automation doesn't need extra information.
In **Actions**, click **Add Action** and select **Send an Email**.
Fill in the fields:
| Field | What to Enter |
| --------------- | ------------------------------------------------ |
| **Target User** | User from trigger (the default) |
| **Subject** | `Welcome to the team, {{field.user.firstName}}!` |
| **Message** | See template below |
Here's a welcome email you can copy and paste. Replace the bracketed line with the booking link for your main training session:
```
Hey {{field.user.firstName}},
You're officially part of the team! 🎉
Here's how to get started: book your first session here: [paste your session's booking link]
If you have any questions, just reply to this email—I'm here to help.
See you soon,
[Your Name]
```
**Dynamic fields** like `{{field.user.firstName}}` automatically insert each member's actual name. Type `@` in the subject or message to insert one from a list instead of typing it. Your email stays personal without extra work.
 Let's also tag new members so you can target them with future automations.
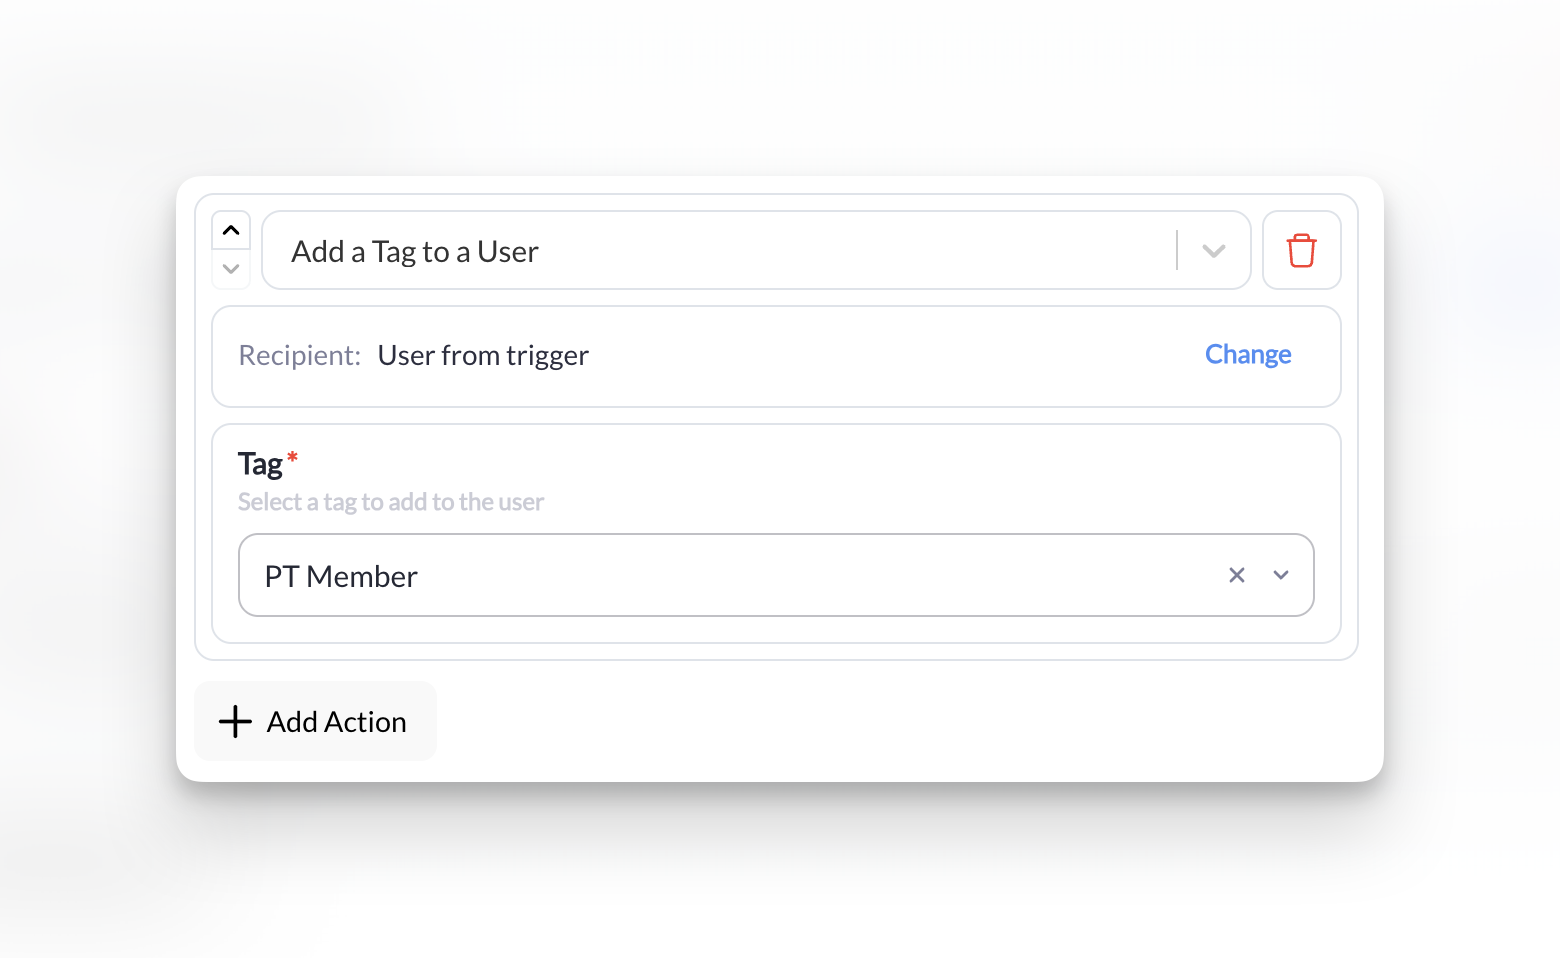
Click **Add Action** and select **Add a Tag to a User**.
| Field | What to Enter |
| --------------- | -------------------------------------------- |
| **Target User** | User from trigger |
| **Tag** | Select "Active Member" (or create a new tag) |
Now every new subscriber automatically gets tagged, making it easy to send announcements or check engagement later.
Let's also tag new members so you can target them with future automations.
Click **Add Action** and select **Add a Tag to a User**.
| Field | What to Enter |
| --------------- | -------------------------------------------- |
| **Target User** | User from trigger |
| **Tag** | Select "Active Member" (or create a new tag) |
Now every new subscriber automatically gets tagged, making it easy to send announcements or check engagement later.
 Click **Create** in the header to save the automation. It is saved with **Enabled** off, so nothing runs yet.
Work through the [test checklist](#test-before-you-enable) below, then open **Settings** and switch **Enabled** on.
**That's it!** Your automation is now live. The next person who purchases a subscription will automatically receive your welcome email and get tagged as an Active Member.
Some screenshots on this page show an earlier layout of the builder with a blank canvas and a **Select Trigger** button. The steps above describe the current builder; the concepts are the same.
***
## Test Before You Enable
Message, SMS, booking, credit, and purchase actions have real effects the moment they run, so check your work before switching an automation on:
1. **Build with Enabled off.** A new automation starts disabled; leave it that way while you edit.
2. **Use a test account.** Make sure the email will land somewhere you can read it—your own test profile, not a real member.
3. **Click Test Run** in the header and read the filled-in email. Test Run really sends, so it will email whoever it targets.
4. **Check Execution Logs** to see which conditions passed and what each action returned.
5. **Then switch Enabled on** in **Settings**, deliberately, once you're happy.
***
## Verify It's Working
A few ways to confirm your automation is running:
* **Check Execution Logs**: Open the automation and scroll to **Logs** for a record of every run, who it was for, and what each action did
* **Make a test purchase**: Use a test account to subscribe and see if the email arrives
* **Wait for your next signup**: You'll see it appear in the logs
***
## What You Just Learned
You now understand the building blocks of every automation:
* **Triggers** start automations when something happens (a purchase, booking, [form submission](/tools/forms/overview), or a schedule)
* **Conditions** filter who it applies to (only subscriptions, only first-time buyers)
* **Actions** are what CoachIQ does automatically (send [messages](/inbox/inbox-overview), add tags, manage credits)
* **Data Sources** (optional) fetch extra information, like a credit balance, for conditions and messages to use
Every automation in CoachIQ—no matter how complex—uses this same pattern.
***
## What's Next?
Browse ready-to-use automations for trial conversions, member retention, credit reminders, and more.
Learn how to run automations on a schedule—like weekly check-ins for inactive members or credit expiration alerts.
## Related articles
What each section of the builder does, including Test Run and Execution Logs
Every trigger, condition, data source, action, and dynamic field
Build forms that trigger automations on submission
Set up the sessions your automations will reference
Where automated emails and in-app messages are delivered
Organize members with tags that automations can add or remove
Click **Create** in the header to save the automation. It is saved with **Enabled** off, so nothing runs yet.
Work through the [test checklist](#test-before-you-enable) below, then open **Settings** and switch **Enabled** on.
**That's it!** Your automation is now live. The next person who purchases a subscription will automatically receive your welcome email and get tagged as an Active Member.
Some screenshots on this page show an earlier layout of the builder with a blank canvas and a **Select Trigger** button. The steps above describe the current builder; the concepts are the same.
***
## Test Before You Enable
Message, SMS, booking, credit, and purchase actions have real effects the moment they run, so check your work before switching an automation on:
1. **Build with Enabled off.** A new automation starts disabled; leave it that way while you edit.
2. **Use a test account.** Make sure the email will land somewhere you can read it—your own test profile, not a real member.
3. **Click Test Run** in the header and read the filled-in email. Test Run really sends, so it will email whoever it targets.
4. **Check Execution Logs** to see which conditions passed and what each action returned.
5. **Then switch Enabled on** in **Settings**, deliberately, once you're happy.
***
## Verify It's Working
A few ways to confirm your automation is running:
* **Check Execution Logs**: Open the automation and scroll to **Logs** for a record of every run, who it was for, and what each action did
* **Make a test purchase**: Use a test account to subscribe and see if the email arrives
* **Wait for your next signup**: You'll see it appear in the logs
***
## What You Just Learned
You now understand the building blocks of every automation:
* **Triggers** start automations when something happens (a purchase, booking, [form submission](/tools/forms/overview), or a schedule)
* **Conditions** filter who it applies to (only subscriptions, only first-time buyers)
* **Actions** are what CoachIQ does automatically (send [messages](/inbox/inbox-overview), add tags, manage credits)
* **Data Sources** (optional) fetch extra information, like a credit balance, for conditions and messages to use
Every automation in CoachIQ—no matter how complex—uses this same pattern.
***
## What's Next?
Browse ready-to-use automations for trial conversions, member retention, credit reminders, and more.
Learn how to run automations on a schedule—like weekly check-ins for inactive members or credit expiration alerts.
## Related articles
What each section of the builder does, including Test Run and Execution Logs
Every trigger, condition, data source, action, and dynamic field
Build forms that trigger automations on submission
Set up the sessions your automations will reference
Where automated emails and in-app messages are delivered
Organize members with tags that automations can add or remove