> ## Documentation Index
> Fetch the complete documentation index at: https://help.coachiq.io/llms.txt
> Use this file to discover all available pages before exploring further.
# Connect CoachIQ to Claude
> Connect your coaching business, verify access, and build a Claude Project with business context and useful everyday workflows.
Connect Claude to CoachIQ, confirm it works, then use one setup prompt to create a personal Project around your business and the way you work.
**Already connected?** [Confirm the connection](#2-confirm-the-connection), then [paste the Project setup prompt](#3-set-up-your-personal-project). You can skip the initial connection steps.
Start in Claude on the web. This guide uses Claude's hosted **custom connector**. Claude Code uses a different setup. A prompt alone does not install the connector or approve access to your CoachIQ account.
## Before you begin
Have your CoachIQ staff login ready and decide which group you want Claude to work with. Use your own account so its permissions apply.
Claude currently supports remote custom connectors on Free, Pro, Max, Team, and Enterprise. Free accounts are limited to one custom connector. In Team and Enterprise, an owner must first add the connector for the organization; each person then connects their own account. Plan limits and workspace settings can affect what you see. [Claude's connector requirements](https://support.claude.com/en/articles/11175166-get-started-with-custom-connectors-using-remote-mcp).
Use this connection address:
```text theme={"theme":"github-dark"}
https://mcp.coachiq.io/mcp
```
You do not need a CoachIQ API key or a local server.
## 1. Connect CoachIQ
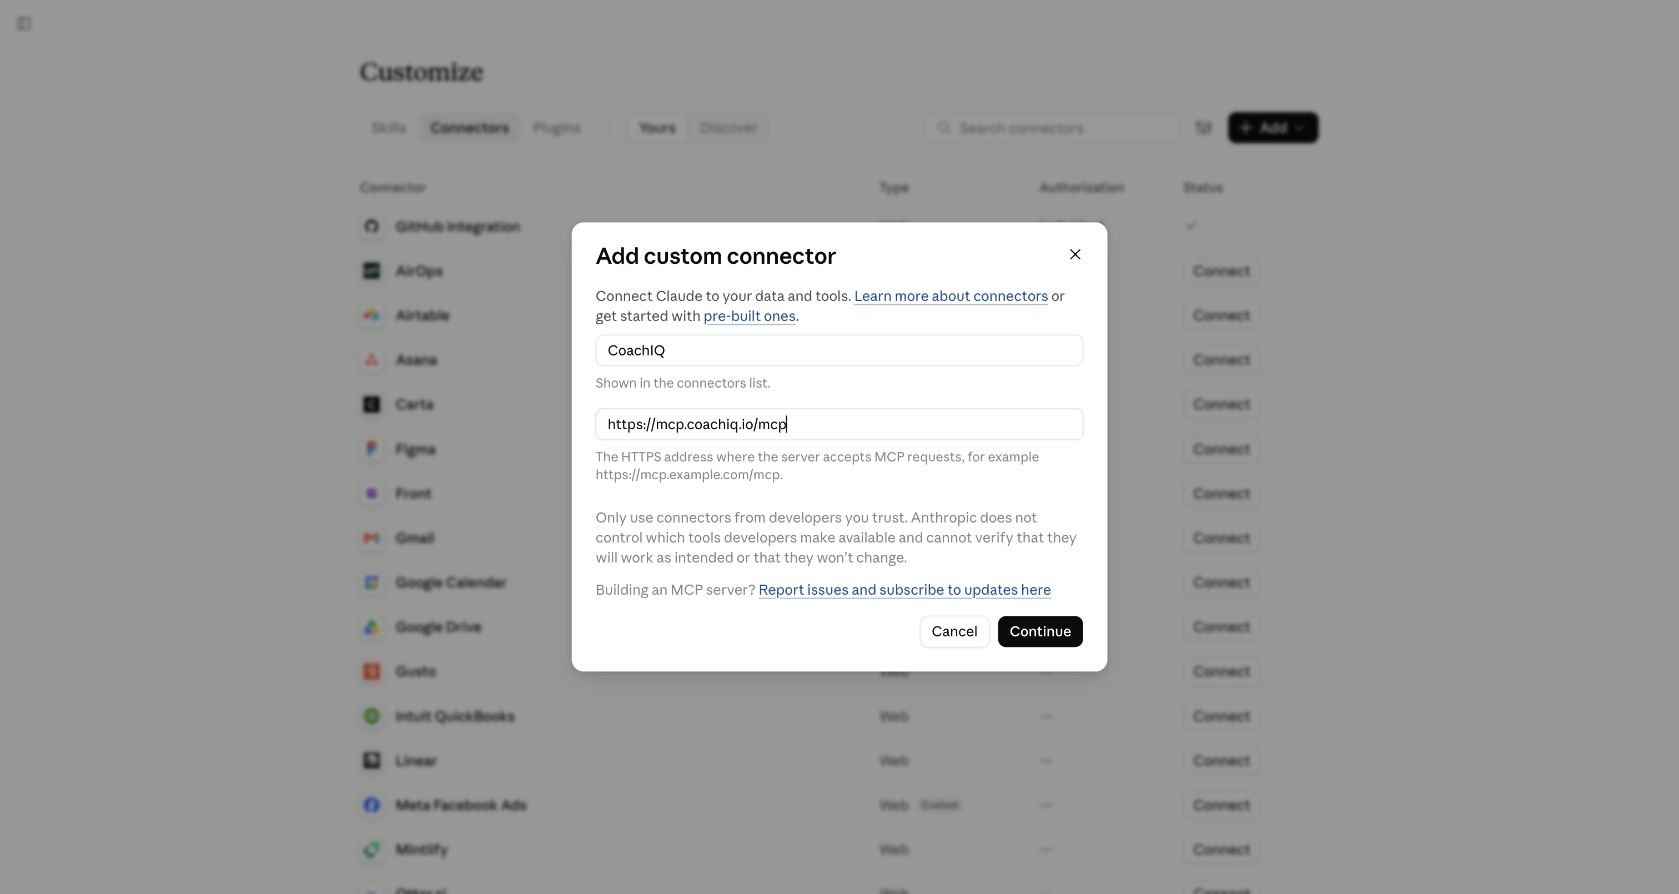
In Claude, go to **Customize → Connectors**. Open **Add** and choose **Add custom connector**.
Name it **CoachIQ**, paste the server address above, and choose **Continue**.
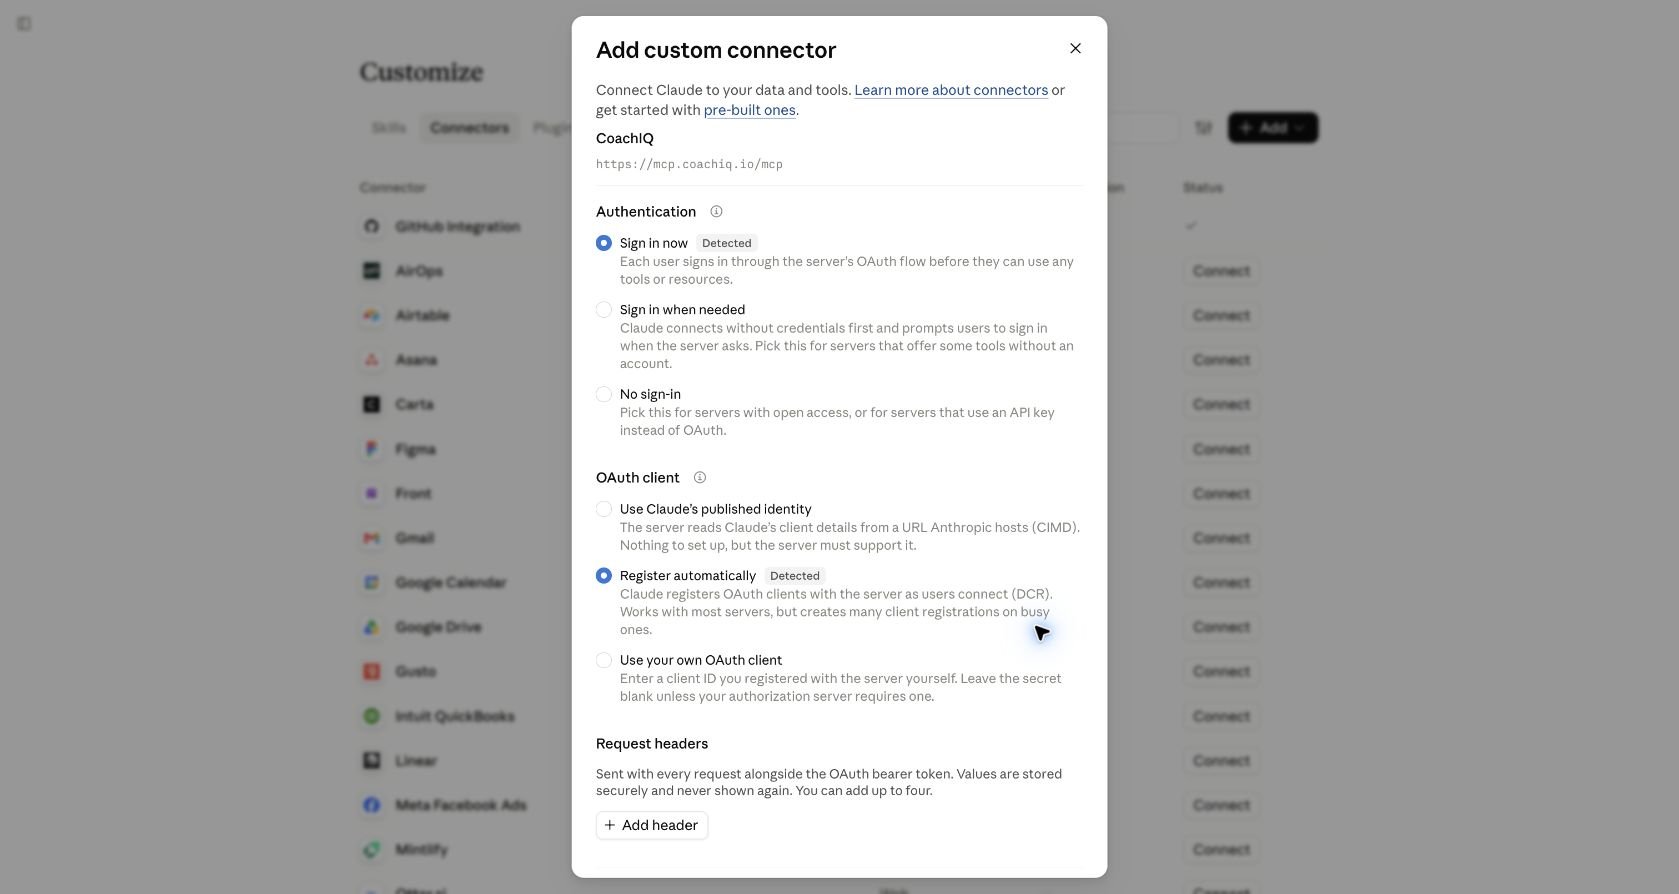
 Keep **Sign in now** and **Register automatically** when Claude detects them. You do not need a custom client ID, client secret, or request headers. Choose **Add**, then **Connect** on the CoachIQ connector page to open CoachIQ's sign-in and approval flow.
 On Team or Enterprise, the owner starts in **Organization settings → Connectors → Add → Custom → Web**. After they add it, members find it in their own connector list and connect. [Claude's setup instructions](https://support.claude.com/en/articles/11176164-use-connectors-to-extend-claude-s-capabilities).
### Choose your group and access
The connection opens CoachIQ's sign-in and approval flow. Sign in normally, then check the organization, group, and role shown on the approval page.
**One connection covers one CoachIQ group.** If you work in several groups, add a separately named connection for each and authorize the correct group. Naming a Claude Project after another group does not switch the connection.
Choose the access you want:
| Choice | What it allows |
| - | - |
| Leave the changes checkbox unchecked | Read information and use it for questions, summaries, and drafts in the chat. |
| Check **I allow this assistant to make supported changes in this group** | Allow supported changes within the connected group's permissions. You still review and approve the work you request. |
Read the access summary and the final button before connecting. For supported changes, the approval button should reflect that choice. If it still says **Connect with read-only access**, you are approving reads only.
Supported changes have limits. The connector is not permission to do everything available in the admin app. For example, automation drafts remain off for you to review in CoachIQ, and the assistant cannot use this connection to charge or refund a client. Ask it to check its current tools before planning a task.
## 2. Confirm the connection
In a new Claude chat, open **+ → Connectors** and enable CoachIQ. A connector can be authenticated but switched off in the current conversation.
Ask Claude to check the connection:
> “Check my CoachIQ connection with a small live read. Confirm my business, group, and whether you can read only or make supported changes. Don’t change anything.”
Once it confirms the correct business and a successful live read, continue below. If it cannot access CoachIQ, use the troubleshooting steps at the end of this guide.
## 3. Set up your personal Project
Once CoachIQ is connected, **copy and paste this prompt into the connected chat**. It will help Claude learn your business through MCP, consult [help.coachiq.io](https://help.coachiq.io), and prepare a Project tailored to how you work.
```text theme={"theme":"github-dark"}
I'm a CoachIQ customer. Help me set up a private Project that understands my business and how I work.
First, use my connected CoachIQ MCP for a small live read. Confirm my business, group, and available access. If it isn't connected, guide me through the appropriate guide at https://help.coachiq.io/getting-started/use-coachiq-with-ai before continuing.
Read https://help.coachiq.io/llms.txt to find the relevant CoachIQ guides, then read those pages to understand how the features work. Use the available MCP tools to learn about my services, coaches, locations, scheduling, and products. Keep this focused; don't pull my entire client list or message history. Tell me if you can't access a source.
Ask up to three questions about my goals and working preferences. Then prepare a concise Business Brief, five useful requests tailored to me, and ready-to-paste Project Instructions.
The instructions should use the Help Center for feature guidance and the MCP for current business facts and supported actions. Stay within the connected group, ask before making changes or sending messages, and verify results. Keep private client details out of saved context. Only read data during this setup.
Suggest a Project name and help me save the brief and instructions. If you can save them directly, do so; otherwise give me the finished content and exact steps. Finish by checking that a new Project chat can use both the saved context and the live CoachIQ connection.
```
Answer its questions, then follow its directions to save your Project. It prepares the content for you; you may need to create the Project and paste or upload that content yourself.
### Save your Project
1. Open **Projects → + New Project** and create a private Project using the suggested name.
2. Paste the generated instructions into **Set project instructions** and add the Business Brief to **project knowledge**.
3. Open a new chat inside the Project and enable CoachIQ under **+ → Connectors**.
[More about Claude Projects](https://support.claude.com/en/articles/9519177-how-can-i-create-and-manage-projects).
In that new chat, ask it to summarize your priorities from the saved brief and check your CoachIQ connection. You're ready when it can use both your saved context and live business information.
### Start using it
Try one of the five requests in your Business Brief, or ask: **“What can you help me with in CoachIQ this week, based on my goals?”**
Use the same Project for ongoing work. The Help Center explains features; the MCP provides current business information and supported actions. Review proposed changes before approving them, and update your brief when your goals change.
Keep each request focused on one outcome. Your assistant's usage limits are separate from CoachIQ, and actions such as SMS can use [messaging credits](/inbox/sms-credits).
## Troubleshooting
Check the CoachIQ account shown on the approval page. MCP requires an **accepted Admin or Coach membership** in the intended group. Sign in with the correct staff account, or ask your group administrator to check that the membership is accepted, then retry. Access to another group or an unaccepted invitation is not enough.
Add the connector through **Customize → Connectors** first, complete CoachIQ authorization, and enable it in the chat. Pasting terminal commands or configuration JSON into a Claude chat does not install it.
Check **+ → Connectors** in this conversation. Turn CoachIQ on, then ask it to check the connection again. Repeat this check in a new Project chat.
Reconnect and review the CoachIQ access choice. If the approval page offers the changes checkbox, select it when you want supported writes. If an older connector offers no write choice, remove that connector and add it again, then authorize the new connection. Rerun verification. If it still reports read-only, send Support the access summary and a screenshot with sign-in details and the browser URL hidden; do not send tokens or passwords.
In a managed Claude workspace, ask its owner to add CoachIQ. Check your account's current connector limits and whether you are in the intended workspace. Start in the web app using the current connector instructions linked above.
Stop before making changes. Use the correctly named connection for that group, or add a separate connection and authorize it. Verify the group before continuing and keep its Project brief separate.
Check that the Business Brief was added to project knowledge and the instructions were saved. Important context should not live only in an earlier conversation. Then enable CoachIQ in the new chat and ask it to check the connection again.
Ask Claude to check the actual record before retrying. A written plan is not proof that CoachIQ changed. For an unsupported action, use the corresponding admin page or contact Support with the requested task and error.
To stop future connector access from Claude, disconnect or remove CoachIQ in **Customize → Connectors**. Removing a connector does not remove previously saved Project files or chat content. Manage those separately if needed.
## Put the connection to work
Use [CoachIQ AI workflows](/settings/ai-workflows) for prompts to check availability, make a reviewed booking change, organize media, and verify what the assistant changed. Keep using the Project setup above to supply your business context.
## Related guides
* [Use CoachIQ with AI](/getting-started/use-coachiq-with-ai)
* [Manage your connections](/settings/connections)
* [Connect CoachIQ to ChatGPT](/settings/connect-chatgpt)
* [Messaging credits](/inbox/sms-credits)
This documentation is built and hosted on [Mintlify](https://mintlify.com), a developer documentation platform.
On Team or Enterprise, the owner starts in **Organization settings → Connectors → Add → Custom → Web**. After they add it, members find it in their own connector list and connect. [Claude's setup instructions](https://support.claude.com/en/articles/11176164-use-connectors-to-extend-claude-s-capabilities).
### Choose your group and access
The connection opens CoachIQ's sign-in and approval flow. Sign in normally, then check the organization, group, and role shown on the approval page.
**One connection covers one CoachIQ group.** If you work in several groups, add a separately named connection for each and authorize the correct group. Naming a Claude Project after another group does not switch the connection.
Choose the access you want:
| Choice | What it allows |
| - | - |
| Leave the changes checkbox unchecked | Read information and use it for questions, summaries, and drafts in the chat. |
| Check **I allow this assistant to make supported changes in this group** | Allow supported changes within the connected group's permissions. You still review and approve the work you request. |
Read the access summary and the final button before connecting. For supported changes, the approval button should reflect that choice. If it still says **Connect with read-only access**, you are approving reads only.
Supported changes have limits. The connector is not permission to do everything available in the admin app. For example, automation drafts remain off for you to review in CoachIQ, and the assistant cannot use this connection to charge or refund a client. Ask it to check its current tools before planning a task.
## 2. Confirm the connection
In a new Claude chat, open **+ → Connectors** and enable CoachIQ. A connector can be authenticated but switched off in the current conversation.
Ask Claude to check the connection:
> “Check my CoachIQ connection with a small live read. Confirm my business, group, and whether you can read only or make supported changes. Don’t change anything.”
Once it confirms the correct business and a successful live read, continue below. If it cannot access CoachIQ, use the troubleshooting steps at the end of this guide.
## 3. Set up your personal Project
Once CoachIQ is connected, **copy and paste this prompt into the connected chat**. It will help Claude learn your business through MCP, consult [help.coachiq.io](https://help.coachiq.io), and prepare a Project tailored to how you work.
```text theme={"theme":"github-dark"}
I'm a CoachIQ customer. Help me set up a private Project that understands my business and how I work.
First, use my connected CoachIQ MCP for a small live read. Confirm my business, group, and available access. If it isn't connected, guide me through the appropriate guide at https://help.coachiq.io/getting-started/use-coachiq-with-ai before continuing.
Read https://help.coachiq.io/llms.txt to find the relevant CoachIQ guides, then read those pages to understand how the features work. Use the available MCP tools to learn about my services, coaches, locations, scheduling, and products. Keep this focused; don't pull my entire client list or message history. Tell me if you can't access a source.
Ask up to three questions about my goals and working preferences. Then prepare a concise Business Brief, five useful requests tailored to me, and ready-to-paste Project Instructions.
The instructions should use the Help Center for feature guidance and the MCP for current business facts and supported actions. Stay within the connected group, ask before making changes or sending messages, and verify results. Keep private client details out of saved context. Only read data during this setup.
Suggest a Project name and help me save the brief and instructions. If you can save them directly, do so; otherwise give me the finished content and exact steps. Finish by checking that a new Project chat can use both the saved context and the live CoachIQ connection.
```
Answer its questions, then follow its directions to save your Project. It prepares the content for you; you may need to create the Project and paste or upload that content yourself.
### Save your Project
1. Open **Projects → + New Project** and create a private Project using the suggested name.
2. Paste the generated instructions into **Set project instructions** and add the Business Brief to **project knowledge**.
3. Open a new chat inside the Project and enable CoachIQ under **+ → Connectors**.
[More about Claude Projects](https://support.claude.com/en/articles/9519177-how-can-i-create-and-manage-projects).
In that new chat, ask it to summarize your priorities from the saved brief and check your CoachIQ connection. You're ready when it can use both your saved context and live business information.
### Start using it
Try one of the five requests in your Business Brief, or ask: **“What can you help me with in CoachIQ this week, based on my goals?”**
Use the same Project for ongoing work. The Help Center explains features; the MCP provides current business information and supported actions. Review proposed changes before approving them, and update your brief when your goals change.
Keep each request focused on one outcome. Your assistant's usage limits are separate from CoachIQ, and actions such as SMS can use [messaging credits](/inbox/sms-credits).
## Troubleshooting
Check the CoachIQ account shown on the approval page. MCP requires an **accepted Admin or Coach membership** in the intended group. Sign in with the correct staff account, or ask your group administrator to check that the membership is accepted, then retry. Access to another group or an unaccepted invitation is not enough.
Add the connector through **Customize → Connectors** first, complete CoachIQ authorization, and enable it in the chat. Pasting terminal commands or configuration JSON into a Claude chat does not install it.
Check **+ → Connectors** in this conversation. Turn CoachIQ on, then ask it to check the connection again. Repeat this check in a new Project chat.
Reconnect and review the CoachIQ access choice. If the approval page offers the changes checkbox, select it when you want supported writes. If an older connector offers no write choice, remove that connector and add it again, then authorize the new connection. Rerun verification. If it still reports read-only, send Support the access summary and a screenshot with sign-in details and the browser URL hidden; do not send tokens or passwords.
In a managed Claude workspace, ask its owner to add CoachIQ. Check your account's current connector limits and whether you are in the intended workspace. Start in the web app using the current connector instructions linked above.
Stop before making changes. Use the correctly named connection for that group, or add a separate connection and authorize it. Verify the group before continuing and keep its Project brief separate.
Check that the Business Brief was added to project knowledge and the instructions were saved. Important context should not live only in an earlier conversation. Then enable CoachIQ in the new chat and ask it to check the connection again.
Ask Claude to check the actual record before retrying. A written plan is not proof that CoachIQ changed. For an unsupported action, use the corresponding admin page or contact Support with the requested task and error.
To stop future connector access from Claude, disconnect or remove CoachIQ in **Customize → Connectors**. Removing a connector does not remove previously saved Project files or chat content. Manage those separately if needed.
## Put the connection to work
Use [CoachIQ AI workflows](/settings/ai-workflows) for prompts to check availability, make a reviewed booking change, organize media, and verify what the assistant changed. Keep using the Project setup above to supply your business context.
## Related guides
* [Use CoachIQ with AI](/getting-started/use-coachiq-with-ai)
* [Manage your connections](/settings/connections)
* [Connect CoachIQ to ChatGPT](/settings/connect-chatgpt)
* [Messaging credits](/inbox/sms-credits)
This documentation is built and hosted on [Mintlify](https://mintlify.com), a developer documentation platform.