> ## Documentation Index
> Fetch the complete documentation index at: https://help.coachiq.io/llms.txt
> Use this file to discover all available pages before exploring further.
# Setting Up Payment Options for Sessions
> Configure free, paid, or credit-based sessions in CoachIQ. Complete guide to connect Stripe, set up products, and process coaching payments.
## What you'll accomplish
By the end of this guide, you'll understand all payment options for your schedulers and know exactly how to configure each one. You'll be able to accept payments, issue credits, or offer free sessions based on your business model.
**Success criteria**: You have clear payment configuration on your schedulers, can process transactions, and understand when to use each payment type for maximum business flexibility.
**Already created a scheduler?** You can change payment options at any time by editing your scheduler. Changes apply to future bookings only—existing bookings remain unchanged.
## Before you begin
Understanding your options helps you choose the right payment model:
**Payment options available**:
* **Free sessions** - No payment required (trials, assessments, complimentary)
* **Direct payment** - Athletes pay per session via Stripe (one-time purchases)
* **Credit-based** - Athletes purchase credit packs, redeem credits to book
* **Hybrid models** - Combine free trials with paid ongoing sessions
**Prerequisites for paid sessions**:
* Stripe account connected to CoachIQ (for direct payments)
* Products created in CoachIQ (for credit-based and direct payment)
* Understanding of your pricing strategy
* 10-15 minutes to configure and test
**Decision framework**: Use free for lead generation, direct payment for simplicity, credits for commitment and package deals. Most scaling coaches use credits for better cash flow and reduced no-shows.
## Understanding the three payment types
Before configuring, understand what each payment type means for your business:
**What it means**: Athletes can book without any payment
**When to use**:
* Free trial sessions for new athletes
* Assessment sessions to evaluate fit
* Complimentary make-up sessions
* Team practices (free for team members)
* Community events or clinics
**Revenue model**: Lead generation → Convert to paid
**Athlete experience**:
* Sees "Free" on booking page
* Books instantly with no payment step
* No payment method required
**Coach considerations**:
* Higher no-show risk (no financial commitment)
* Great for building pipeline
* Easy to convert to paid after trial
* Still tracks attendance and engagement
**Example use case**: "Free 30-Minute Skills Assessment" as lead magnet, then upsell to paid package.
**What it means**: Athletes pay per session at time of booking via Stripe
**When to use**:
* Drop-in sessions (pay-as-you-go)
* Special workshops or clinics
* Premium one-off sessions
* Guest training opportunities
* Simple pricing model for solo coaches
**Revenue model**: Immediate transaction per booking
**Athlete experience**:
* Sees price on booking page (\$50, \$75, \$100, etc.)
* Completes checkout before booking confirms
* Receives payment receipt immediately
**Coach considerations**:
* Instant revenue (minus processing fees)
* Each session requires separate payment
* Lower commitment from athletes
* Transaction fees per booking (Stripe \~2.9% + \$0.30)
* Simpler than credit system
**Example use case**: "\$75 60-Minute Hitting Lesson" where athletes book and pay individually without long-term commitment.
**What it means**: Athletes purchase credit packages, then redeem credits to book sessions
**When to use**:
* Package deals (10-session bundles)
* Membership models with recurring credits
* Multi-session commitments
* Facility access models
* Any scenario where you want prepayment
**Revenue model**: Upfront payment for credits → Athletes redeem over time
**Athlete experience**:
* Purchases credits first (separate transaction)
* Sees "1 Credit" or "2 Credits" on booking page
* Books by redeeming credits (no additional payment)
* Can track remaining credit balance
* Credits may expire based on your settings
**Coach considerations**:
* Better cash flow (payment upfront)
* Lower no-show rates (sunk cost psychology)
* Can offer discounts on larger packages
* Requires credit management
* More complex than direct payment
* Transaction fees only on credit purchase (not per booking)
**Example use case**: "10-Session Package - \$650 (10 Credits)" where athletes prepay, then book by redeeming 1 credit per session over time.
## Decision framework: Choosing your payment type
Use this framework to decide which payment model fits your business:
### Choose **FREE** sessions if:
* ✅ You're building a new coaching business and need to attract athletes
* ✅ You want to offer risk-free trials before commitment
* ✅ You're running community events or team practices
* ✅ You plan to convert free users to paid packages after experiencing your coaching
* ❌ BUT: Higher no-show rates and no immediate revenue
### Choose **DIRECT PAYMENT** if:
* ✅ You want simplicity (no credit management)
* ✅ You offer drop-in sessions or workshops
* ✅ Athletes prefer flexibility over commitment
* ✅ You're comfortable with per-transaction revenue model
* ❌ BUT: Transaction fees on every booking and less predictable revenue
### Choose **CREDIT-BASED** if:
* ✅ You want better cash flow (payment upfront)
* ✅ You offer package deals or memberships
* ✅ You want to reduce no-shows (prepayment commitment)
* ✅ You can manage credit issuance, expiration, and tracking
* ✅ You want to offer subscriptions with recurring credit delivery
* ❌ BUT: More complex setup and requires product creation
### Choose **HYBRID MODEL** if:
* ✅ You want the best of all worlds
* ✅ You offer free trials that convert to credit packages
* ✅ You have different services at different price points
* ✅ You're willing to manage multiple schedulers
**Most common pattern**: Start with FREE trial session scheduler + CREDIT-BASED ongoing training scheduler. New athletes try free, then purchase credit package to continue.
## Option 1: Setting up FREE sessions
Free sessions require no special configuration—just don't connect any payment method.
Navigate to **Schedule → Schedulers** and create a new scheduler or edit an existing one.
Scroll to the **Payment** or **Pricing** section in your scheduler configuration.
This section may be labeled:
* "Payment Settings"
* "Pricing"
* "How should athletes pay?"
* "Session cost"
Choose the **Free** or **No payment required** option.
You may see:
* Radio button for "Free"
* Toggle for "Charge for this session" (set to OFF)
* Dropdown with "Free" as an option
 Click **Create** or **Update**.
**Configuration complete**: Athletes can now book this session without any payment. The booking page will show "Free" where price normally appears.
Get your scheduler booking link and open it:
1. Verify "Free" displays clearly
2. Complete a test booking
3. Confirm no payment step appears
4. Check that booking appears on your calendar
**Marketing tip**: Even though it's free, write a compelling description. Athletes still need to know what they're getting and why it's valuable.
### When to upgrade free sessions to paid
Once athletes experience your coaching through free sessions:
**Conversion triggers**:
* After 1-2 free trial sessions, present package options
* Use email or in-person conversation to explain ongoing pricing
* Create urgency with limited-time package discounts
* Share success stories from other athletes
**Setup for conversion**:
1. Create credit-based scheduler for ongoing training
2. Create product for credit packages (e.g., "10-Session Package")
3. Share booking link for paid scheduler after free session
4. Consider automation to send package offer after free session completion
## Option 2: Setting up DIRECT PAYMENT sessions
Direct payment requires connecting a Product that processes payment via Stripe.
### Prerequisites for direct payment
**Critical**: You must have Stripe connected to CoachIQ before you can accept direct payments. If you haven't connected Stripe, you'll need to do that first.
Before starting:
1. **Stripe account connected**: Settings → Stripe Portal → Connect Stripe
2. **Bank account connected to Stripe**: For receiving payouts
3. **Product created**: You'll create this during setup (or use existing)
### Creating a direct payment session
In your scheduler configuration, go to the **Payment** section.
Look for options like:
* "How should athletes pay?"
* "Payment type"
* "Pricing configuration"
Choose the option for **Paywall**.
This tells CoachIQ that athletes will pay at time of booking rather than using credits.
Click **Create** or **Update**.
**Configuration complete**: Athletes can now book this session without any payment. The booking page will show "Free" where price normally appears.
Get your scheduler booking link and open it:
1. Verify "Free" displays clearly
2. Complete a test booking
3. Confirm no payment step appears
4. Check that booking appears on your calendar
**Marketing tip**: Even though it's free, write a compelling description. Athletes still need to know what they're getting and why it's valuable.
### When to upgrade free sessions to paid
Once athletes experience your coaching through free sessions:
**Conversion triggers**:
* After 1-2 free trial sessions, present package options
* Use email or in-person conversation to explain ongoing pricing
* Create urgency with limited-time package discounts
* Share success stories from other athletes
**Setup for conversion**:
1. Create credit-based scheduler for ongoing training
2. Create product for credit packages (e.g., "10-Session Package")
3. Share booking link for paid scheduler after free session
4. Consider automation to send package offer after free session completion
## Option 2: Setting up DIRECT PAYMENT sessions
Direct payment requires connecting a Product that processes payment via Stripe.
### Prerequisites for direct payment
**Critical**: You must have Stripe connected to CoachIQ before you can accept direct payments. If you haven't connected Stripe, you'll need to do that first.
Before starting:
1. **Stripe account connected**: Settings → Stripe Portal → Connect Stripe
2. **Bank account connected to Stripe**: For receiving payouts
3. **Product created**: You'll create this during setup (or use existing)
### Creating a direct payment session
In your scheduler configuration, go to the **Payment** section.
Look for options like:
* "How should athletes pay?"
* "Payment type"
* "Pricing configuration"
Choose the option for **Paywall**.
This tells CoachIQ that athletes will pay at time of booking rather than using credits.
 You'll now need to connect this scheduler to a Product that defines the price.
**Select existing product**
1. Click dropdown to see existing products
2. Select the product with correct pricing
3. Scheduler now uses that product's price
**Product vs Scheduler names**: These can be different. Product is internal (payment processing), Scheduler name is what athletes see when booking.
After connecting or creating the product, save your scheduler.
The scheduler is now configured to:
1. Show price to athletes on booking page
2. Redirect to Stripe checkout when athlete books
3. Complete booking only after successful payment
4. Issue receipt automatically
**Critical testing step** - always test before sharing with athletes:
1. Get your scheduler booking link
2. Open in incognito/private browser
3. Select a time slot
4. Verify price displays correctly
5. Complete Stripe checkout using test card:
* Card: 4242 4242 4242 4242
* Expiry: Any future date
* CVC: Any 3 digits
6. Confirm booking completes
7. Check booking appears on calendar
8. Verify you received payment notification
**Don't skip testing**: Payment errors discovered by athletes damage credibility. Always test the complete payment flow before going live.
### Managing direct payment sessions
**After going live**:
* Athletes see price before selecting time
* Stripe processes payment securely
* You receive payout on Stripe's schedule (typically 2 business days)
* Athletes receive email receipt automatically
* Refunds processed through Stripe dashboard
**Transaction fees**:
* Standard Stripe fee: 2.9% + \$0.30 per transaction
* On 75 session: \~2.48 fee (you receive \$72.52)
* Decide if you absorb fees or add them to price
## Option 3: Setting up CREDIT-BASED sessions
Credit-based sessions are the most powerful but require understanding CoachIQ's credit system.
### How credits work in CoachIQ
Before configuring, understand the credit flow:
Coach creates Product (Credit Package) ↓ Athlete purchases Product (10 Credits for \$650) ↓ Credits added to athlete's account ↓ Athlete books session using Scheduler ↓ System deducts credits (1 Credit per booking) ↓ Athlete can continue booking until credits depleted
**Key concepts**:
* **Credits** = Virtual currency athletes redeem to book
* **Products** = What athletes purchase to get credits
* **Schedulers** = Require X credits to book (typically 1 credit)
* **Credit balance** = How many credits athlete has remaining
### Creating credit-based products
Before connecting schedulers to credits, you need products that issue credits.
Go to **Payments → Products** in the main navigation.
Click \*\*+ Create \*\*button.
Fill out the product information:
**Product name**:
* Descriptive of what athlete gets
* Example: "10-Session Training Package"
**Product type**:
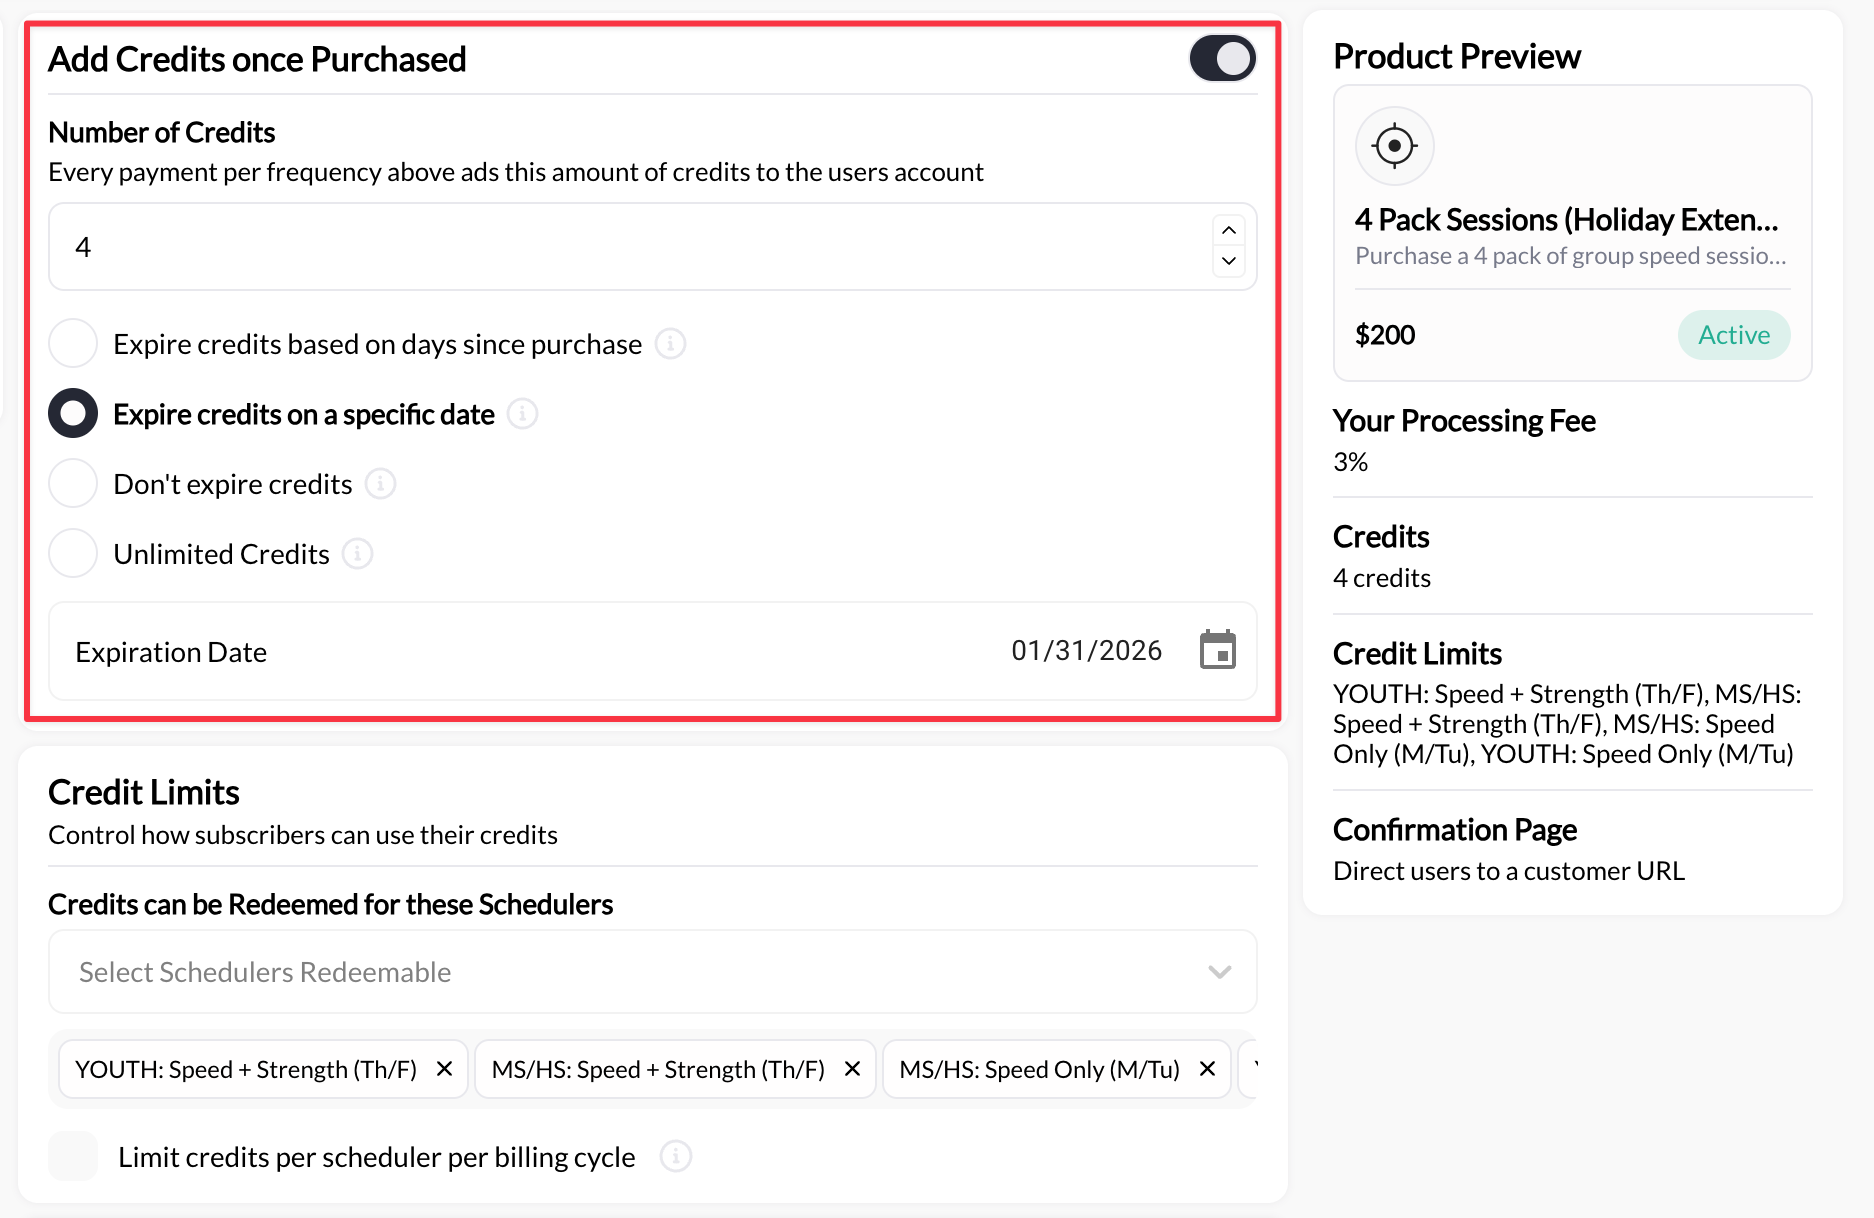
* Select **Add Credits once Purchased.**
* This tells CoachIQ to add credits upon purchase
**Price**:
* Total package price (e.g., \$650 for 10 credits)
* Consider bulk discounts (10 sessions = 650, not 750 if individual price is \$75)
**Package pricing strategy**: Offer 10-15% discount on larger packages to incentivize commitment. Example: Singles at 75, package of 10 for 650 (\$65/session effective rate).
In the credit configuration section:
**Number of credits issued**:
* How many credits athlete receives upon purchase
* Example: 10 credits for 10-session package
**Credit expiration** (optional but recommended):
* Set expiration period (30 days, 60 days, 90 days, 6 months, 1 year)
* Creates urgency and prevents indefinite credit holding
* Example: "Credits expire 90 days after purchase"
**Credit usage restrictions** (optional):
* Limit daily bookings (prevent athlete from booking all sessions at once)
* Limit weekly bookings
* Specific schedulers credits can be used for
**Expiration best practice**: 90 days is standard for most coaches. Too short feels pressuring, too long reduces urgency. Communicate expiration clearly at purchase.
You'll now need to connect this scheduler to a Product that defines the price.
**Select existing product**
1. Click dropdown to see existing products
2. Select the product with correct pricing
3. Scheduler now uses that product's price
**Product vs Scheduler names**: These can be different. Product is internal (payment processing), Scheduler name is what athletes see when booking.
After connecting or creating the product, save your scheduler.
The scheduler is now configured to:
1. Show price to athletes on booking page
2. Redirect to Stripe checkout when athlete books
3. Complete booking only after successful payment
4. Issue receipt automatically
**Critical testing step** - always test before sharing with athletes:
1. Get your scheduler booking link
2. Open in incognito/private browser
3. Select a time slot
4. Verify price displays correctly
5. Complete Stripe checkout using test card:
* Card: 4242 4242 4242 4242
* Expiry: Any future date
* CVC: Any 3 digits
6. Confirm booking completes
7. Check booking appears on calendar
8. Verify you received payment notification
**Don't skip testing**: Payment errors discovered by athletes damage credibility. Always test the complete payment flow before going live.
### Managing direct payment sessions
**After going live**:
* Athletes see price before selecting time
* Stripe processes payment securely
* You receive payout on Stripe's schedule (typically 2 business days)
* Athletes receive email receipt automatically
* Refunds processed through Stripe dashboard
**Transaction fees**:
* Standard Stripe fee: 2.9% + \$0.30 per transaction
* On 75 session: \~2.48 fee (you receive \$72.52)
* Decide if you absorb fees or add them to price
## Option 3: Setting up CREDIT-BASED sessions
Credit-based sessions are the most powerful but require understanding CoachIQ's credit system.
### How credits work in CoachIQ
Before configuring, understand the credit flow:
Coach creates Product (Credit Package) ↓ Athlete purchases Product (10 Credits for \$650) ↓ Credits added to athlete's account ↓ Athlete books session using Scheduler ↓ System deducts credits (1 Credit per booking) ↓ Athlete can continue booking until credits depleted
**Key concepts**:
* **Credits** = Virtual currency athletes redeem to book
* **Products** = What athletes purchase to get credits
* **Schedulers** = Require X credits to book (typically 1 credit)
* **Credit balance** = How many credits athlete has remaining
### Creating credit-based products
Before connecting schedulers to credits, you need products that issue credits.
Go to **Payments → Products** in the main navigation.
Click \*\*+ Create \*\*button.
Fill out the product information:
**Product name**:
* Descriptive of what athlete gets
* Example: "10-Session Training Package"
**Product type**:
* Select **Add Credits once Purchased.**
* This tells CoachIQ to add credits upon purchase
**Price**:
* Total package price (e.g., \$650 for 10 credits)
* Consider bulk discounts (10 sessions = 650, not 750 if individual price is \$75)
**Package pricing strategy**: Offer 10-15% discount on larger packages to incentivize commitment. Example: Singles at 75, package of 10 for 650 (\$65/session effective rate).
In the credit configuration section:
**Number of credits issued**:
* How many credits athlete receives upon purchase
* Example: 10 credits for 10-session package
**Credit expiration** (optional but recommended):
* Set expiration period (30 days, 60 days, 90 days, 6 months, 1 year)
* Creates urgency and prevents indefinite credit holding
* Example: "Credits expire 90 days after purchase"
**Credit usage restrictions** (optional):
* Limit daily bookings (prevent athlete from booking all sessions at once)
* Limit weekly bookings
* Specific schedulers credits can be used for
**Expiration best practice**: 90 days is standard for most coaches. Too short feels pressuring, too long reduces urgency. Communicate expiration clearly at purchase.
 Click **Create One Time** or **Create Subscription**.
Your credit-issuing product is now ready to be connected to schedulers.
### Connecting scheduler to credits
Now configure your scheduler to accept credits as payment:
Go to **Schedule → Schedulers** and edit the scheduler you want to make credit-based.
In the **Payment** section:
1. Choose **Credit Charge** option
2. This changes the payment model from direct payment to credit redemption
Click **Create One Time** or **Create Subscription**.
Your credit-issuing product is now ready to be connected to schedulers.
### Connecting scheduler to credits
Now configure your scheduler to accept credits as payment:
Go to **Schedule → Schedulers** and edit the scheduler you want to make credit-based.
In the **Payment** section:
1. Choose **Credit Charge** option
2. This changes the payment model from direct payment to credit redemption
 Specify how many credits this session costs:
**Credit cost**:
* Most coaches use **1 credit** per session
* Advanced: Use 2 credits for longer/premium sessions
**Standard is 1 credit**: Unless you have good reason, keep it simple with 1 credit = 1 session. Athletes understand this easily.
You can link a specific product that issues compatible credits for renew.
Enter the product url in the text box once the \*\*Add a credit renew link \*\*setting is toggled on
Click **Create** or **Update**.
**Configuration complete**: Your scheduler now requires credits instead of direct payment. Athletes must have credits in their account to book.
### Testing the credit-based flow
Complete end-to-end testing before going live:
Use a test email address or have a real athlete help test.
1. Share your Products page link or use "Buy Credits" flow
2. Find your credit package product
3. Complete purchase using Stripe test card (4242 4242 4242 4242)
4. Verify credits added to account
5. Check email receipt mentions credit quantity
1. Navigate to scheduler booking page
2. Verify it shows credit amount instead of dollar amount
3. Select time slot
4. Confirm booking flow doesn't request payment
5. Verify credit deducted from balance after booking
6. Check booking appears on calendar
**What athletes see**: Booking page shows "1 Credit" or "2 Credits" where price normally displays. After booking, their credit balance updates (10 credits → 9 credits).
Check the athlete's profile:
1. Go to **People → Clients**
2. Find test athlete
3. View **Credits** tab or section
4. Confirm balance shows correctly (purchased - redeemed)
5. Verify transaction history logs the booking redemption
## Option 4: Hybrid payment models
Advanced coaches use multiple schedulers with different payment types for strategic business design.
### Common hybrid patterns
#### Pattern 1: Free Trial → Credit Package
**Setup**:
* Scheduler A: "Free 30-Min Assessment" (free)
* Scheduler B: "Ongoing Training" (1 credit per session)
* Product: "10-Session Package - \$650" (issues 10 credits)
**Flow**:
1. New athlete books free assessment
2. After assessment, coach presents package offer
3. Athlete purchases 10-session package
4. Athlete books ongoing sessions using credits
**Why it works**: Risk-free trial converts to committed package purchase with upfront cash flow.
#### Pattern 2: Drop-In + Membership
**Setup**:
* Scheduler A: "Drop-In Session" (\$85 direct payment)
* Scheduler B: "Member Session" (1 credit per session)
* Product: "Monthly Membership - \$300" (issues 5 credits/month)
**Flow**:
1. Casual athletes use drop-in (\$85 each)
2. Regular athletes see value in membership (\$60/session effective rate)
3. Members prepay, then book using credits
**Why it works**: Higher drop-in price incentivizes membership, while drop-in catches occasional athletes.
#### Pattern 3: Tiered Service Pricing
**Setup**:
* Scheduler A: "Group Training" (1 credit)
* Scheduler B: "Private Training" (2 credits)
* Product: "20-Credit Package - \$1,200" (issues 20 credits)
**Flow**:
1. Athletes purchase credit package
2. Athletes choose scheduler based on session
3. Private sessions cost more credits
**Why it works**: Flexible credit use across service tiers with single payment.
### Setting up hybrid models
Before creating schedulers, design the athlete flow:
**Questions to answer**:
* How do athletes discover you? (free trial, referral, drop-in)
* What's your conversion path? (trial → package, drop-in → membership)
* How do you upsell? (small package → large package)
* What prices incentivize each path?
Set up separate schedulers:
1. Entry-level scheduler (free or low-priced direct payment)
2. Mid-tier scheduler (credit-based main offering)
3. Premium scheduler (credit-based or higher direct price)
Each scheduler has:
* Distinct name explaining the difference
* Appropriate payment configuration
* Clear description of what athlete gets
Build product offerings that match business goals:
* Small package (5-10 sessions) for new athletes
* Standard package (10-20 sessions) for regulars
* Large package (30+ sessions) for committed athletes
* Monthly subscription (recurring credit delivery)
Price with strategic incentives (bulk discounts, membership perks).
Plan how athletes move between tiers:
* Automate email after free trial with package offer
* Train coaches on presenting packages in-person
* Website clearly shows "Start with free trial"
* Booking confirmations link to upgrade options
Walk through each possible athlete journey:
* Free trial → Check email → Purchase package → Book with credits
* Drop-in purchase → Compare pricing → Choose membership
* Standard member → Run low on credits → Upsell to larger package
## Troubleshooting common payment issues
**Symptoms**: Athlete can't find where to pay or buy credits
**Common causes**:
1. Product page not shared with athlete
2. Athlete looking in wrong place
3. Product visibility settings
**Fixes**:
1. **For direct payment**: Payment happens during booking (athletes see price and checkout before confirming)
2. **For credit-based**: Athletes must purchase credits FIRST before booking:
* Share direct product link or to your website or athlete portal
* Or share general "Buy Credits" page link
* Or add "Purchase Credits" button to website
3. Verify product isn't set to "Private" or "Invite only"
4. Test the flow yourself to ensure it's clear
**Symptoms**: Have credit-based scheduler, want to switch to direct payment (or vice versa)
**Impact**: Changing payment type affects future bookings only. Existing bookings stay unchanged.
**Process**:
1. Edit scheduler → Change payment configuration
2. Disconnect old product if applicable
3. Connect new product with new payment type
4. Save scheduler
5. **Critical**: Communicate change to athletes
6. Existing bookings remain valid with old payment method
**Better approach**: Instead of changing existing scheduler, create NEW scheduler with different payment type. This prevents confusion and lets you run both simultaneously during transition.
## Best practices for payment configuration
Always explain pricing before athlete books. Include price in scheduler name, description, and any promotional materials. Surprise costs destroy trust.
After any payment configuration change, complete a test booking yourself. Use Stripe test cards (4242...) to verify the flow without real money.
Price packages to incentivize commitment: 750 for 10 singles vs 650 for 10-pack (13% discount). Make the package obviously better value.
Track: total revenue, average package size, conversion rate from free to paid, credit redemption rate, payment failures. Optimize based on data.
Publish clear refund policy. Typical: 24-hour cancellation for refund, credits non-refundable but transferable. Fair policies reduce disputes.
90-day expiration balances urgency with fairness. Too short feels predatory, too long reduces motivation. Always disclose expiration at purchase.
## Related articles
Complete guide to your first scheduler setup
Understand schedulers vs sessions vs bookings
Connect Stripe to accept payments in CoachIQ
Book athletes into sessions with payment handling
**Need help choosing the right payment model?** Our support team can review your business model and recommend the optimal payment configuration. [Contact Support](https://support.coachiq.com)
Specify how many credits this session costs:
**Credit cost**:
* Most coaches use **1 credit** per session
* Advanced: Use 2 credits for longer/premium sessions
**Standard is 1 credit**: Unless you have good reason, keep it simple with 1 credit = 1 session. Athletes understand this easily.
You can link a specific product that issues compatible credits for renew.
Enter the product url in the text box once the \*\*Add a credit renew link \*\*setting is toggled on
Click **Create** or **Update**.
**Configuration complete**: Your scheduler now requires credits instead of direct payment. Athletes must have credits in their account to book.
### Testing the credit-based flow
Complete end-to-end testing before going live:
Use a test email address or have a real athlete help test.
1. Share your Products page link or use "Buy Credits" flow
2. Find your credit package product
3. Complete purchase using Stripe test card (4242 4242 4242 4242)
4. Verify credits added to account
5. Check email receipt mentions credit quantity
1. Navigate to scheduler booking page
2. Verify it shows credit amount instead of dollar amount
3. Select time slot
4. Confirm booking flow doesn't request payment
5. Verify credit deducted from balance after booking
6. Check booking appears on calendar
**What athletes see**: Booking page shows "1 Credit" or "2 Credits" where price normally displays. After booking, their credit balance updates (10 credits → 9 credits).
Check the athlete's profile:
1. Go to **People → Clients**
2. Find test athlete
3. View **Credits** tab or section
4. Confirm balance shows correctly (purchased - redeemed)
5. Verify transaction history logs the booking redemption
## Option 4: Hybrid payment models
Advanced coaches use multiple schedulers with different payment types for strategic business design.
### Common hybrid patterns
#### Pattern 1: Free Trial → Credit Package
**Setup**:
* Scheduler A: "Free 30-Min Assessment" (free)
* Scheduler B: "Ongoing Training" (1 credit per session)
* Product: "10-Session Package - \$650" (issues 10 credits)
**Flow**:
1. New athlete books free assessment
2. After assessment, coach presents package offer
3. Athlete purchases 10-session package
4. Athlete books ongoing sessions using credits
**Why it works**: Risk-free trial converts to committed package purchase with upfront cash flow.
#### Pattern 2: Drop-In + Membership
**Setup**:
* Scheduler A: "Drop-In Session" (\$85 direct payment)
* Scheduler B: "Member Session" (1 credit per session)
* Product: "Monthly Membership - \$300" (issues 5 credits/month)
**Flow**:
1. Casual athletes use drop-in (\$85 each)
2. Regular athletes see value in membership (\$60/session effective rate)
3. Members prepay, then book using credits
**Why it works**: Higher drop-in price incentivizes membership, while drop-in catches occasional athletes.
#### Pattern 3: Tiered Service Pricing
**Setup**:
* Scheduler A: "Group Training" (1 credit)
* Scheduler B: "Private Training" (2 credits)
* Product: "20-Credit Package - \$1,200" (issues 20 credits)
**Flow**:
1. Athletes purchase credit package
2. Athletes choose scheduler based on session
3. Private sessions cost more credits
**Why it works**: Flexible credit use across service tiers with single payment.
### Setting up hybrid models
Before creating schedulers, design the athlete flow:
**Questions to answer**:
* How do athletes discover you? (free trial, referral, drop-in)
* What's your conversion path? (trial → package, drop-in → membership)
* How do you upsell? (small package → large package)
* What prices incentivize each path?
Set up separate schedulers:
1. Entry-level scheduler (free or low-priced direct payment)
2. Mid-tier scheduler (credit-based main offering)
3. Premium scheduler (credit-based or higher direct price)
Each scheduler has:
* Distinct name explaining the difference
* Appropriate payment configuration
* Clear description of what athlete gets
Build product offerings that match business goals:
* Small package (5-10 sessions) for new athletes
* Standard package (10-20 sessions) for regulars
* Large package (30+ sessions) for committed athletes
* Monthly subscription (recurring credit delivery)
Price with strategic incentives (bulk discounts, membership perks).
Plan how athletes move between tiers:
* Automate email after free trial with package offer
* Train coaches on presenting packages in-person
* Website clearly shows "Start with free trial"
* Booking confirmations link to upgrade options
Walk through each possible athlete journey:
* Free trial → Check email → Purchase package → Book with credits
* Drop-in purchase → Compare pricing → Choose membership
* Standard member → Run low on credits → Upsell to larger package
## Troubleshooting common payment issues
**Symptoms**: Athlete can't find where to pay or buy credits
**Common causes**:
1. Product page not shared with athlete
2. Athlete looking in wrong place
3. Product visibility settings
**Fixes**:
1. **For direct payment**: Payment happens during booking (athletes see price and checkout before confirming)
2. **For credit-based**: Athletes must purchase credits FIRST before booking:
* Share direct product link or to your website or athlete portal
* Or share general "Buy Credits" page link
* Or add "Purchase Credits" button to website
3. Verify product isn't set to "Private" or "Invite only"
4. Test the flow yourself to ensure it's clear
**Symptoms**: Have credit-based scheduler, want to switch to direct payment (or vice versa)
**Impact**: Changing payment type affects future bookings only. Existing bookings stay unchanged.
**Process**:
1. Edit scheduler → Change payment configuration
2. Disconnect old product if applicable
3. Connect new product with new payment type
4. Save scheduler
5. **Critical**: Communicate change to athletes
6. Existing bookings remain valid with old payment method
**Better approach**: Instead of changing existing scheduler, create NEW scheduler with different payment type. This prevents confusion and lets you run both simultaneously during transition.
## Best practices for payment configuration
Always explain pricing before athlete books. Include price in scheduler name, description, and any promotional materials. Surprise costs destroy trust.
After any payment configuration change, complete a test booking yourself. Use Stripe test cards (4242...) to verify the flow without real money.
Price packages to incentivize commitment: 750 for 10 singles vs 650 for 10-pack (13% discount). Make the package obviously better value.
Track: total revenue, average package size, conversion rate from free to paid, credit redemption rate, payment failures. Optimize based on data.
Publish clear refund policy. Typical: 24-hour cancellation for refund, credits non-refundable but transferable. Fair policies reduce disputes.
90-day expiration balances urgency with fairness. Too short feels predatory, too long reduces motivation. Always disclose expiration at purchase.
## Related articles
Complete guide to your first scheduler setup
Understand schedulers vs sessions vs bookings
Connect Stripe to accept payments in CoachIQ
Book athletes into sessions with payment handling
**Need help choosing the right payment model?** Our support team can review your business model and recommend the optimal payment configuration. [Contact Support](https://support.coachiq.com)