> ## Documentation Index
> Fetch the complete documentation index at: https://help.coachiq.io/llms.txt
> Use this file to discover all available pages before exploring further.
# Creating Your First Scheduler
> Complete walkthrough of creating your first scheduler with duration, capacity, and booking settings
## What you'll accomplish
By the end of this guide, you'll have a fully configured scheduler that athletes can book. This is where your availability templates become actual bookable services that generate revenue.
**Success criteria**: Your scheduler is created, connected to availability, configured with rules, and generating bookable time slots that athletes can see and book.
**New to schedulers?** Read [What Are Schedulers?](/scheduling/what-are-schedulers) first to understand the concepts. This article focuses on the practical creation steps.
## Before you begin
Preparation makes creation faster and reduces errors:
**Have ready**:
* Clear idea of what service you're offering
* Decided on duration (30, 45, 60 minutes, or custom)
* Decided on price (free, direct payment, or credits)
* Availability already set up (or ready to create during this process)
* 15-20 minutes of uninterrupted time
**First scheduler recommendation**: Start with your most common service type. For most coaches, this is a 60-minute private session at your standard rate. Get this working first before adding complexity.
## The scheduler builder sections overview
Before diving in, understand what you'll configure:
**Required sections** (must complete):
1. **Basic Details** - Name, description, duration
2. **Availability** - When this scheduler can be booked
3. **Payment** - Free, paid, or credit-based
4. **Capacity** - How many athletes per session
**Optional sections** (can skip initially):
5. **Booking Rules** - Limits, permissions, cancellation policies
6. **Buffer Time** - Breaks between sessions
7. **Scheduling Windows** - Minimum notice, maximum future booking
8. **Reminders** - Automated notifications
9. **Location** - Where sessions take place
10. **Connected Coaches** - Who delivers this service
**Phased approach**: Complete required sections first to get a working scheduler. Return later to add optional features as needed.
## Step 1: Navigate to scheduler creation
From your CoachIQ dashboard:
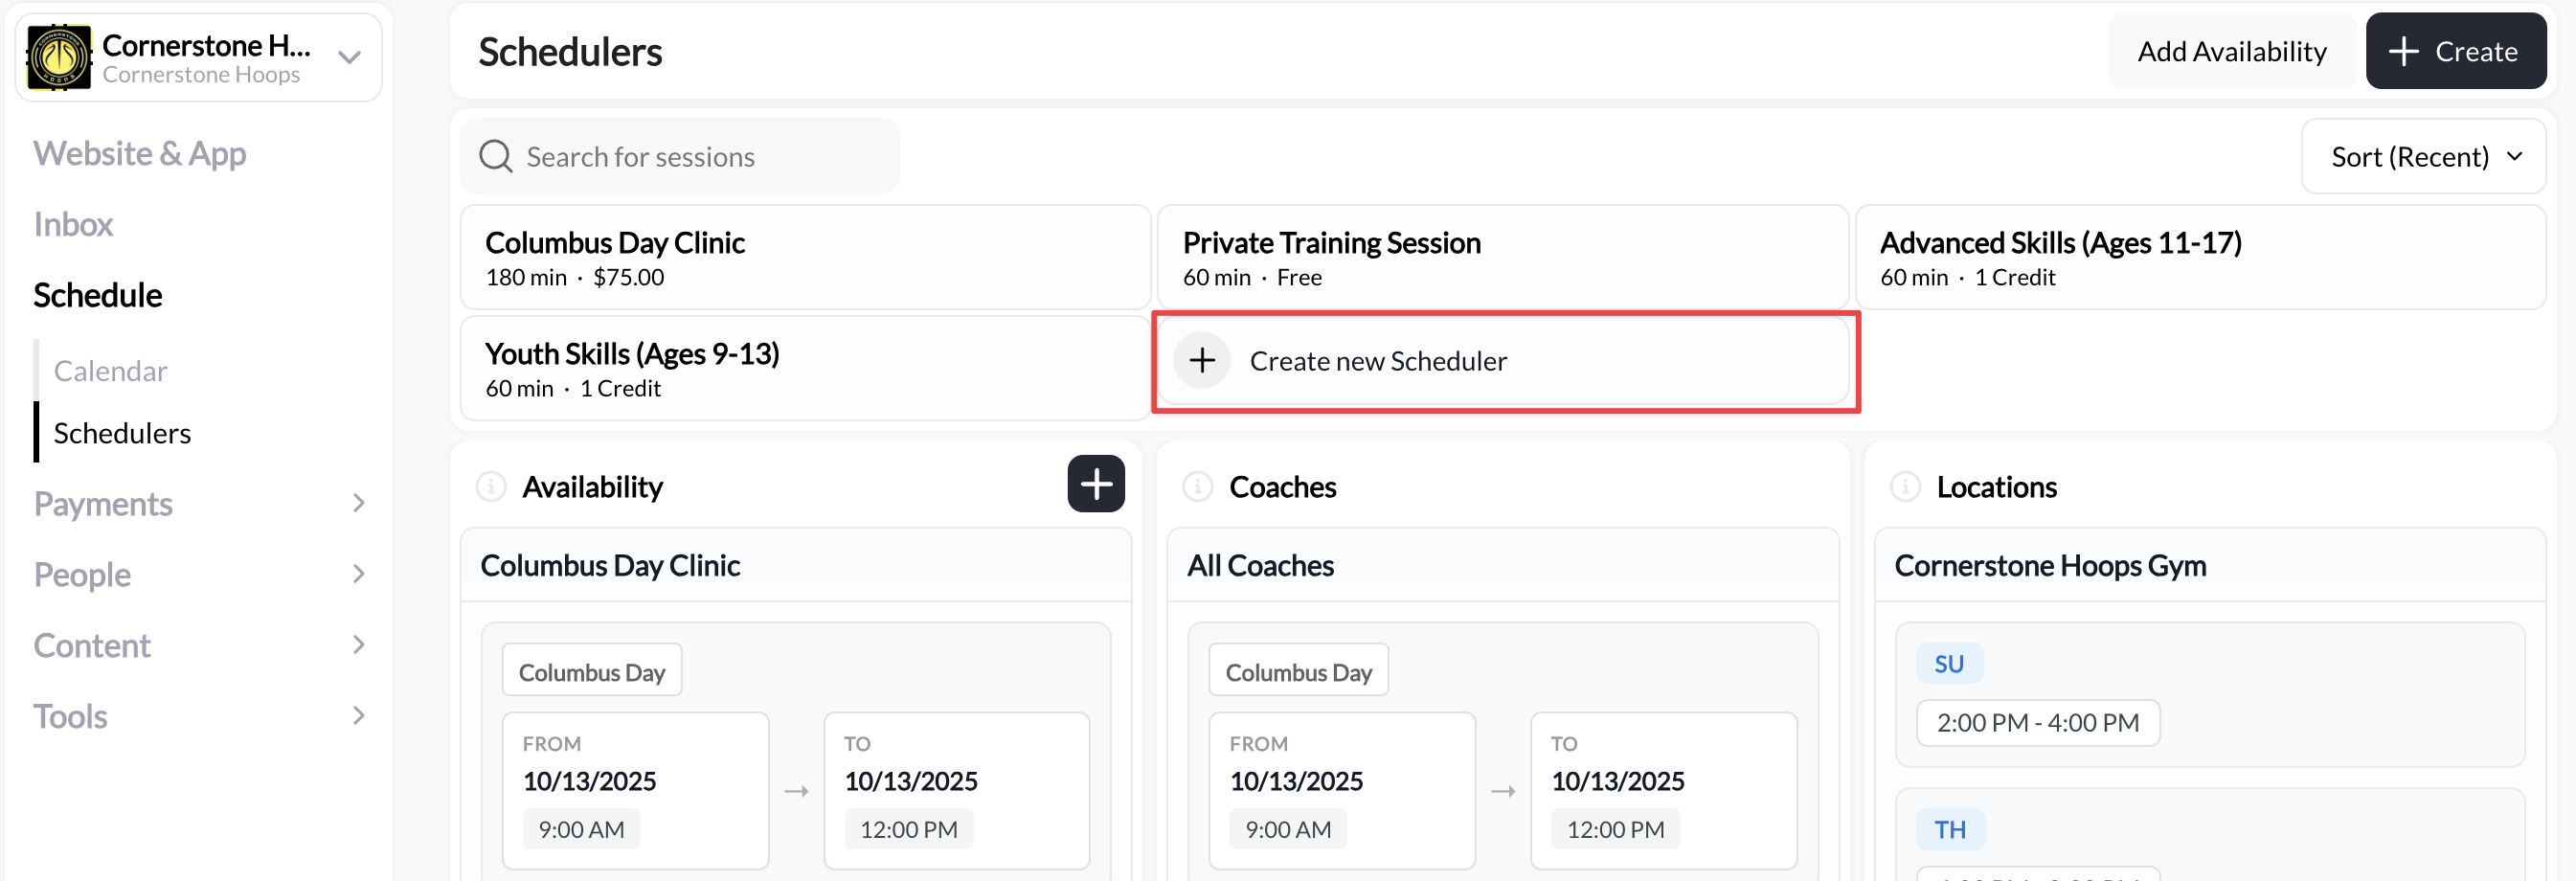
1. Click **Schedule**, then **Schedulers** in the main left navigation menu
Click the **Create** \*\*New Scheduler \*\*button
 ## Step 2: Configure basic session details
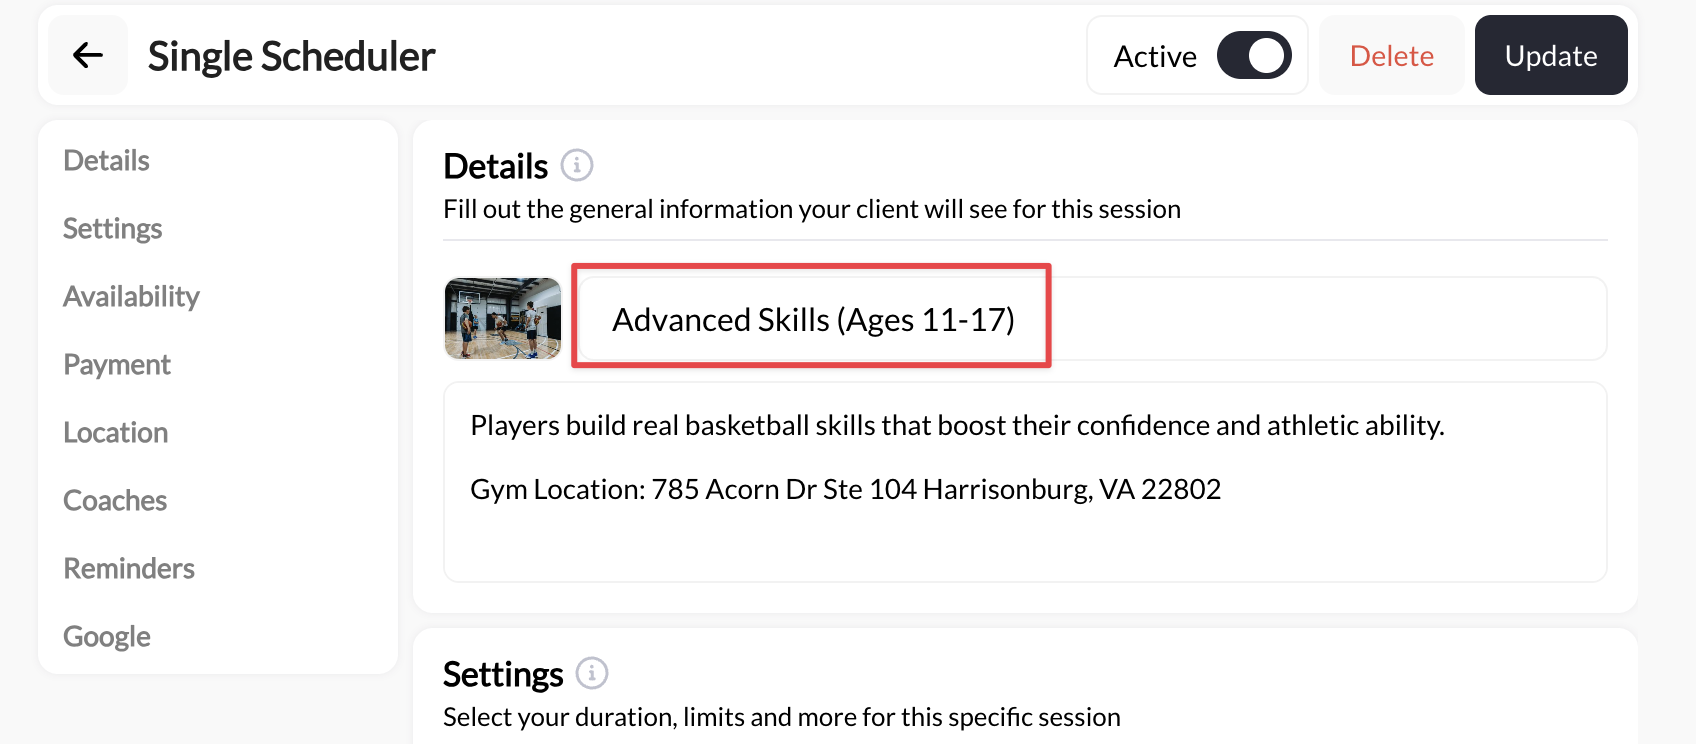
Start with the fundamentals that define what athletes are booking.
**Field**: Session Name, Scheduler Name, or Title
**What athletes see**: This name appears prominently when they're choosing what to book.
**Good naming examples**:
* "60-Minute Private Training"
* "Small Group Strength Class"
* "Free Initial Assessment"
* "45-Minute Speed & Agility Session"
**Include in name**:
* ✅ Format (ex: Private, Group, Semi-Private)
* ✅ Key differentiator (ex: Skill Level)
* ✅ Location
**Avoid in name**:
* ❌ Internal codes (PT-60-A)
* ❌ Overly generic ("Training Session")
* ❌ Too long (save details for description)
## Step 2: Configure basic session details
Start with the fundamentals that define what athletes are booking.
**Field**: Session Name, Scheduler Name, or Title
**What athletes see**: This name appears prominently when they're choosing what to book.
**Good naming examples**:
* "60-Minute Private Training"
* "Small Group Strength Class"
* "Free Initial Assessment"
* "45-Minute Speed & Agility Session"
**Include in name**:
* ✅ Format (ex: Private, Group, Semi-Private)
* ✅ Key differentiator (ex: Skill Level)
* ✅ Location
**Avoid in name**:
* ❌ Internal codes (PT-60-A)
* ❌ Overly generic ("Training Session")
* ❌ Too long (save details for description)
 **Name testing**: If you showed just the name to a stranger, would they understand what they're booking? If not, make it clearer.
**Field**: Description, Details, or About This Session
**Purpose**: Explain what happens in this session, who it's for, what athletes will learn/accomplish.
**What to include**:
* What happens during the session
* Who this session is for (skill level, age, goals)
* What athletes should bring or wear
* What makes this valuable
* Any prerequisites or requirements
**Example description**:
> "One-on-one personalized training focused on your specific goals. We'll work on technique, strength, conditioning, and sport-specific skills. Perfect for athletes of all levels looking to improve performance. Bring athletic shoes, water bottle, and workout clothes. Each session includes video analysis and personalized homework."
**Length guideline**: 2-4 sentences is ideal. Enough to inform without overwhelming. Save very detailed information for your website or session materials.
**Field**: Duration, Session Length, or Time
**Options typically**:
* 60 minutes (standard training, most common)
* 90 minutes (extended training)
* 120+ minutes (one day clinics)
* Custom (enter any duration)
**For your first scheduler**: 60 minutes is the safe default choice for most private training.
**Duration impacts availability**: A 60-minute session in a 5-hour availability window = \~5 bookable slots (accounting for buffer). Shorter sessions = more slots per day.
Before moving to next section, verify:
* ✅ Name clearly describes the service
* ✅ Description is compelling and informative
* ✅ Duration matches your intended session length
These three fields are what athletes primarily see when deciding to book.
## Step 3: Connect availability
This is where you define WHEN this scheduler can be booked.
Scroll down in the scheduler builder to find:
* **Availability**
* **Schedule**
* **When You're Available**
* Or similar section heading
**Name testing**: If you showed just the name to a stranger, would they understand what they're booking? If not, make it clearer.
**Field**: Description, Details, or About This Session
**Purpose**: Explain what happens in this session, who it's for, what athletes will learn/accomplish.
**What to include**:
* What happens during the session
* Who this session is for (skill level, age, goals)
* What athletes should bring or wear
* What makes this valuable
* Any prerequisites or requirements
**Example description**:
> "One-on-one personalized training focused on your specific goals. We'll work on technique, strength, conditioning, and sport-specific skills. Perfect for athletes of all levels looking to improve performance. Bring athletic shoes, water bottle, and workout clothes. Each session includes video analysis and personalized homework."
**Length guideline**: 2-4 sentences is ideal. Enough to inform without overwhelming. Save very detailed information for your website or session materials.
**Field**: Duration, Session Length, or Time
**Options typically**:
* 60 minutes (standard training, most common)
* 90 minutes (extended training)
* 120+ minutes (one day clinics)
* Custom (enter any duration)
**For your first scheduler**: 60 minutes is the safe default choice for most private training.
**Duration impacts availability**: A 60-minute session in a 5-hour availability window = \~5 bookable slots (accounting for buffer). Shorter sessions = more slots per day.
Before moving to next section, verify:
* ✅ Name clearly describes the service
* ✅ Description is compelling and informative
* ✅ Duration matches your intended session length
These three fields are what athletes primarily see when deciding to book.
## Step 3: Connect availability
This is where you define WHEN this scheduler can be booked.
Scroll down in the scheduler builder to find:
* **Availability**
* **Schedule**
* **When You're Available**
* Or similar section heading
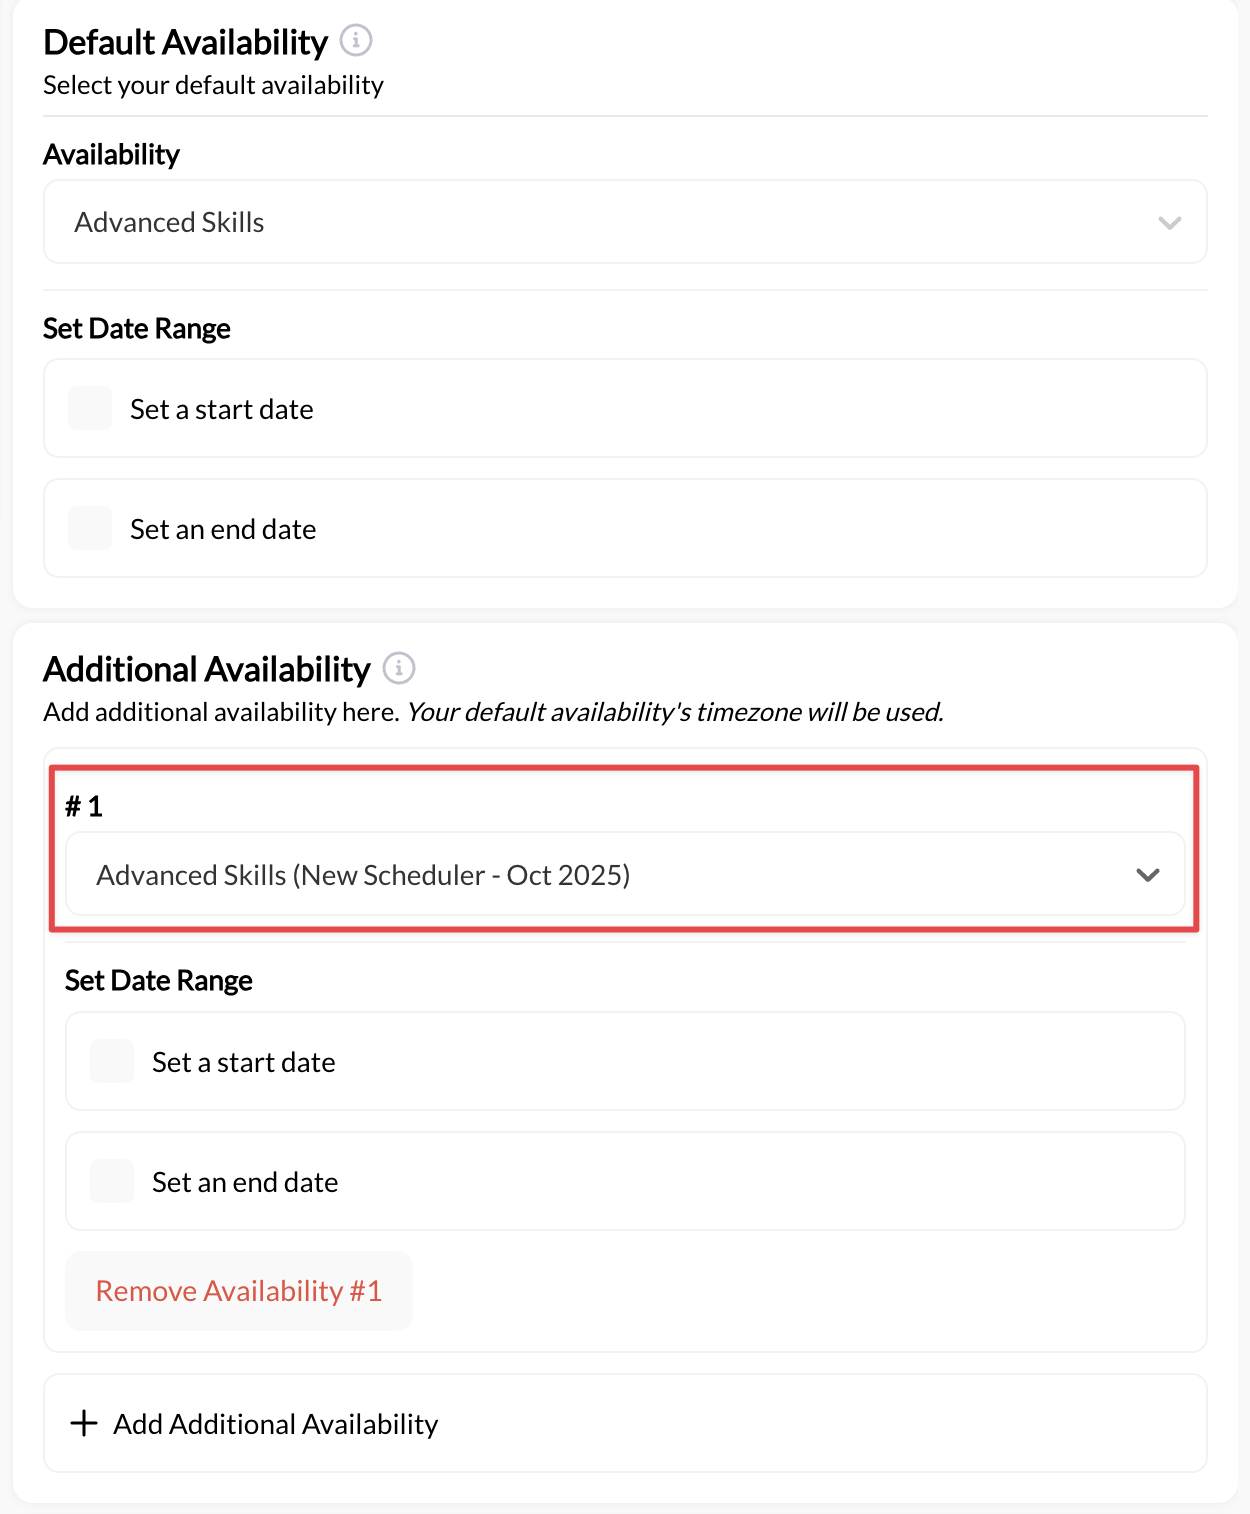
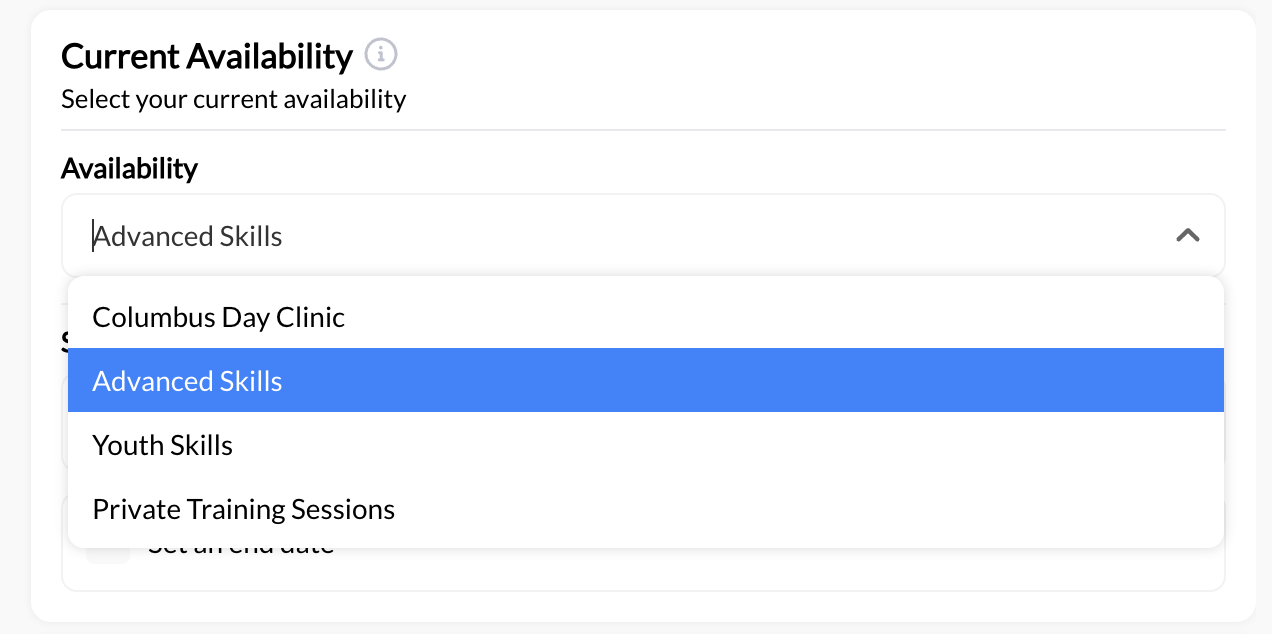 Select the drop menu and choose the corresponding availablity to attach to your scheduler
**Reusability reminder**: The availability you set here can power multiple schedulers. Think about it as your general coaching hours, not specific to this one service.
You can also customize start and end dates when clients can book with you
**Good to use if you're:**
* Launching a new program
* Switching to a new schedule after a certain date
Select the drop menu and choose the corresponding availablity to attach to your scheduler
**Reusability reminder**: The availability you set here can power multiple schedulers. Think about it as your general coaching hours, not specific to this one service.
You can also customize start and end dates when clients can book with you
**Good to use if you're:**
* Launching a new program
* Switching to a new schedule after a certain date
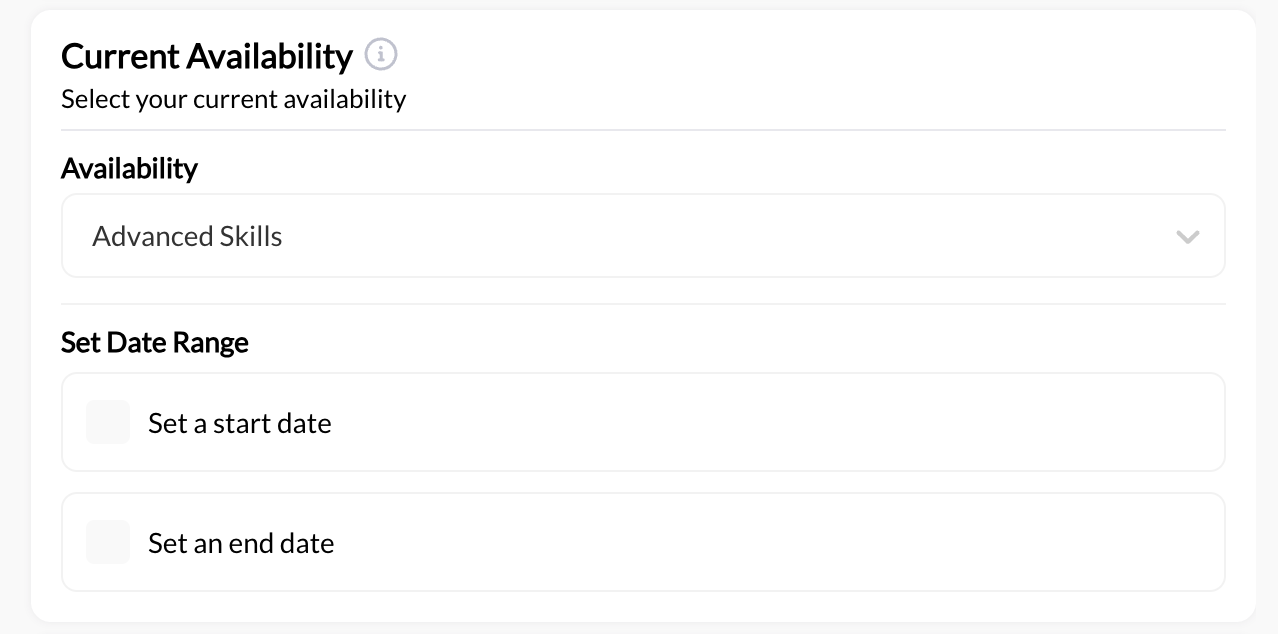 If you need to attach another availability to your scheduler, you can select one from the Addtional Availability tab.
**Good to use if you're:**
* Switching to a new schedule at a later date
If you need to attach another availability to your scheduler, you can select one from the Addtional Availability tab.
**Good to use if you're:**
* Switching to a new schedule at a later date
 ## Step 4: Configure payment settings
Decide how athletes will pay for this scheduler.
**When to use**:
* Trial/assessment sessions
* Team practices
* Makeup sessions
* Building relationships
**How to set up**:
1. Find payment section
2. Select **Free**
**Result**: Athletes can book without any payment or credits.
**First scheduler tip**: If this is your very first scheduler and you're still learning, start with FREE. You can always change to paid later once you're comfortable with the system.
**When to use**:
* Drop-in sessions
* One-time bookings
* New athletes who haven't purchased packages
**How to set up**:
Find payment options and select **Paywall**
You need a payment product:
* Click **Select Product**
* Choose your session product from list
## Step 4: Configure payment settings
Decide how athletes will pay for this scheduler.
**When to use**:
* Trial/assessment sessions
* Team practices
* Makeup sessions
* Building relationships
**How to set up**:
1. Find payment section
2. Select **Free**
**Result**: Athletes can book without any payment or credits.
**First scheduler tip**: If this is your very first scheduler and you're still learning, start with FREE. You can always change to paid later once you're comfortable with the system.
**When to use**:
* Drop-in sessions
* One-time bookings
* New athletes who haven't purchased packages
**How to set up**:
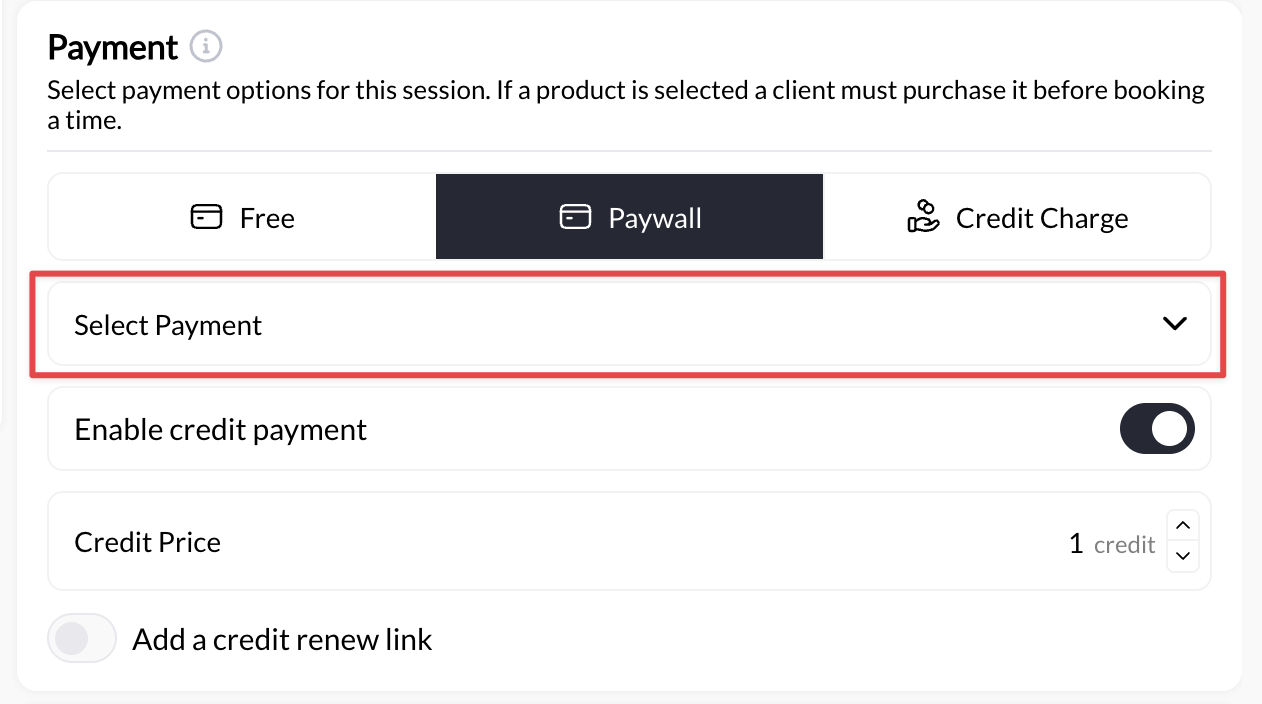
Find payment options and select **Paywall**
You need a payment product:
* Click **Select Product**
* Choose your session product from list
 **Result**: Athletes must purchase the product (pay the price) to book this session.
**Payment processing required**: Direct payment only works if you've connected a payment processor (Stripe) to your CoachIQ account. Set this up in Payments → Settings first.
**When to use**:
* Ongoing client relationships
* Session packages or subscriptions
* Membership models
**How to set up**:
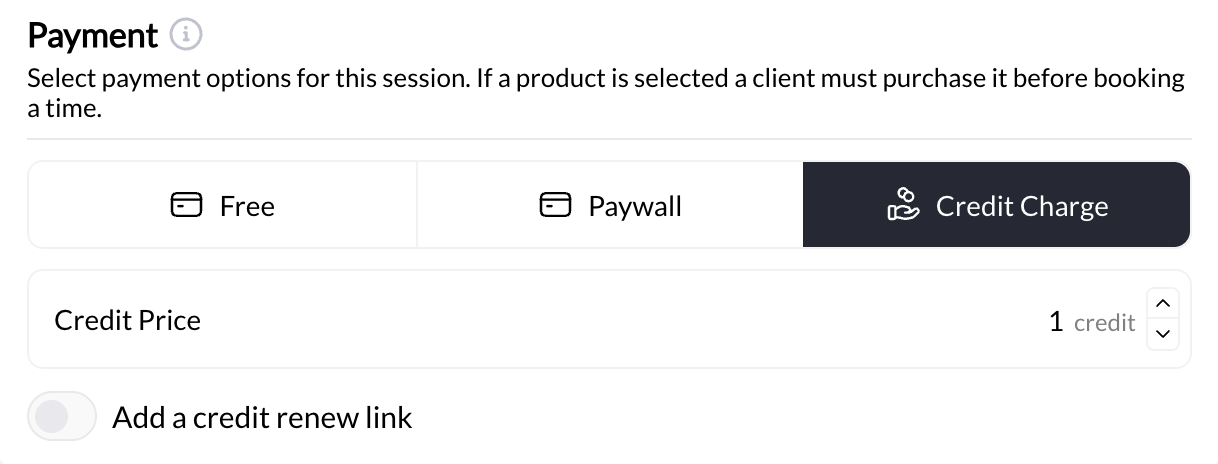
Find payment settings and select **Credit Charge**
Enter how many credits this session costs:
* 1 credit (most common)
* 2 credits (premium/longer sessions)
**Result**: Athletes must purchase the product (pay the price) to book this session.
**Payment processing required**: Direct payment only works if you've connected a payment processor (Stripe) to your CoachIQ account. Set this up in Payments → Settings first.
**When to use**:
* Ongoing client relationships
* Session packages or subscriptions
* Membership models
**How to set up**:
Find payment settings and select **Credit Charge**
Enter how many credits this session costs:
* 1 credit (most common)
* 2 credits (premium/longer sessions)
 For athletes to book:
* They need credits in their account
* Credits come from products (packages or subscriptions)
* You'll need to set up credit-issuing products separately
**Credit setup complexity**: Credit-based scheduling requires additional setup (creating products that award credits, understanding credit system). If this is your first scheduler, consider starting with free or direct payment.
**Result**: Athletes redeem credits from their balance when booking.
**When to use**:
* Maximum flexibility
* Accommodate different athlete preferences
* Package holders and drop-ins both welcome
**How to set up**:
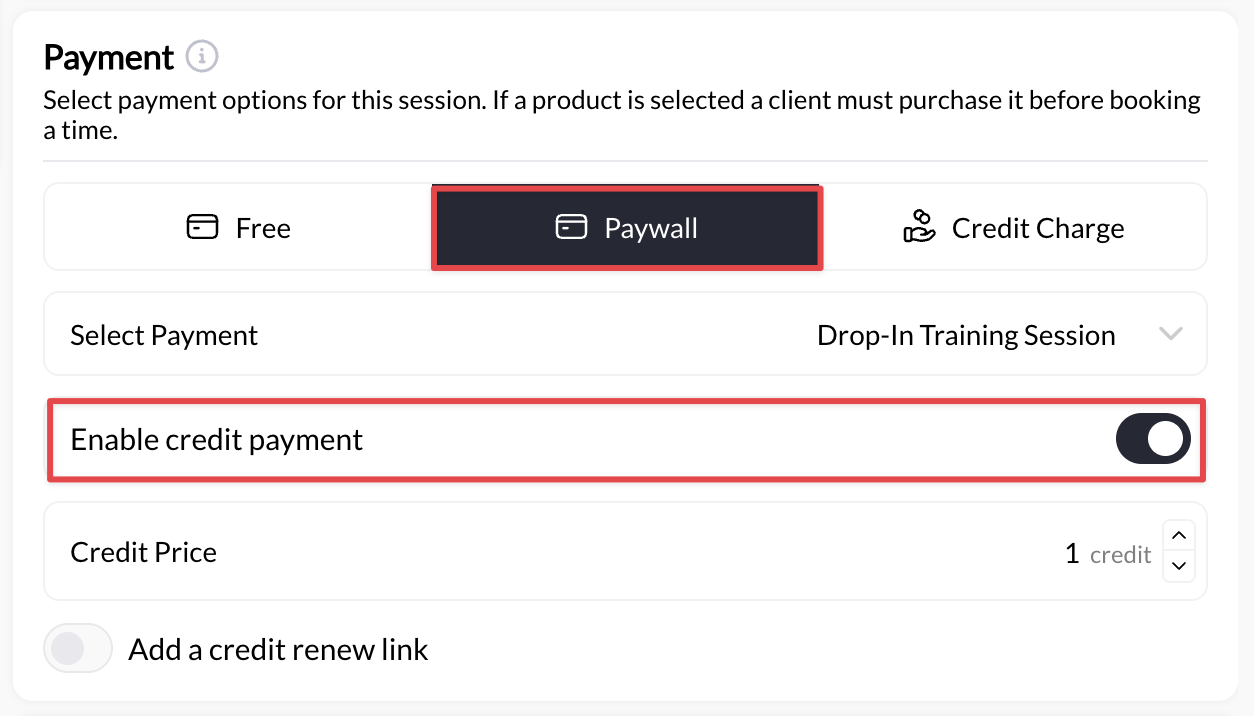
1. Enable BOTH payment options:
* Connect payment product (for direct payment)
* Enable credits with cost set
2. Athletes choose at booking time whether to pay or use credit
For athletes to book:
* They need credits in their account
* Credits come from products (packages or subscriptions)
* You'll need to set up credit-issuing products separately
**Credit setup complexity**: Credit-based scheduling requires additional setup (creating products that award credits, understanding credit system). If this is your first scheduler, consider starting with free or direct payment.
**Result**: Athletes redeem credits from their balance when booking.
**When to use**:
* Maximum flexibility
* Accommodate different athlete preferences
* Package holders and drop-ins both welcome
**How to set up**:
1. Enable BOTH payment options:
* Connect payment product (for direct payment)
* Enable credits with cost set
2. Athletes choose at booking time whether to pay or use credit
 **Result**: Athletes can either pay the direct price or redeem a credit—their choice.
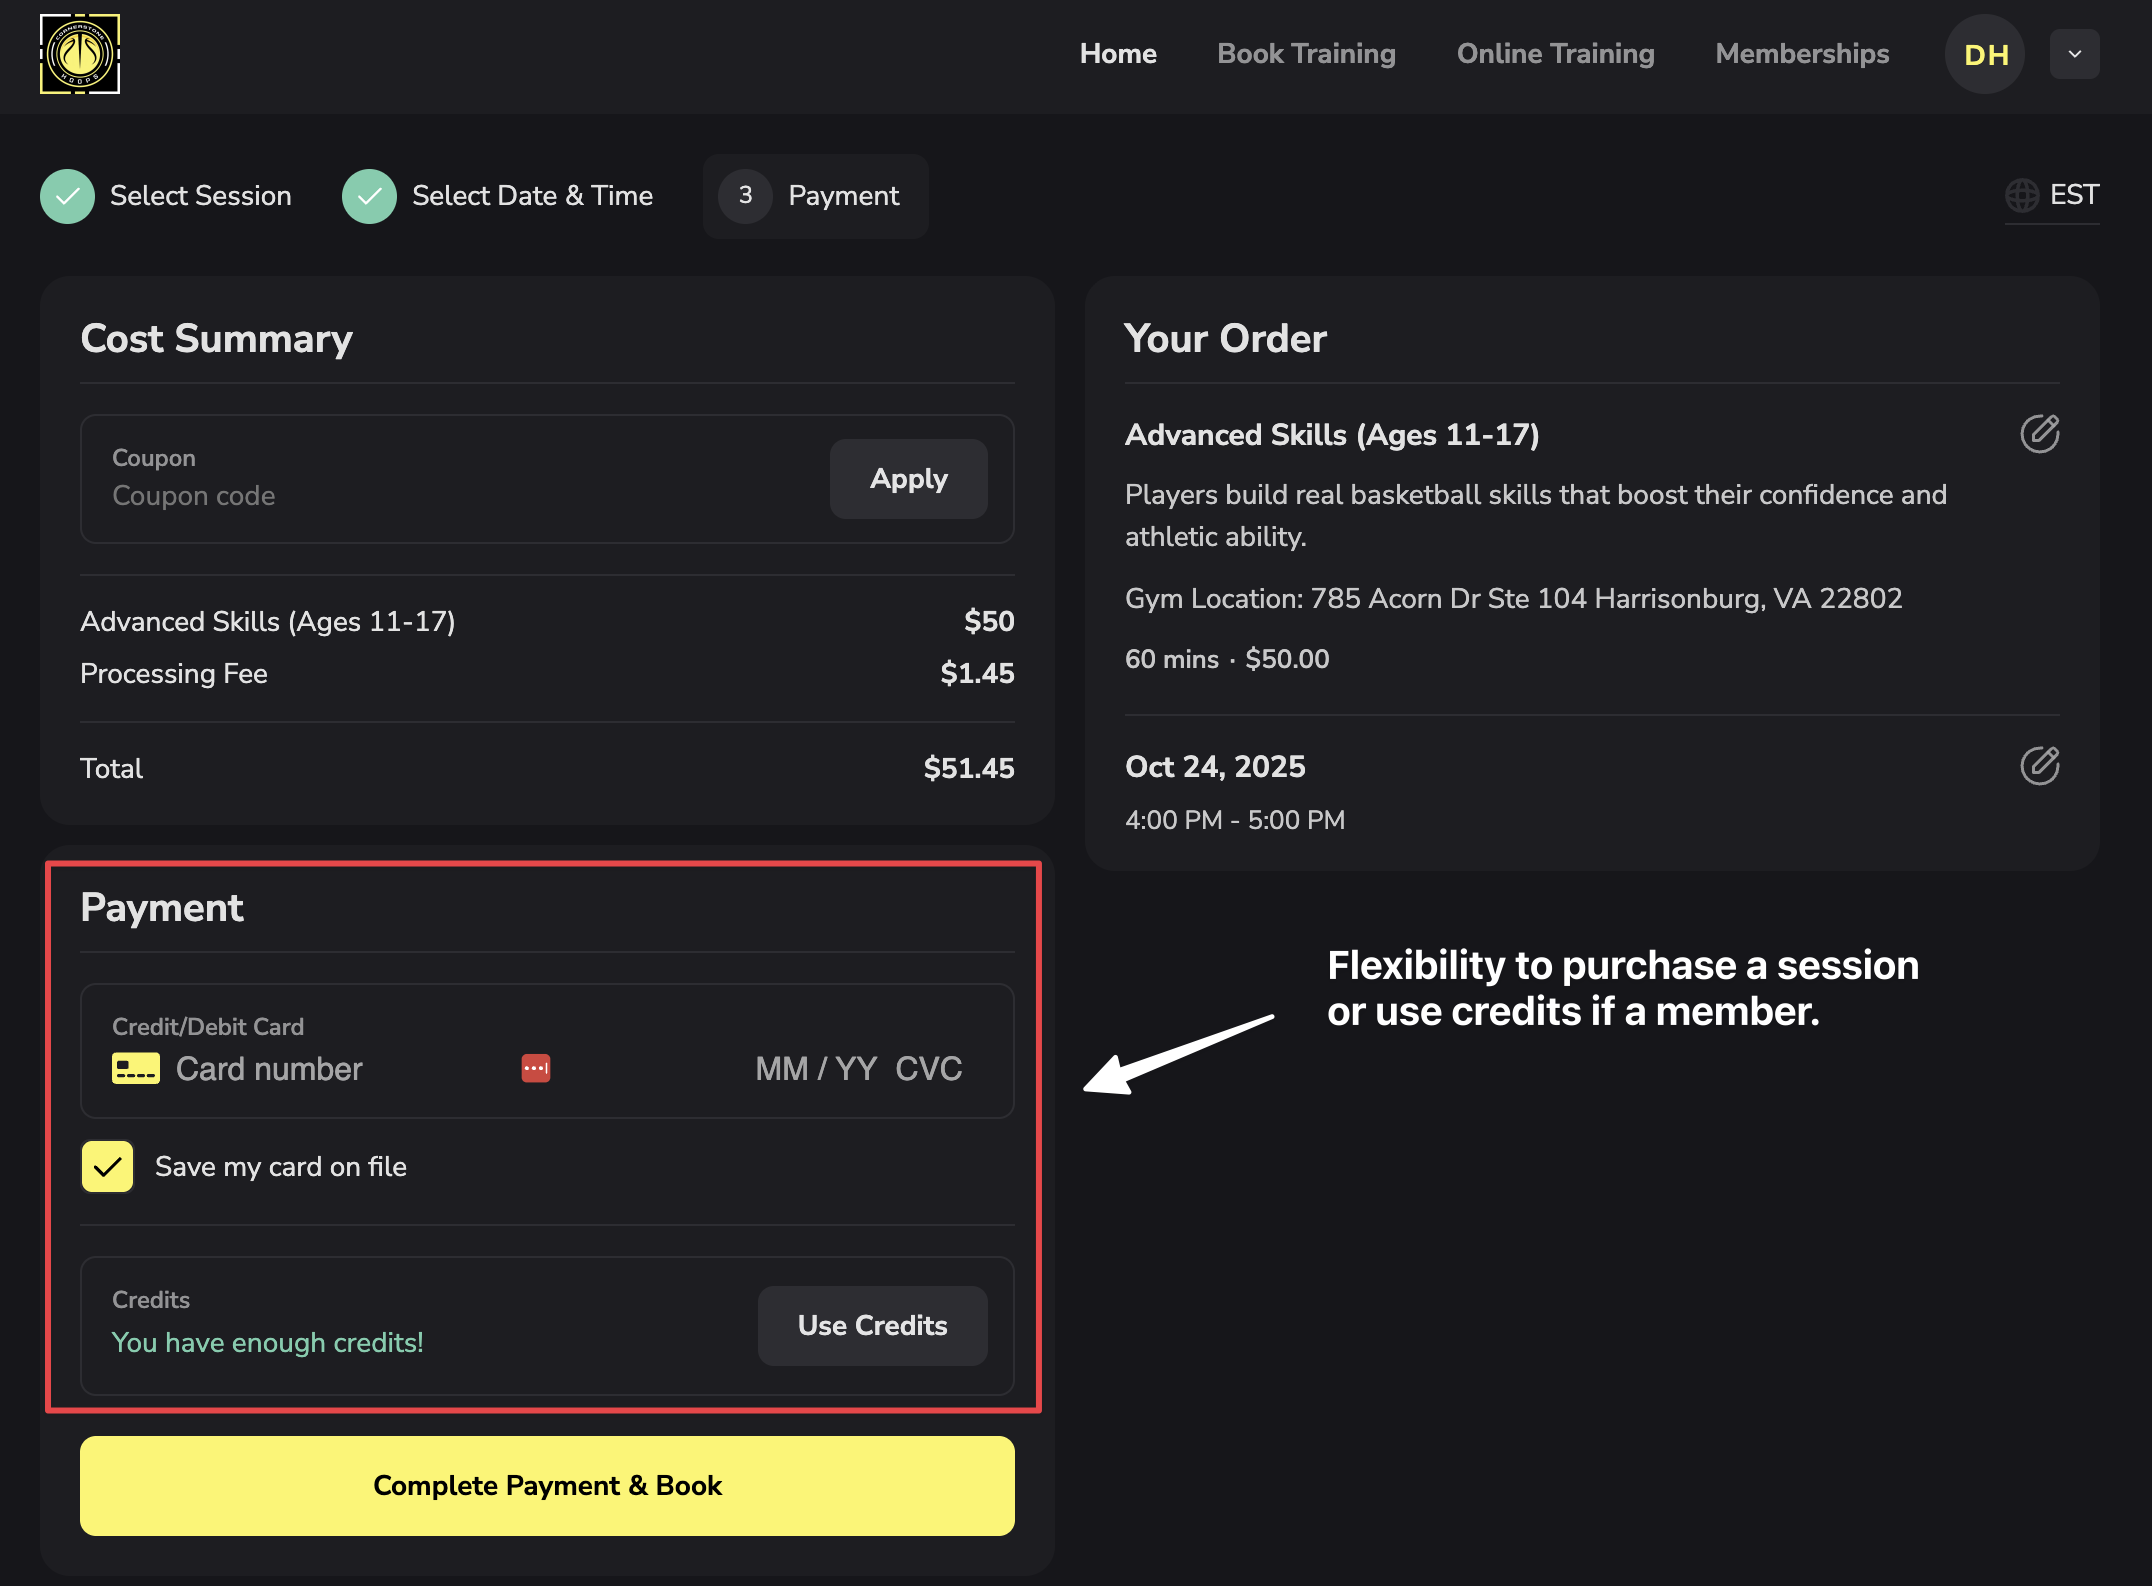 **Most flexible option**: Hybrid is great for established businesses but may be confusing for your very first scheduler. Start simpler, add flexibility later.
## Step 5: Set capacity and participant limits
Control how many athletes can book.
**Options:**
* Max booking per day: limit on the number of bookings in a day
* Max bookings per week: limit on the number of bookings in a week
* Max athletes per session (most common): limit on the number of athletes in a session
**Common settings for max athletes per session**:
* **1 athlete** = Private 1-on-1 sessions (most common for first scheduler)
* **2 athletes** = Semi-private training
* **3-6 athletes** = Small group sessions
* **8-12 athletes** = Medium group classes
* **15-20+ athletes** = Large group classes or team training
**Capacity impacts pricing**: If setting capacity >1, consider per-athlete pricing. 40 per athlete × 6 athletes = 40 \_per athlete \_×6 \_athletes \_= 240 per session (much more valuable than 1-on-1 at \$75).
## Step 6: Configure booking rules (optional but recommended)
These settings control how athletes can book and cancel.
**Field**: Allow Cancellations, Cancellation Policy, or similar
**Options**:
* **Allow anytime** - Athletes can cancel up until session start
* **Require 24-hour notice** - Can't cancel within 24 hours
* **Require 48-hour notice** - Can't cancel within 48 hours
* **No cancellations allowed** - Once booked, no cancellation
**Credit refund settings** (if using credits):
* **Refund credits on cancellation** - Credit returns to athlete balance
* **No refund** - Credit is consumed even if canceled
**Recommended for first scheduler**: "Allow cancellation with 24-hour notice, refund credits"
**Why**: Prevents last-minute cancellations while being fair to athletes with legitimate conflicts.
**Flexibility vs firmness**: More flexible policies attract bookings but risk no-shows. Stricter policies protect your time but may discourage booking. Find your balance.
**Purpose**: Prevent athletes from over-booking
**Options**:
* **Max bookings per day** - Athlete can book max 1 (or 2, 3) per day
* **Max bookings per week** - Athlete can book max 2 (or 3, 4, 5) per week
* **No limits** - Athletes can book as many as they want
**Recommended for first scheduler**: Start with no limits unless you have specific reason to restrict.
**When to use limits**:
* High-demand schedulers with limited slots
* Preventing single athlete from monopolizing schedule
* Encouraging distribution across athlete base
**Most flexible option**: Hybrid is great for established businesses but may be confusing for your very first scheduler. Start simpler, add flexibility later.
## Step 5: Set capacity and participant limits
Control how many athletes can book.
**Options:**
* Max booking per day: limit on the number of bookings in a day
* Max bookings per week: limit on the number of bookings in a week
* Max athletes per session (most common): limit on the number of athletes in a session
**Common settings for max athletes per session**:
* **1 athlete** = Private 1-on-1 sessions (most common for first scheduler)
* **2 athletes** = Semi-private training
* **3-6 athletes** = Small group sessions
* **8-12 athletes** = Medium group classes
* **15-20+ athletes** = Large group classes or team training
**Capacity impacts pricing**: If setting capacity >1, consider per-athlete pricing. 40 per athlete × 6 athletes = 40 \_per athlete \_×6 \_athletes \_= 240 per session (much more valuable than 1-on-1 at \$75).
## Step 6: Configure booking rules (optional but recommended)
These settings control how athletes can book and cancel.
**Field**: Allow Cancellations, Cancellation Policy, or similar
**Options**:
* **Allow anytime** - Athletes can cancel up until session start
* **Require 24-hour notice** - Can't cancel within 24 hours
* **Require 48-hour notice** - Can't cancel within 48 hours
* **No cancellations allowed** - Once booked, no cancellation
**Credit refund settings** (if using credits):
* **Refund credits on cancellation** - Credit returns to athlete balance
* **No refund** - Credit is consumed even if canceled
**Recommended for first scheduler**: "Allow cancellation with 24-hour notice, refund credits"
**Why**: Prevents last-minute cancellations while being fair to athletes with legitimate conflicts.
**Flexibility vs firmness**: More flexible policies attract bookings but risk no-shows. Stricter policies protect your time but may discourage booking. Find your balance.
**Purpose**: Prevent athletes from over-booking
**Options**:
* **Max bookings per day** - Athlete can book max 1 (or 2, 3) per day
* **Max bookings per week** - Athlete can book max 2 (or 3, 4, 5) per week
* **No limits** - Athletes can book as many as they want
**Recommended for first scheduler**: Start with no limits unless you have specific reason to restrict.
**When to use limits**:
* High-demand schedulers with limited slots
* Preventing single athlete from monopolizing schedule
* Encouraging distribution across athlete base
 **Setting**: Can athlete book multiple future sessions at once?
**Options**:
* **Yes** - Athlete can book Monday, Wednesday, Friday all at once
* **No** - Athlete must book one session at a time
**Recommended**: **Yes** (allow multiple bookings) for better athlete experience
**Why**: Athletes with regular training schedules want to book their week at once, not one session at a time.
**Settings**: Can athletes reschedule their own bookings?
**Allow athletes to reschedule** — When on, athletes can move their booking to a different available time slot from the Athlete Portal or app without contacting you. No additional payment is required; the original credit or payment carries over to the new time.
**Block rescheduling within cancellation window** — When on, athletes cannot reschedule once they are inside your cancellation notice window. This closes the loophole where an athlete avoids a credit forfeit by rescheduling instead of canceling. The window used is the same one set in your Cancellation Policy (e.g., if you require 24-hour notice, rescheduling is also blocked within that same 24 hours).
**Recommended**: Enable both for paid schedulers — allowing rescheduling reduces cancellations, while blocking rescheduling inside the cancellation window prevents athletes from using it to bypass your policy.
**Settings**: Who can book this scheduler?
**Options available in some systems**:
* **All athletes** - Anyone with account can book
* **Specific groups** - Only athletes in certain programs
* **Invite only** - You must enable access per athlete
* **Access codes** - Athlete needs code to book
**Recommended for first scheduler**: **All athletes** (open access)
**When to restrict**: VIP services, specialty programs, beta testing new offerings
## Step 7: Add buffer time
Buffer time creates breathing room between back-to-back sessions.
Look for:
* **Buffer**
**Setting**: Can athlete book multiple future sessions at once?
**Options**:
* **Yes** - Athlete can book Monday, Wednesday, Friday all at once
* **No** - Athlete must book one session at a time
**Recommended**: **Yes** (allow multiple bookings) for better athlete experience
**Why**: Athletes with regular training schedules want to book their week at once, not one session at a time.
**Settings**: Can athletes reschedule their own bookings?
**Allow athletes to reschedule** — When on, athletes can move their booking to a different available time slot from the Athlete Portal or app without contacting you. No additional payment is required; the original credit or payment carries over to the new time.
**Block rescheduling within cancellation window** — When on, athletes cannot reschedule once they are inside your cancellation notice window. This closes the loophole where an athlete avoids a credit forfeit by rescheduling instead of canceling. The window used is the same one set in your Cancellation Policy (e.g., if you require 24-hour notice, rescheduling is also blocked within that same 24 hours).
**Recommended**: Enable both for paid schedulers — allowing rescheduling reduces cancellations, while blocking rescheduling inside the cancellation window prevents athletes from using it to bypass your policy.
**Settings**: Who can book this scheduler?
**Options available in some systems**:
* **All athletes** - Anyone with account can book
* **Specific groups** - Only athletes in certain programs
* **Invite only** - You must enable access per athlete
* **Access codes** - Athlete needs code to book
**Recommended for first scheduler**: **All athletes** (open access)
**When to restrict**: VIP services, specialty programs, beta testing new offerings
## Step 7: Add buffer time
Buffer time creates breathing room between back-to-back sessions.
Look for:
* **Buffer**
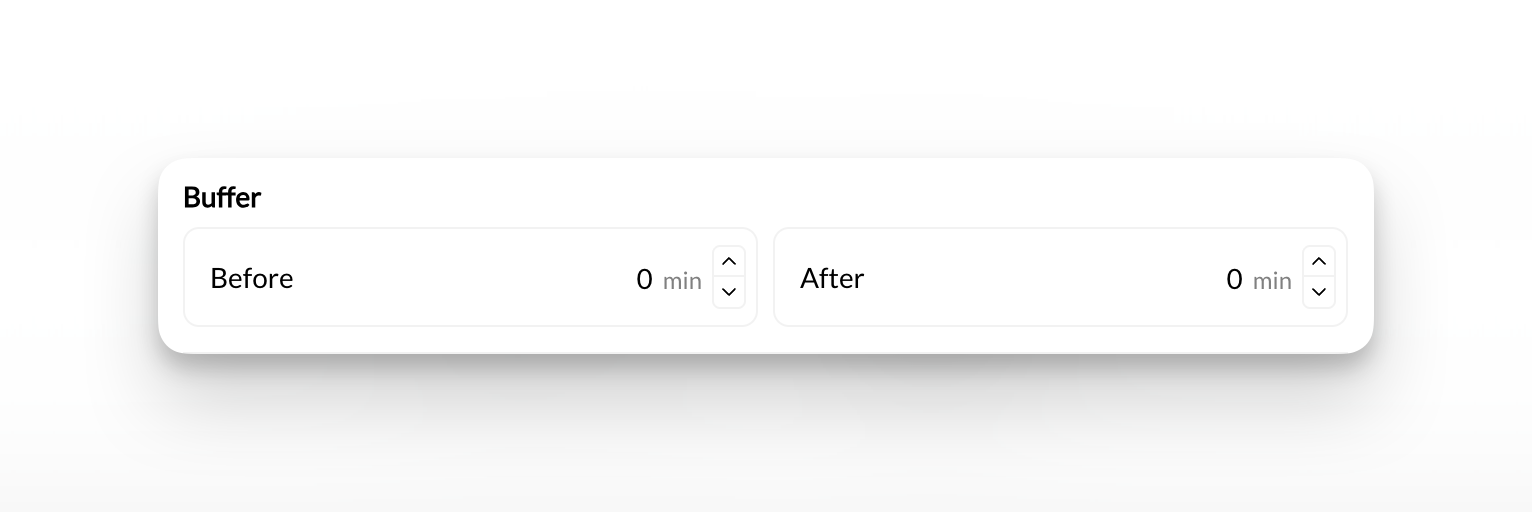 **Pre-session buffer**: Time blocked before each session starts
**Use cases**:
* Setup time (equipment, training area)
* Review athlete notes
* Personal prep time
**Typical setting**: 5-10 minutes
**Most coaches skip this** for their first scheduler.
**Post-session buffer**: Time blocked after each session ends
**Use cases**:
* Cleanup time
* Bathroom break
* Notes and documentation
* Transition between athletes
* Sessions running slightly over
**Typical setting**: 10-15 minutes
**Recommended for first scheduler**: **15 minutes**
**Buffer is invisible to athletes**: They only see available booking times. The buffer time happens automatically between sessions but doesn't appear on their booking screen.
**Without buffer** (back-to-back):
* 3:00-4:00 PM (Session 1)
* 4:00-5:00 PM (Session 2)
* 5:00-6:00 PM (Session 3)
**With 15-min buffer**:
* 3:00-4:00 PM (Session 1)
* 4:15-5:15 PM (Session 2)
* 5:30-6:30 PM (Session 3)
**Result**: Proper spacing, no burnout, accommodation for sessions running over.
**Verify**: Your availability end time accounts for buffer after last session. If last session starts at 7:00 PM (60 min) + 15 min buffer = need availability until 8:15 PM.
## Step 8: Set scheduling windows (optional)
Control how far in advance (or how last-minute) athletes can book.
**Setting**: Earliest time before session when booking is allowed
**Options**:
* No minimum - Can book right up to start time
* 1 hour - Must book at least 1 hour before
* 4 hours - Must book at least 4 hours before
* 24 hours - Must book at least 24 hours before
* 48 hours - Must book at least 48 hours before
**Recommended for first scheduler**: **No minimum** OR **4 hours**
**Why use minimum notice**:
* Prevents last-minute bookings when you can't prepare
* Ensures you see bookings before they happen
* Reduces stress of surprise bookings
**Why skip minimum notice**:
* Maximizes booking flexibility
* Good for urgent/emergency sessions
* Simpler for athletes
**Start flexible, add restrictions later**: Begin with no minimum and add restrictions only if last-minute bookings become problematic.
**Setting**: How far in the future athletes can book
**Options**:
* No limit - Can book months/years ahead
* 30 days - Can only book within next month
* 60 days - Can book up to 2 months ahead
* 90 days - Can book up to 3 months ahead
**Recommended for first scheduler**: **30-60 days** OR **No limit**
**Why use maximum window**:
* Prevents schedule from filling too far out
* Allows flexibility to adjust pricing/availability
* Keeps bookings manageable
**Why skip maximum window**:
* Accommodates athletes who plan far ahead
* Good for seasonal businesses
* Maximizes booking opportunities
**Most coaches**: Either set no limit or 30-60 days. Very few use shorter windows unless there's specific reason.
## Step 9: Configure reminders (optional but valuable)
Set up automated notifications before sessions to reduce no-shows.
Look for **Reminders** toward the bottom of the scheduler settings
**Pre-session buffer**: Time blocked before each session starts
**Use cases**:
* Setup time (equipment, training area)
* Review athlete notes
* Personal prep time
**Typical setting**: 5-10 minutes
**Most coaches skip this** for their first scheduler.
**Post-session buffer**: Time blocked after each session ends
**Use cases**:
* Cleanup time
* Bathroom break
* Notes and documentation
* Transition between athletes
* Sessions running slightly over
**Typical setting**: 10-15 minutes
**Recommended for first scheduler**: **15 minutes**
**Buffer is invisible to athletes**: They only see available booking times. The buffer time happens automatically between sessions but doesn't appear on their booking screen.
**Without buffer** (back-to-back):
* 3:00-4:00 PM (Session 1)
* 4:00-5:00 PM (Session 2)
* 5:00-6:00 PM (Session 3)
**With 15-min buffer**:
* 3:00-4:00 PM (Session 1)
* 4:15-5:15 PM (Session 2)
* 5:30-6:30 PM (Session 3)
**Result**: Proper spacing, no burnout, accommodation for sessions running over.
**Verify**: Your availability end time accounts for buffer after last session. If last session starts at 7:00 PM (60 min) + 15 min buffer = need availability until 8:15 PM.
## Step 8: Set scheduling windows (optional)
Control how far in advance (or how last-minute) athletes can book.
**Setting**: Earliest time before session when booking is allowed
**Options**:
* No minimum - Can book right up to start time
* 1 hour - Must book at least 1 hour before
* 4 hours - Must book at least 4 hours before
* 24 hours - Must book at least 24 hours before
* 48 hours - Must book at least 48 hours before
**Recommended for first scheduler**: **No minimum** OR **4 hours**
**Why use minimum notice**:
* Prevents last-minute bookings when you can't prepare
* Ensures you see bookings before they happen
* Reduces stress of surprise bookings
**Why skip minimum notice**:
* Maximizes booking flexibility
* Good for urgent/emergency sessions
* Simpler for athletes
**Start flexible, add restrictions later**: Begin with no minimum and add restrictions only if last-minute bookings become problematic.
**Setting**: How far in the future athletes can book
**Options**:
* No limit - Can book months/years ahead
* 30 days - Can only book within next month
* 60 days - Can book up to 2 months ahead
* 90 days - Can book up to 3 months ahead
**Recommended for first scheduler**: **30-60 days** OR **No limit**
**Why use maximum window**:
* Prevents schedule from filling too far out
* Allows flexibility to adjust pricing/availability
* Keeps bookings manageable
**Why skip maximum window**:
* Accommodates athletes who plan far ahead
* Good for seasonal businesses
* Maximizes booking opportunities
**Most coaches**: Either set no limit or 30-60 days. Very few use shorter windows unless there's specific reason.
## Step 9: Configure reminders (optional but valuable)
Set up automated notifications before sessions to reduce no-shows.
Look for **Reminders** toward the bottom of the scheduler settings
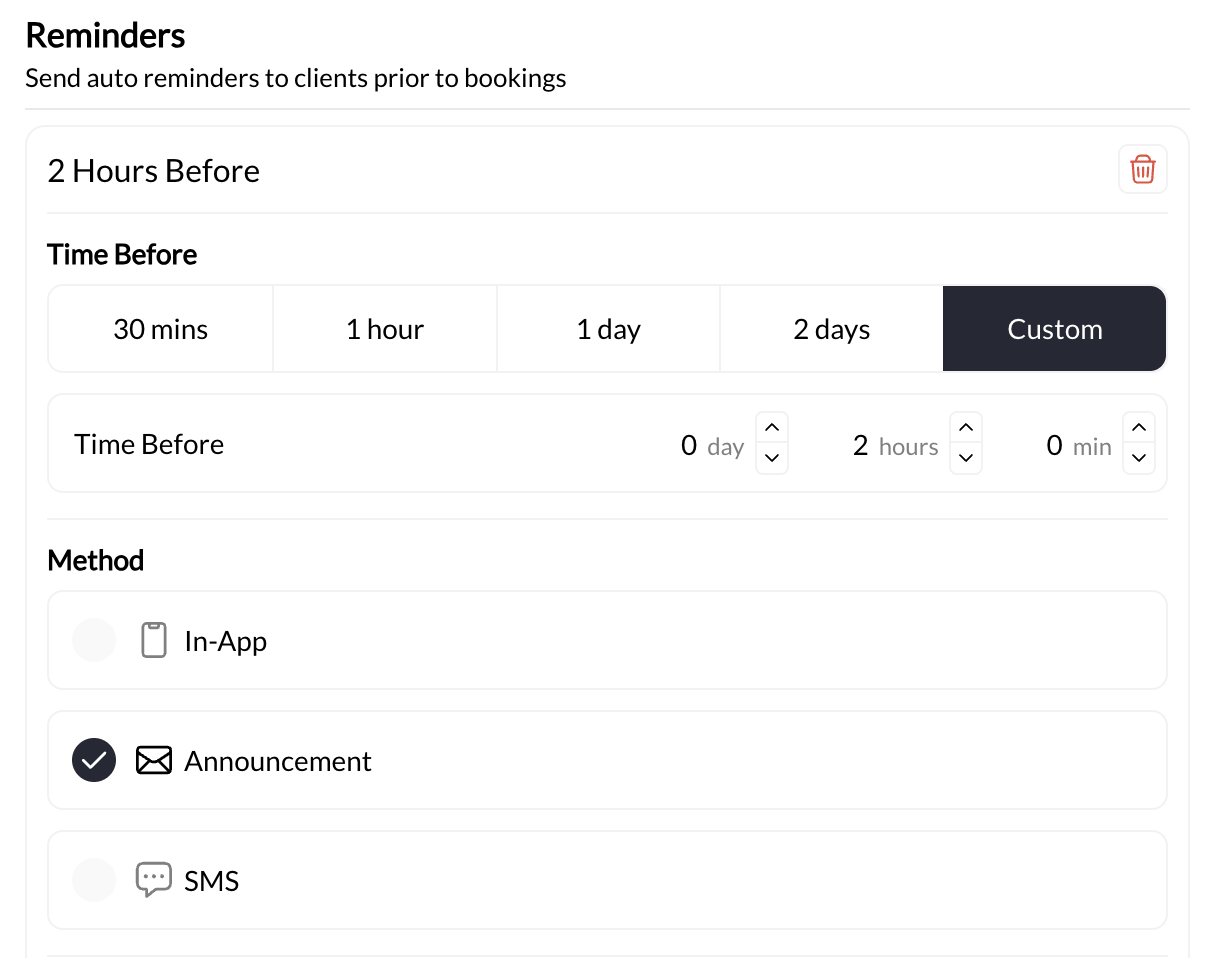 Choose when reminder is sent before session:
* **30 minutes** - Last-minute reminder
* **1 hour** - Short-notice reminder
* **2 hours** - Moderate notice
* **1 day** - Day-before reminder (most common)
* **2 days** - Advance notice
* **Custom** - Any timing you specify
**Recommended for first scheduler**: **1 day before** (24 hours)
**Why**: Gives athletes enough time to cancel or prepare, without being too early to forget again.
**Multiple reminders**: Some coaches set both 1-day and 1-hour reminders for important sessions. Start with just one for simplicity.
How athletes receive the reminder:
* **In-App** - Notification in CoachIQ app/portal and inbox
* **Announcement/Email** - Sent to athlete's email and in-app announcement feed
* **SMS** - Text message to athlete's phone (SMS rates apply)
**Recommended for first scheduler**: **Announcement/Email**
**Why**: Maximum reach without SMS costs, covers both app users and email checkers.
Some systems let you customize the reminder text:
**Default message** works fine:
> "Reminder: You have a session tomorrow at 3:00 PM with Coach Mike"
**Custom message** example:
> "Your training session is tomorrow at 3:00 PM! Please bring your workout gear, water bottle, and be ready to work. See you soon!"
**Start with default**: Custom messages are nice-to-have, not critical for first scheduler. Default messages work perfectly well.
## Step 10: Add location (optional)
Specify where this session takes place.
Find **Location:**
Choose when reminder is sent before session:
* **30 minutes** - Last-minute reminder
* **1 hour** - Short-notice reminder
* **2 hours** - Moderate notice
* **1 day** - Day-before reminder (most common)
* **2 days** - Advance notice
* **Custom** - Any timing you specify
**Recommended for first scheduler**: **1 day before** (24 hours)
**Why**: Gives athletes enough time to cancel or prepare, without being too early to forget again.
**Multiple reminders**: Some coaches set both 1-day and 1-hour reminders for important sessions. Start with just one for simplicity.
How athletes receive the reminder:
* **In-App** - Notification in CoachIQ app/portal and inbox
* **Announcement/Email** - Sent to athlete's email and in-app announcement feed
* **SMS** - Text message to athlete's phone (SMS rates apply)
**Recommended for first scheduler**: **Announcement/Email**
**Why**: Maximum reach without SMS costs, covers both app users and email checkers.
Some systems let you customize the reminder text:
**Default message** works fine:
> "Reminder: You have a session tomorrow at 3:00 PM with Coach Mike"
**Custom message** example:
> "Your training session is tomorrow at 3:00 PM! Please bring your workout gear, water bottle, and be ready to work. See you soon!"
**Start with default**: Custom messages are nice-to-have, not critical for first scheduler. Default messages work perfectly well.
## Step 10: Add location (optional)
Specify where this session takes place.
Find **Location:**
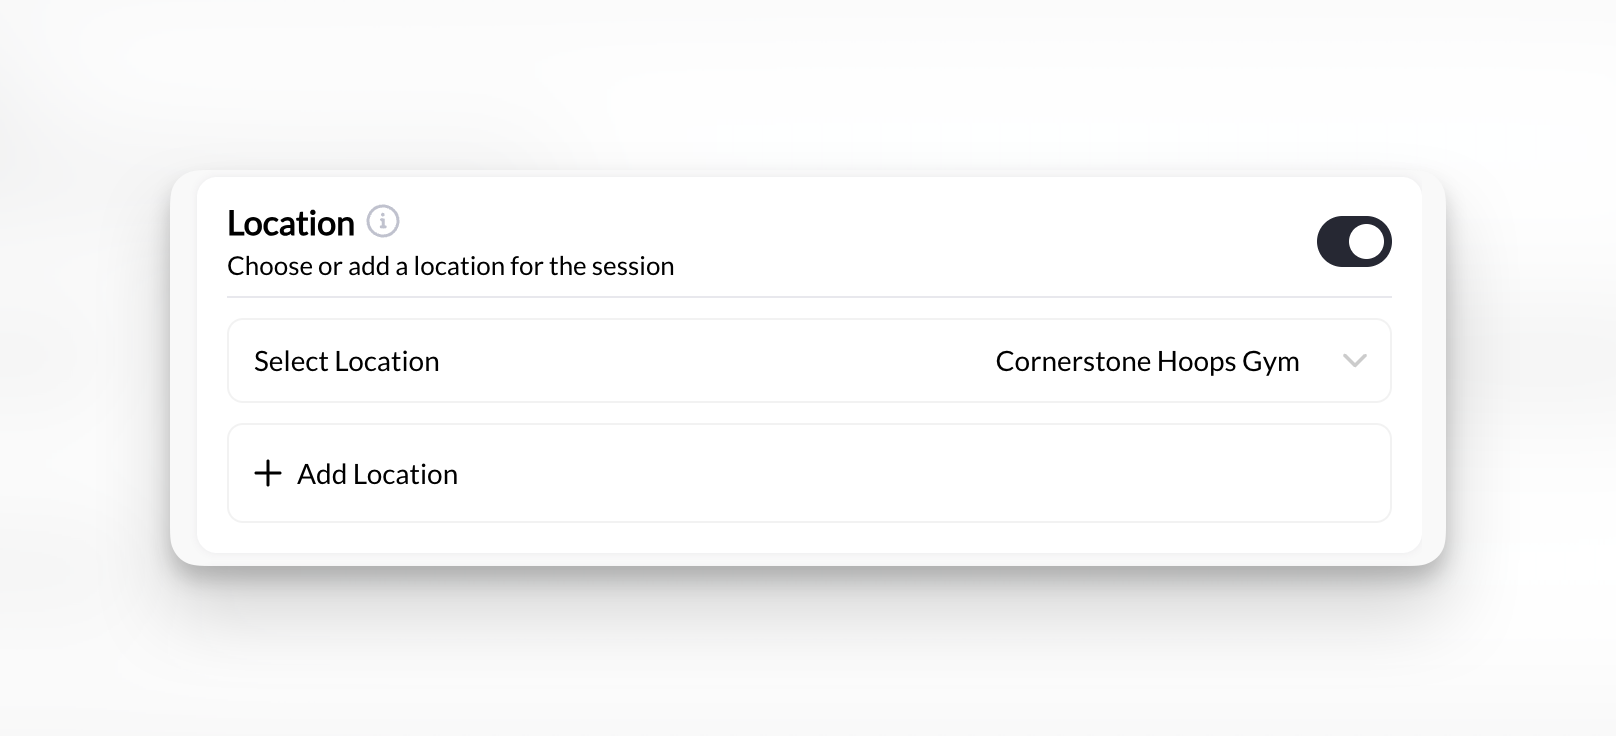 **If location exists**:
* Select from dropdown of existing locations
**If creating new location**:
1. Click **Add New Location**
2. Enter location name (ex: "Main Training Facility")
3. Enter address (optional but helpful for athletes)
4. Add notes (ex: "Use side entrance, check in at front desk")
5. Save location
**Virtual sessions**: If sessions are virtual, create location called "Virtual Session" or "Online via Zoom" with video link in notes.
Some schedulers may not need location:
* Video analysis (you watch film together remotely)
* Programming consultation (virtual)
* Flexible location (meet at athlete's preferred gym)
Toggle "No specific location" if applicable.
## Step 11: Assign coaches (if applicable)
Specify which coach(es) deliver this scheduler.
Look for **Connected Coaches**
**If location exists**:
* Select from dropdown of existing locations
**If creating new location**:
1. Click **Add New Location**
2. Enter location name (ex: "Main Training Facility")
3. Enter address (optional but helpful for athletes)
4. Add notes (ex: "Use side entrance, check in at front desk")
5. Save location
**Virtual sessions**: If sessions are virtual, create location called "Virtual Session" or "Online via Zoom" with video link in notes.
Some schedulers may not need location:
* Video analysis (you watch film together remotely)
* Programming consultation (virtual)
* Flexible location (meet at athlete's preferred gym)
Toggle "No specific location" if applicable.
## Step 11: Assign coaches (if applicable)
Specify which coach(es) deliver this scheduler.
Look for **Connected Coaches**
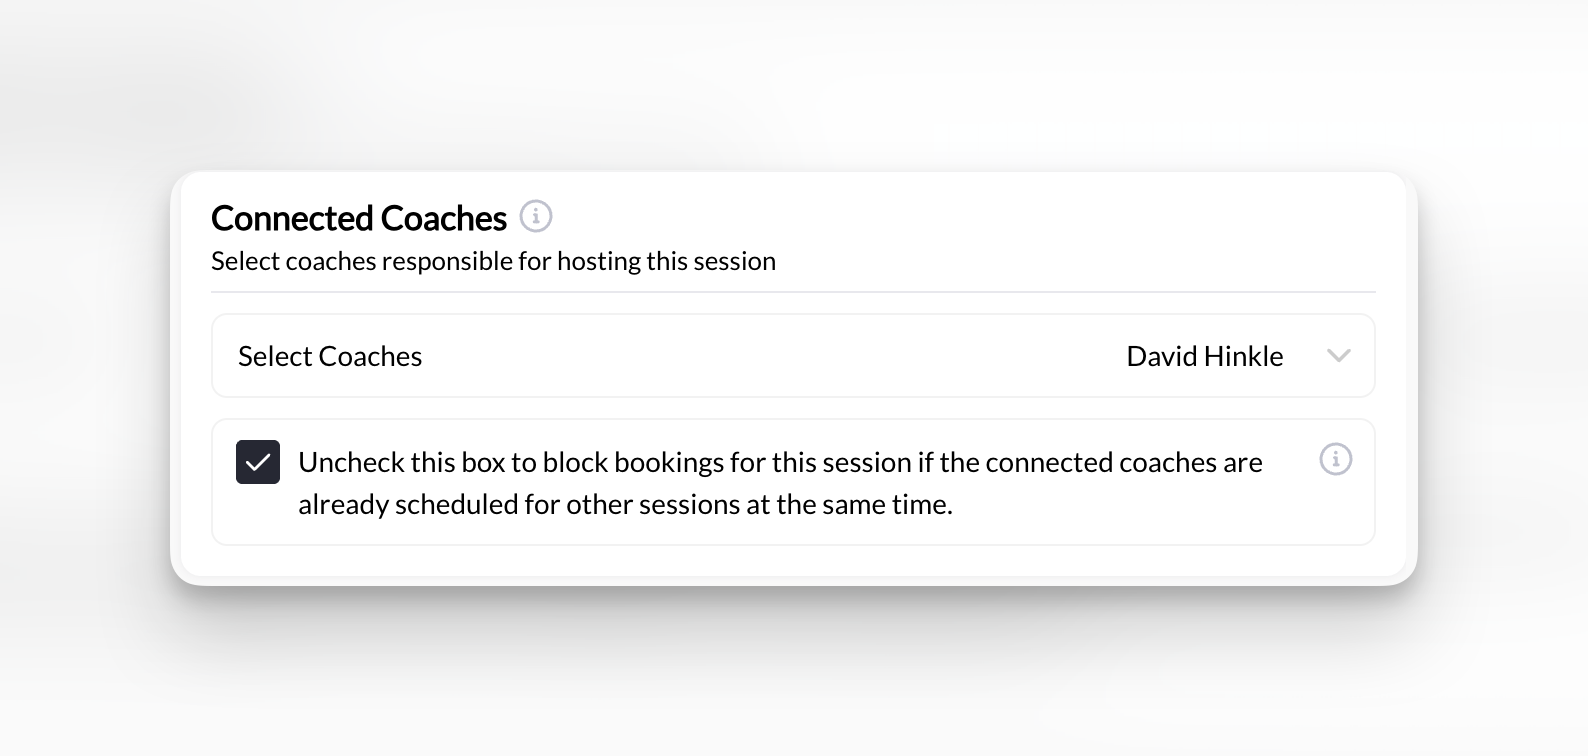 **Solo coach**: Select yourself
**Multi-coach facility**:
* Select specific coach if this scheduler is coach-specific
* Select multiple coaches if any can deliver this session
**If you're solo**: You can skip this section or select yourself. Most solo coaches leave this at default.
**Setting**: Can this coach be booked for multiple sessions at same time?
**Options**:
* **No** - Prevent double-booking (recommended)
* **Yes** - Allow overlapping bookings (only for group sessions where coach leads multiple)
**Recommended**: **No** (prevent double-booking) unless you specifically need overlap for group classes.
## Step 12: Review and save
Final checks before activating your scheduler.
Scroll through the entire scheduler and verify:
**Basic Details**:
* ✅ Name is clear and descriptive
* ✅ Description is compelling
* ✅ Duration is correct
**Availability**:
* ✅ Days and times match your schedule
* ✅ Blackout days added for known time off
* ✅ End time accounts for buffer after last session
**Payment**:
* ✅ Payment type matches intent (free/paid/credits)
* ✅ Price is correct
* ✅ Product connected (if direct payment)
**Capacity**:
* ✅ Max athletes setting matches session format
* ✅ Group vs private is correct
**Optional Settings**:
* ✅ Buffer time set (15 min recommended)
* ✅ Booking rules configured (if needed)
* ✅ Reminders enabled (1 day before recommended)
* ✅ Location added (if needed)
Click \*\*Create \*\*in the top right hand corner
**Success!** Your scheduler is now created and will start generating bookable time slots.
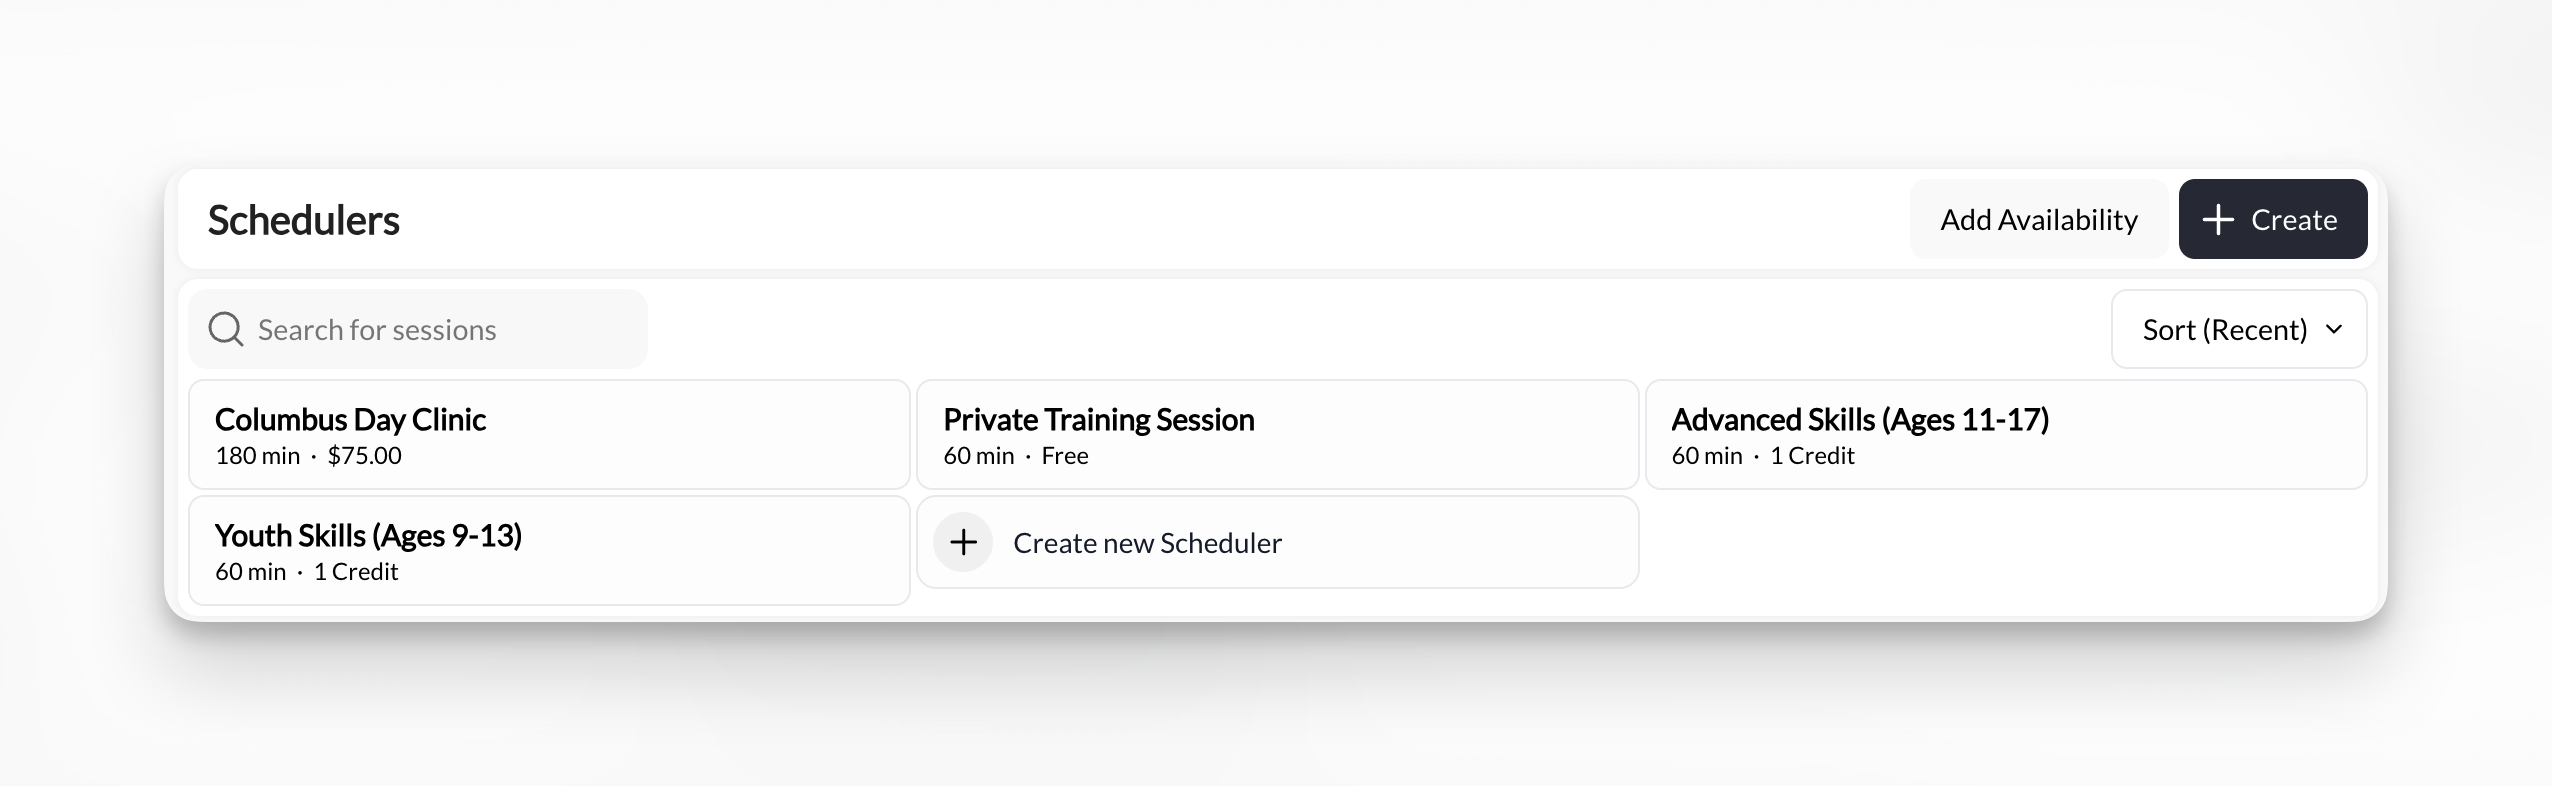
After saving, you'll be taken to the Schedulers list.
Find your newly created scheduler and note:
* Scheduler name
* Duration (mins)
* Cost per session (free, price, credit charge)
* Booking link
**Solo coach**: Select yourself
**Multi-coach facility**:
* Select specific coach if this scheduler is coach-specific
* Select multiple coaches if any can deliver this session
**If you're solo**: You can skip this section or select yourself. Most solo coaches leave this at default.
**Setting**: Can this coach be booked for multiple sessions at same time?
**Options**:
* **No** - Prevent double-booking (recommended)
* **Yes** - Allow overlapping bookings (only for group sessions where coach leads multiple)
**Recommended**: **No** (prevent double-booking) unless you specifically need overlap for group classes.
## Step 12: Review and save
Final checks before activating your scheduler.
Scroll through the entire scheduler and verify:
**Basic Details**:
* ✅ Name is clear and descriptive
* ✅ Description is compelling
* ✅ Duration is correct
**Availability**:
* ✅ Days and times match your schedule
* ✅ Blackout days added for known time off
* ✅ End time accounts for buffer after last session
**Payment**:
* ✅ Payment type matches intent (free/paid/credits)
* ✅ Price is correct
* ✅ Product connected (if direct payment)
**Capacity**:
* ✅ Max athletes setting matches session format
* ✅ Group vs private is correct
**Optional Settings**:
* ✅ Buffer time set (15 min recommended)
* ✅ Booking rules configured (if needed)
* ✅ Reminders enabled (1 day before recommended)
* ✅ Location added (if needed)
Click \*\*Create \*\*in the top right hand corner
**Success!** Your scheduler is now created and will start generating bookable time slots.
After saving, you'll be taken to the Schedulers list.
Find your newly created scheduler and note:
* Scheduler name
* Duration (mins)
* Cost per session (free, price, credit charge)
* Booking link
 ## Step 13: Test your scheduler
**Critical step**: Always test your scheduler before sharing with athletes. This catches configuration errors before they cause problems.
From the Schedulers list:
1. Hover over your new scheduler
2. Look for **Copy Link** button
3. Copy the link
## Step 13: Test your scheduler
**Critical step**: Always test your scheduler before sharing with athletes. This catches configuration errors before they cause problems.
From the Schedulers list:
1. Hover over your new scheduler
2. Look for **Copy Link** button
3. Copy the link
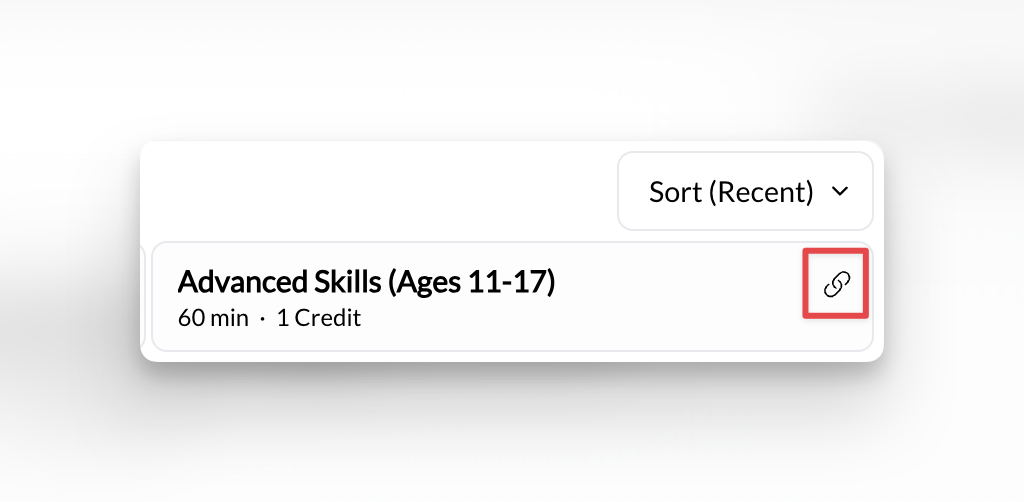 Paste the link into a new browser tab (or incognito window to see unauthenicated view).
**What you should see**:
* Scheduler name and description
* Price or credit cost
* Duration clearly stated
* Available time slots listed
* Booking button or time selection
Paste the link into a new browser tab (or incognito window to see unauthenicated view).
**What you should see**:
* Scheduler name and description
* Price or credit cost
* Duration clearly stated
* Available time slots listed
* Booking button or time selection
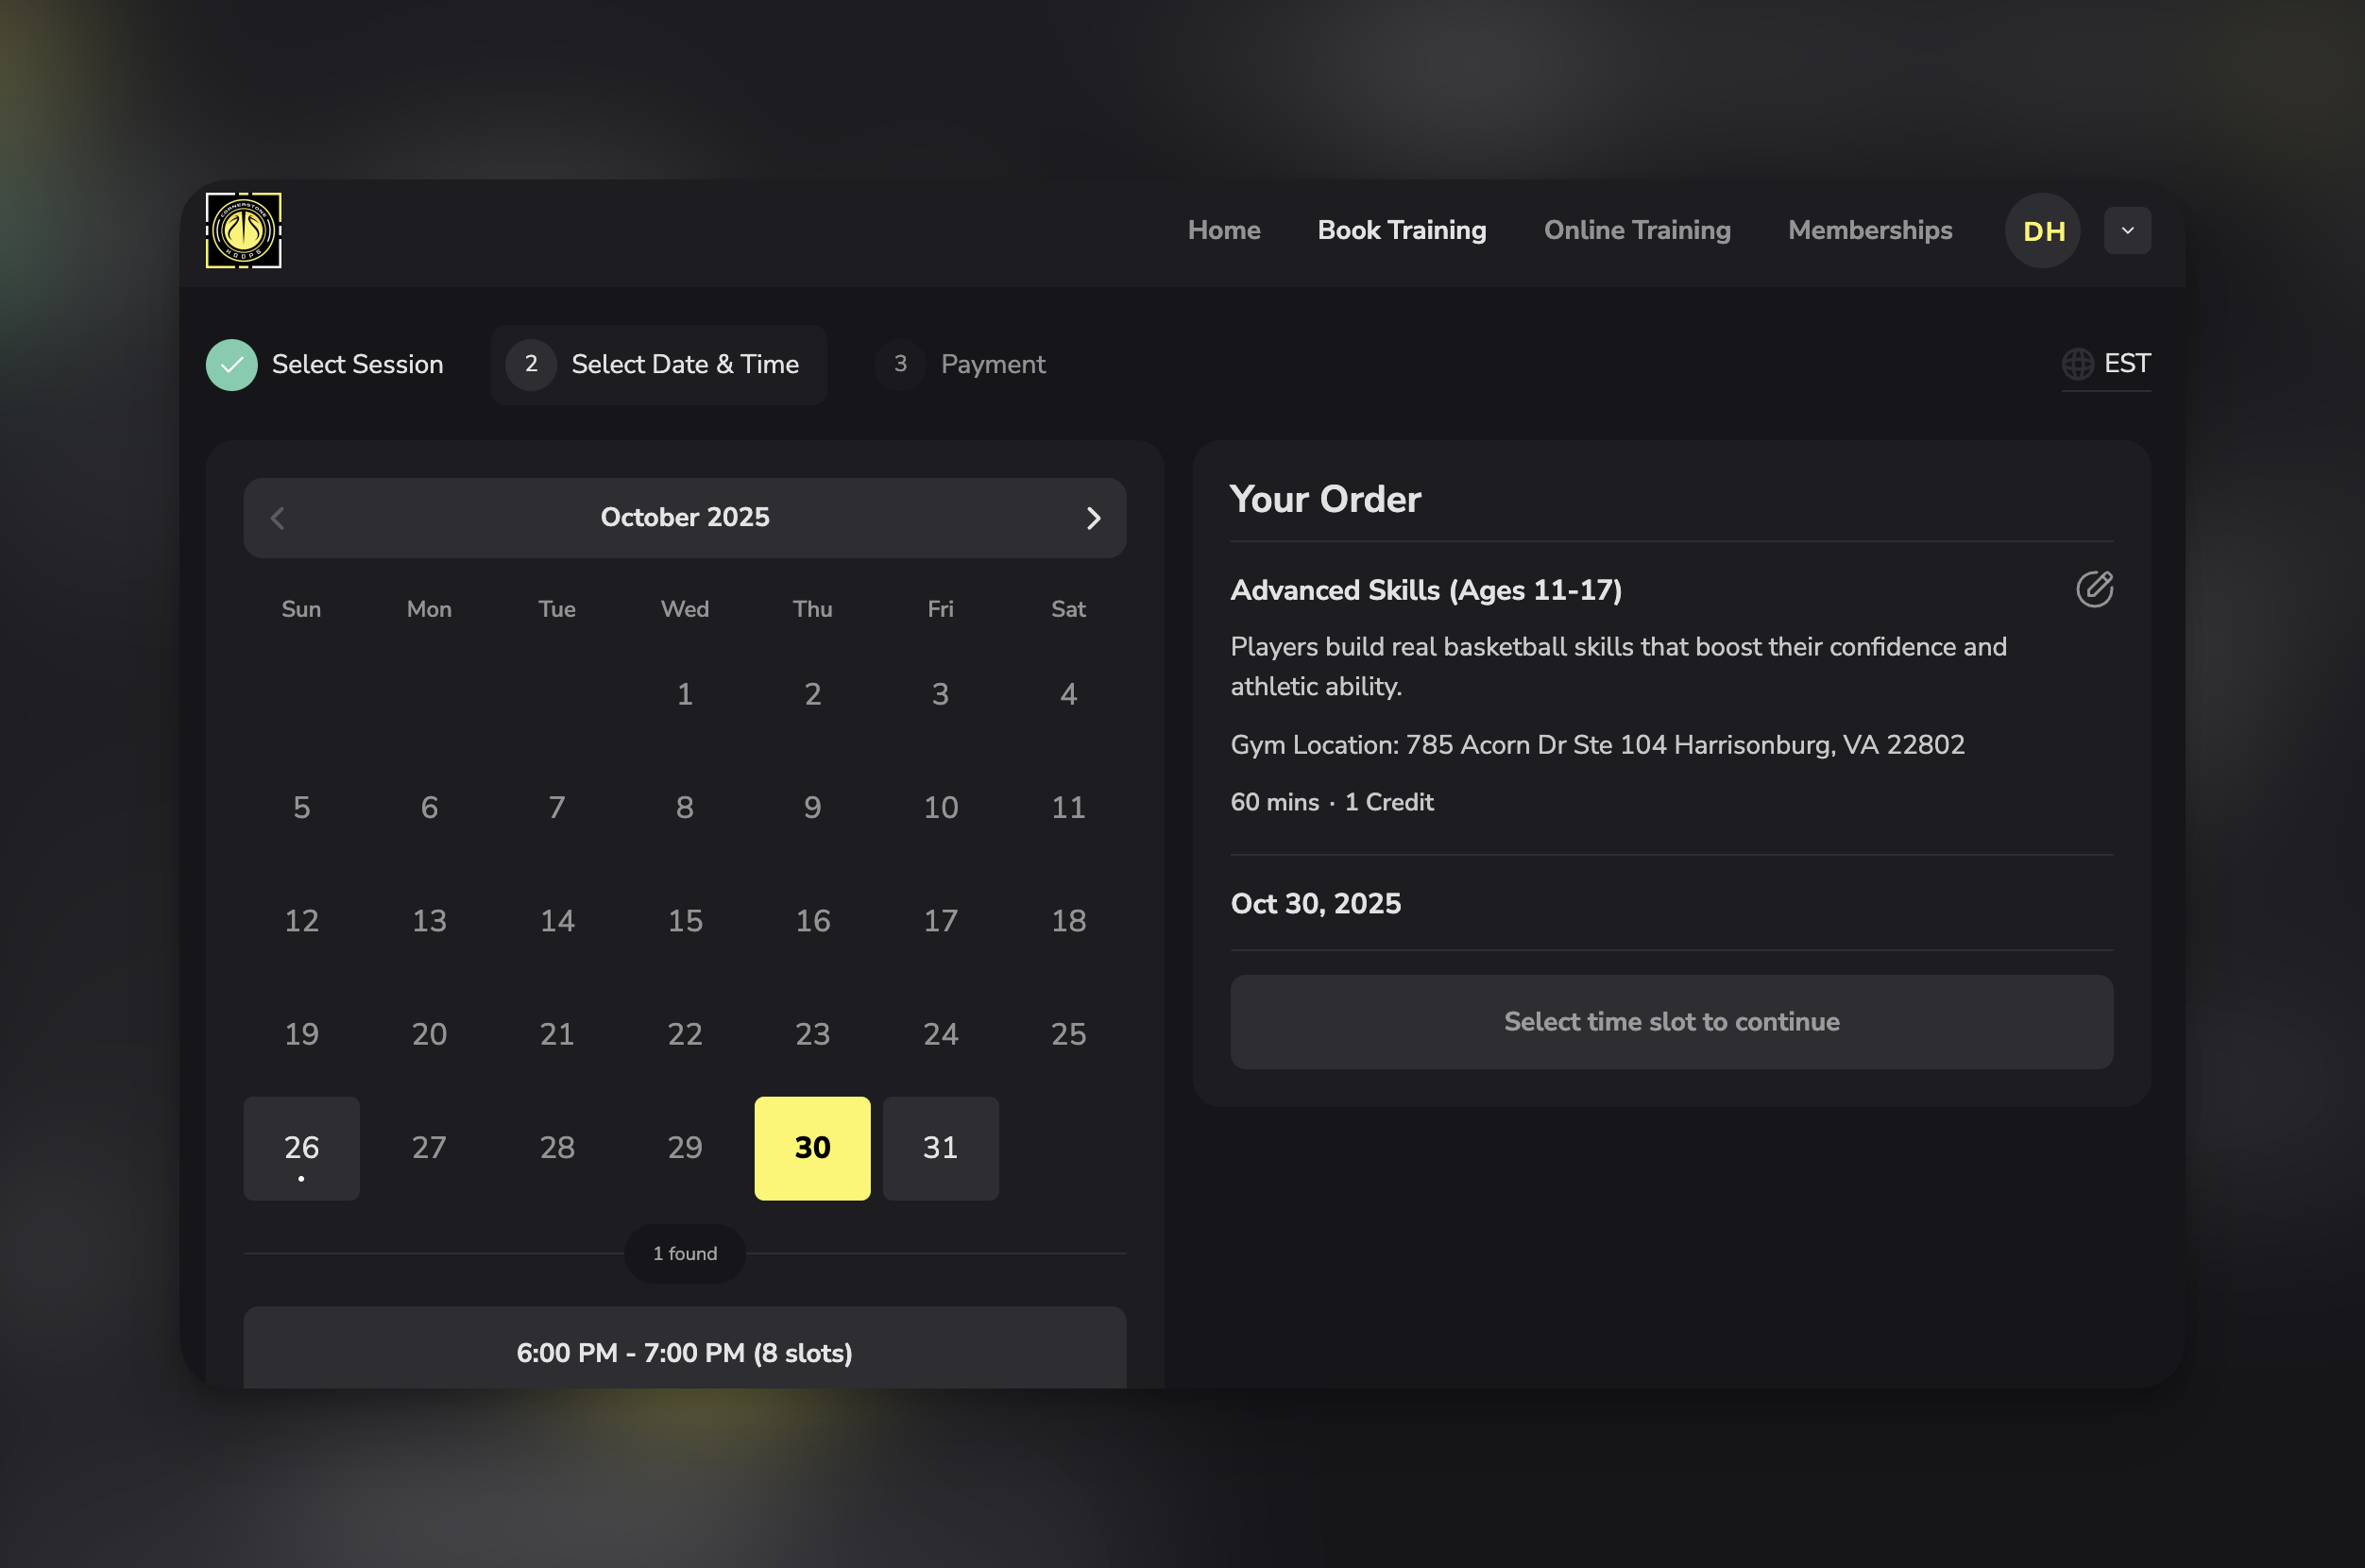 Check that:
* ✅ Days match your availability configuration
* ✅ Times are correct (not AM when you meant PM)
* ✅ Proper number of slots appear
* ✅ Slots are spaced correctly (accounting for buffer time)
* ✅ No inappropriate times showing
**If no slots appear**: Your availability isn't configured correctly. Go back and verify availability days/times are set, and date range extends into the future.
If you have a test athlete account:
1. Select an available time slot
2. Go through the booking process
3. Complete payment or credit redemption
4. Verify booking confirmation appears
5. Check that session appears on your calendar
**If you don't have test athlete**:
* At minimum, verify slot selection works
* Check that booking button appears
* Verify payment/credit information displays correctly
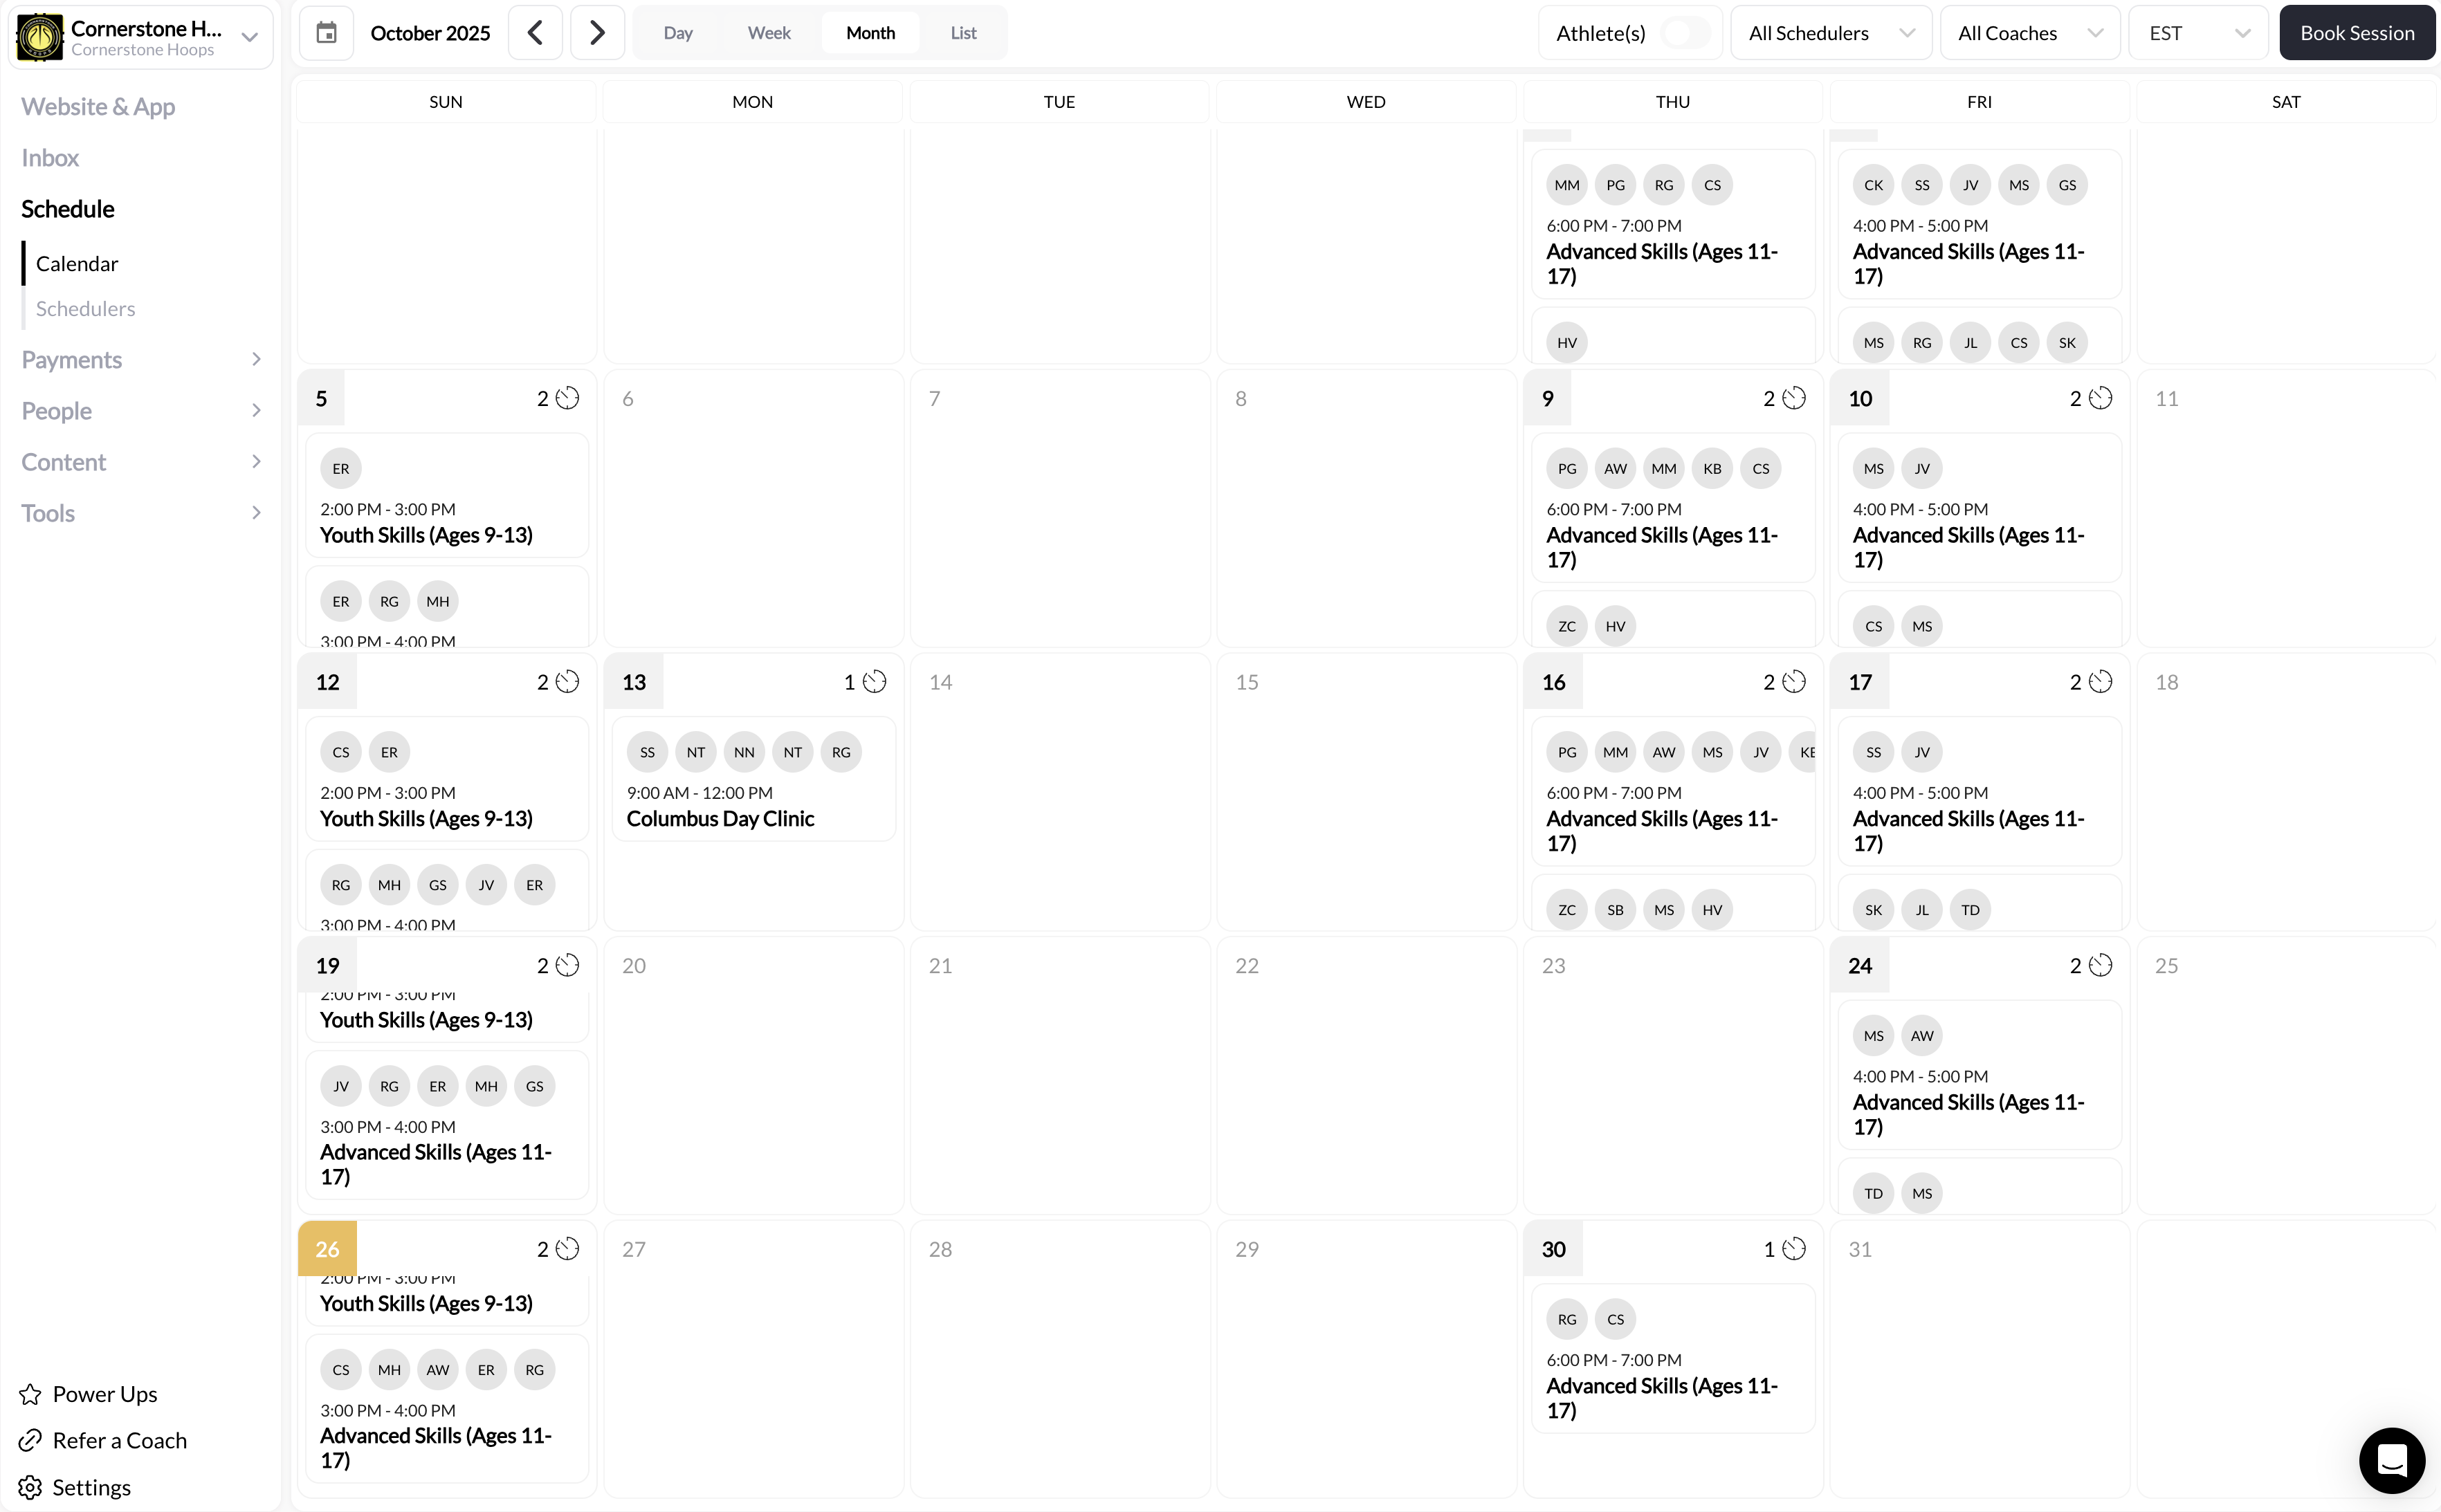
Navigate to **Schedule → Calendar**:
* ✅ Test booking appears (if you completed test)
* ✅ Time displays correctly
* ✅ Scheduler name shows on booking
Check that:
* ✅ Days match your availability configuration
* ✅ Times are correct (not AM when you meant PM)
* ✅ Proper number of slots appear
* ✅ Slots are spaced correctly (accounting for buffer time)
* ✅ No inappropriate times showing
**If no slots appear**: Your availability isn't configured correctly. Go back and verify availability days/times are set, and date range extends into the future.
If you have a test athlete account:
1. Select an available time slot
2. Go through the booking process
3. Complete payment or credit redemption
4. Verify booking confirmation appears
5. Check that session appears on your calendar
**If you don't have test athlete**:
* At minimum, verify slot selection works
* Check that booking button appears
* Verify payment/credit information displays correctly
Navigate to **Schedule → Calendar**:
* ✅ Test booking appears (if you completed test)
* ✅ Time displays correctly
* ✅ Scheduler name shows on booking
 **Testing complete**: Your scheduler is working correctly and ready for real athlete bookings.
## Troubleshooting common creation issues
**Possible causes**:
* Required fields not completed
* Invalid data in fields (negative numbers, etc.)
* System validation error
**How to fix**:
1. Scroll through entire form
2. Look for red error messages or highlighted fields
3. Most common missing items:
* Scheduler name
* Duration
* Availability (no days/times set)
* Payment configuration incomplete
4. Complete all required fields marked with \* or red indicators
5. Try saving again
**Most common issue** for new schedulers!
**Possible causes**:
1. **Connected coach already booked elsewhere** - If the coach assigned to this scheduler has sessions booked through other schedulers at those times, slots won't appear (this is double-booking prevention working correctly)
2. **No availability set** - Forgot to add days/times
3. **Availability in past** - End date already passed
4. **All dates blocked** - Blackout days covering everything
5. **Buffer time too long** - Consuming entire availability window
**How to fix**:
* **Check for coach conflicts first**: Go to Schedule → Calendar and check if the connected coach has existing sessions during the times you expect to see availability
* Edit scheduler → Availability section
* Verify days are checked
* Verify time ranges are set
* Verify date range includes future dates
* Check blackout days aren't blocking everything
* Calculate: (Availability hours) ÷ (Duration + Buffer) = Expected slots
* Example: 5 hours ÷ 1.25 hours (60 min + 15 min) = 4 slots expected
**Quick test**: Remove all buffer time temporarily. If slots appear, buffer was consuming availability. Adjust accordingly.
For detailed troubleshooting, see [Why Aren't My Sessions Showing Up?](/help-center/helping-your-athlete/sessions-not-showing)
**Issue**: Slots showing 3:00 AM when you meant 3:00 PM
**Cause**: 12/24-hour time format confusion
**How to fix**:
* Edit scheduler → Availability
* Check all time fields
* Verify AM/PM selections
* Or switch to 24-hour format (15:00 instead of 3:00 PM) if available
* Save and re-test
**Issue**: Product dropdown is empty or not connecting
**Possible causes**:
1. No products exist yet
2. Product type mismatch (looking for one-time, only subscriptions exist)
3. Payment processor not connected
**How to fix**:
1. Go to **Payments → Products**
2. Verify products exist
3. Create new product if needed:
* Name: Match your scheduler name
* Type: One-time purchase (for direct payment)
* Price: Match your intended rate
4. Return to scheduler builder
5. Select newly created product
**Issue**: Booking button disabled or error when athlete tries to book
**Possible causes**:
1. Insufficient credits (if credit-based)
2. Payment processing error (if direct payment)
3. Capacity full (unlikely for brand new scheduler)
4. Booking limits reached (if configured)
**How to debug**:
* Test as athlete (what error message appears?)
* Verify payment processing is set up
* Check if test athlete has credits (if credit-based)
* Review booking limit settings
* Check scheduler status (Active/Published?)
## What to do after creating your first scheduler
Copy your booking link and share via:
* Email to current athletes
* Social media
* Website embedding
* SMS/messaging apps
Now that you've created one, add more:
* Different durations (30 min, 90 min)
* Different formats (group sessions vs private sessions)
* Different services (assessments, consultations)
If you started with FREE, add payment:
* Edit your scheduler
* Change to direct payment or credits
* Connect products
* Test purchase flow
As you add more schedulers, organize them:
* Use program groupings
* Create logical categories
* Improve athlete booking experience by keeping things simple and clean
## Related articles
Understand scheduler concepts before creating
Set up availability before creating schedulers
View and manage your booked sessions
Book athletes directly into sessions
Fix scheduler and availability problems
**Questions about scheduler configuration?** Our support team can help you set up schedulers optimized for your coaching business. [Contact Support](https://coachiq.com/support)
**Testing complete**: Your scheduler is working correctly and ready for real athlete bookings.
## Troubleshooting common creation issues
**Possible causes**:
* Required fields not completed
* Invalid data in fields (negative numbers, etc.)
* System validation error
**How to fix**:
1. Scroll through entire form
2. Look for red error messages or highlighted fields
3. Most common missing items:
* Scheduler name
* Duration
* Availability (no days/times set)
* Payment configuration incomplete
4. Complete all required fields marked with \* or red indicators
5. Try saving again
**Most common issue** for new schedulers!
**Possible causes**:
1. **Connected coach already booked elsewhere** - If the coach assigned to this scheduler has sessions booked through other schedulers at those times, slots won't appear (this is double-booking prevention working correctly)
2. **No availability set** - Forgot to add days/times
3. **Availability in past** - End date already passed
4. **All dates blocked** - Blackout days covering everything
5. **Buffer time too long** - Consuming entire availability window
**How to fix**:
* **Check for coach conflicts first**: Go to Schedule → Calendar and check if the connected coach has existing sessions during the times you expect to see availability
* Edit scheduler → Availability section
* Verify days are checked
* Verify time ranges are set
* Verify date range includes future dates
* Check blackout days aren't blocking everything
* Calculate: (Availability hours) ÷ (Duration + Buffer) = Expected slots
* Example: 5 hours ÷ 1.25 hours (60 min + 15 min) = 4 slots expected
**Quick test**: Remove all buffer time temporarily. If slots appear, buffer was consuming availability. Adjust accordingly.
For detailed troubleshooting, see [Why Aren't My Sessions Showing Up?](/help-center/helping-your-athlete/sessions-not-showing)
**Issue**: Slots showing 3:00 AM when you meant 3:00 PM
**Cause**: 12/24-hour time format confusion
**How to fix**:
* Edit scheduler → Availability
* Check all time fields
* Verify AM/PM selections
* Or switch to 24-hour format (15:00 instead of 3:00 PM) if available
* Save and re-test
**Issue**: Product dropdown is empty or not connecting
**Possible causes**:
1. No products exist yet
2. Product type mismatch (looking for one-time, only subscriptions exist)
3. Payment processor not connected
**How to fix**:
1. Go to **Payments → Products**
2. Verify products exist
3. Create new product if needed:
* Name: Match your scheduler name
* Type: One-time purchase (for direct payment)
* Price: Match your intended rate
4. Return to scheduler builder
5. Select newly created product
**Issue**: Booking button disabled or error when athlete tries to book
**Possible causes**:
1. Insufficient credits (if credit-based)
2. Payment processing error (if direct payment)
3. Capacity full (unlikely for brand new scheduler)
4. Booking limits reached (if configured)
**How to debug**:
* Test as athlete (what error message appears?)
* Verify payment processing is set up
* Check if test athlete has credits (if credit-based)
* Review booking limit settings
* Check scheduler status (Active/Published?)
## What to do after creating your first scheduler
Copy your booking link and share via:
* Email to current athletes
* Social media
* Website embedding
* SMS/messaging apps
Now that you've created one, add more:
* Different durations (30 min, 90 min)
* Different formats (group sessions vs private sessions)
* Different services (assessments, consultations)
If you started with FREE, add payment:
* Edit your scheduler
* Change to direct payment or credits
* Connect products
* Test purchase flow
As you add more schedulers, organize them:
* Use program groupings
* Create logical categories
* Improve athlete booking experience by keeping things simple and clean
## Related articles
Understand scheduler concepts before creating
Set up availability before creating schedulers
View and manage your booked sessions
Book athletes directly into sessions
Fix scheduler and availability problems
**Questions about scheduler configuration?** Our support team can help you set up schedulers optimized for your coaching business. [Contact Support](https://coachiq.com/support)