> ## Documentation Index
> Fetch the complete documentation index at: https://help.coachiq.io/llms.txt
> Use this file to discover all available pages before exploring further.
# Send an Email from the Inbox
> Send a formatted email from CoachIQ with Blank, Branded, or Spotlight designs, your logo, and editable headers and footers.
Open **Inbox → Create New → Email** to write a message with a subject line and send it to an email address. Use it for client check-ins, session follow-ups, and updates that need more formatting than a text message.
## Choose the right message type
| Message type | Use it for |
| - | - |
| [In-app messages](/inbox/in-app-messages) | Conversations with athletes and parents in CoachIQ |
| [SMS](/inbox/sms-messages) | Text messages to a phone number |
| [Announcements](/inbox/announcements) | Group updates that also appear in the app |
| Email | A formatted email with its own subject and design |
A [professional email address](/inbox/professional-email), such as [coach@yourbusiness.com](mailto:coach@yourbusiness.com), is your business mailbox. It is separate from choosing the Email channel or a branded design in CoachIQ.
## Send your first email
Open **Inbox**, click **Create New**, then select **Email** from the channel choices across the top.
In **Send to**, search for a person in your group or enter an email address. Review the selected recipients, then enter a clear **Subject**. The recipient does not need to use the CoachIQ app to receive email.
Write in the main editor. Use the toolbar for paragraph styles, bold, italic, text color, lists, and links. If you want clients to book or buy, include the relevant scheduler or product link in your message.
Open **Design** and choose Blank, Branded, or Spotlight. Review the subject, message, links, recipients, and any header/footer text before sending. The canvas shows the design you are editing; recipients' email apps may render spacing differently.
Click **Send** when the email is ready. If CoachIQ shows an error, follow the message before retrying. Do not assume that leaving the composer saved an unfinished draft.
 ## Choose Blank, Branded, or Spotlight
| Design | What it adds |
| - | - |
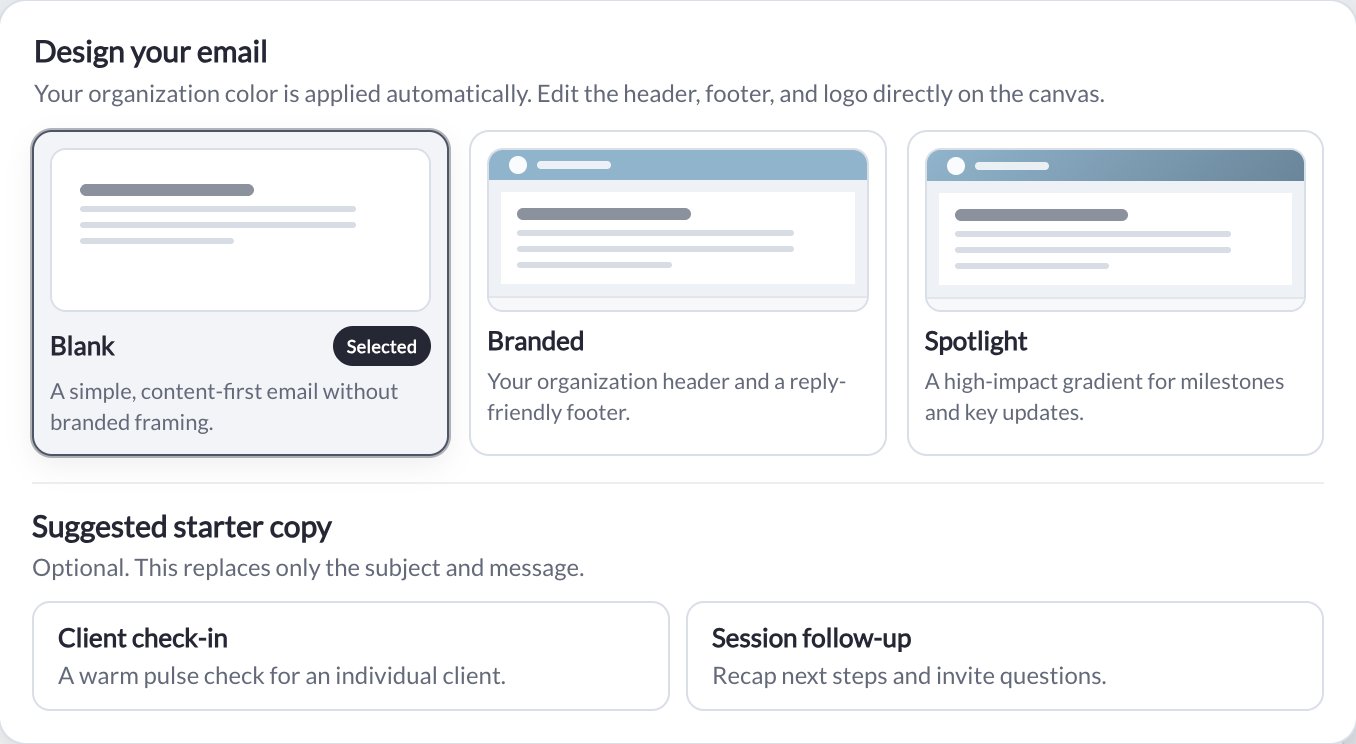
| **Blank** | A simple message without branded framing |
| **Branded** | A colored header and a footer with space for reply guidance |
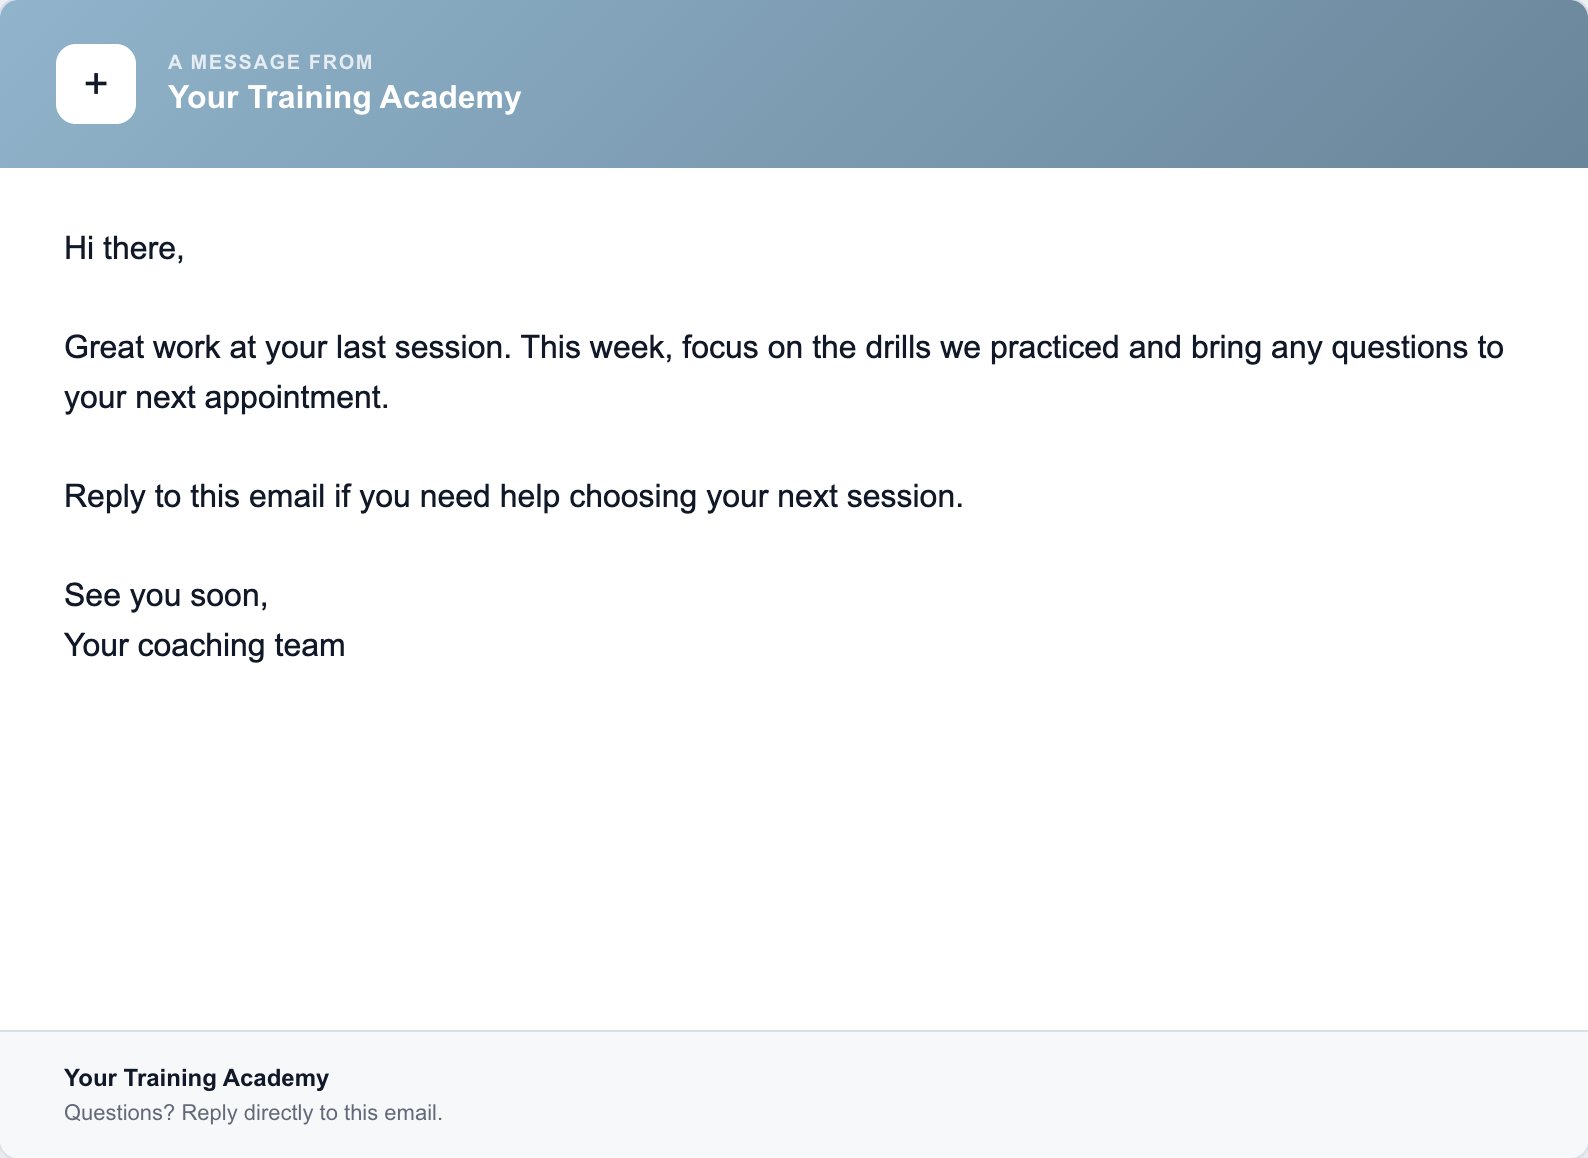
| **Spotlight** | A gradient header with an additional short heading above your title |
The **Design** menu also offers **Client check-in** and **Session follow-up** starter copy. These are optional and replace the subject and message, so choose them before writing your final text or review what they replace.
## Choose Blank, Branded, or Spotlight
| Design | What it adds |
| - | - |
| **Blank** | A simple message without branded framing |
| **Branded** | A colored header and a footer with space for reply guidance |
| **Spotlight** | A gradient header with an additional short heading above your title |
The **Design** menu also offers **Client check-in** and **Session follow-up** starter copy. These are optional and replace the subject and message, so choose them before writing your final text or review what they replace.
 ## Customize a branded email
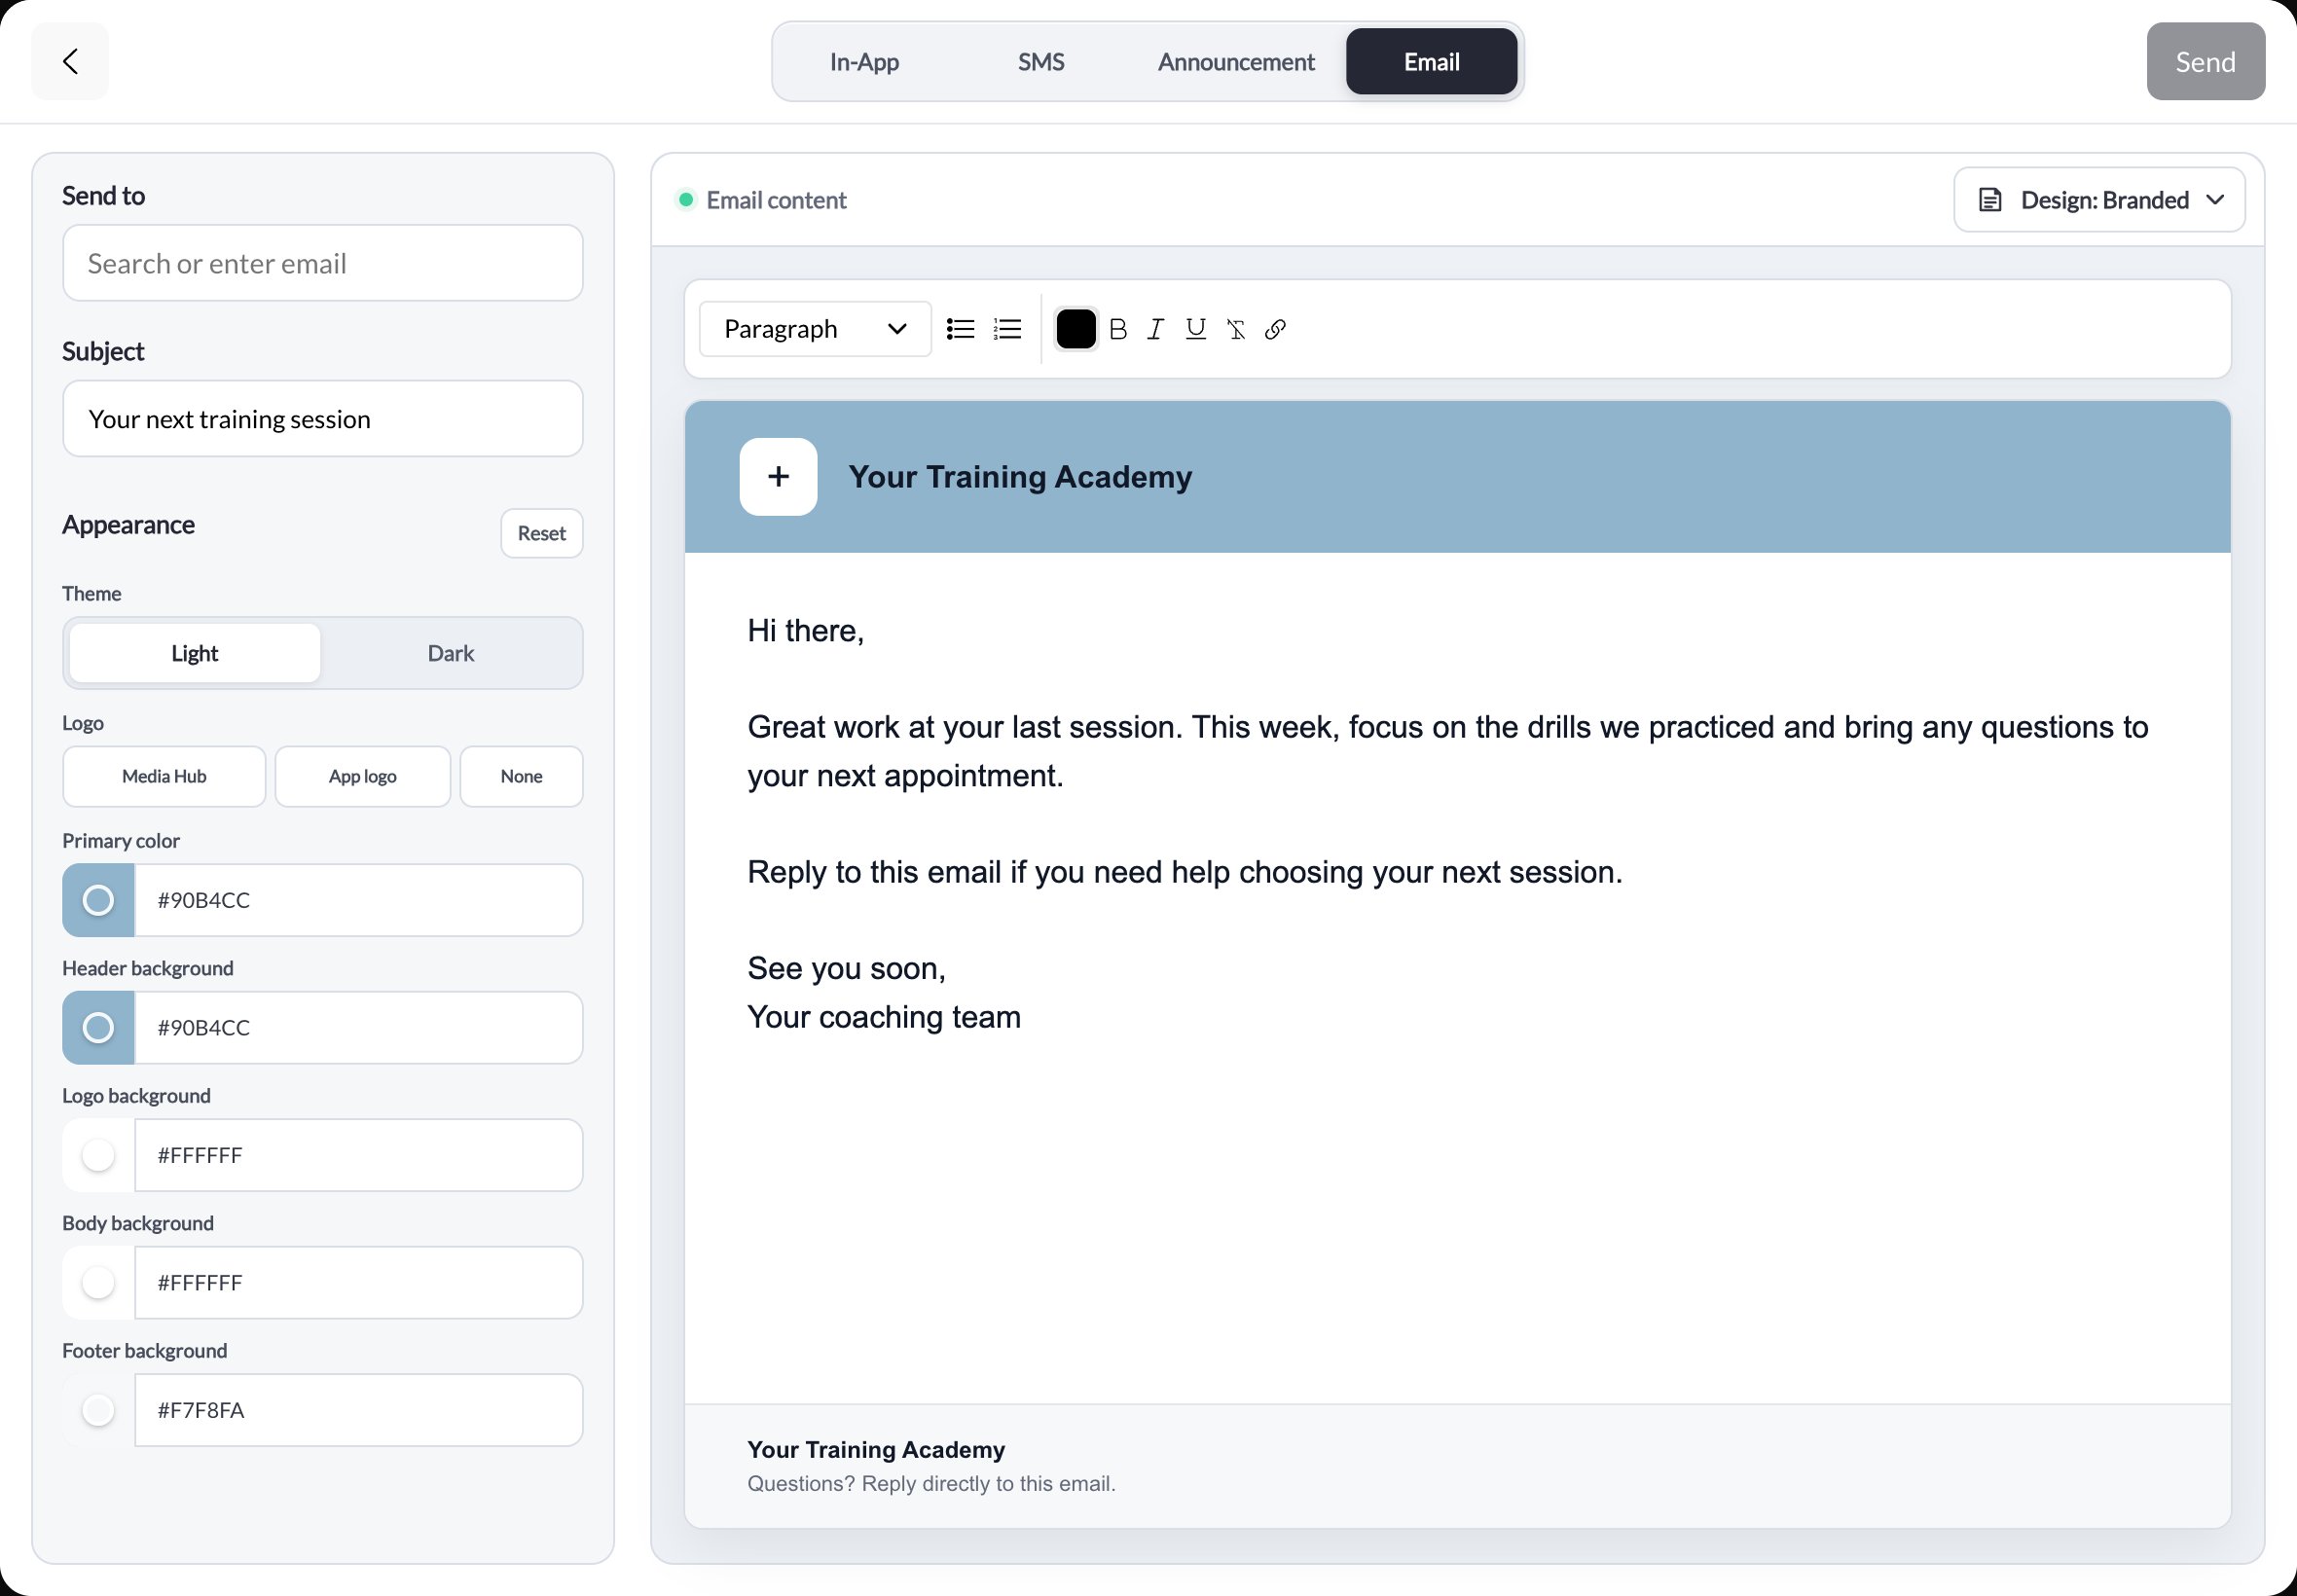
Choose **Branded** or **Spotlight** to show **Appearance** controls beside the canvas.
* **Theme:** choose Light or Dark.
* **Logo:** choose an image through **Media Hub**, use **App logo**, or select **None**. You can also use the logo control on the canvas.
* **Colors:** adjust the primary color and header, logo, body, and footer backgrounds using their color controls or hex values.
* **Header and footer:** click their text on the canvas to edit it. Spotlight also includes a short heading above the main header.
* **Reset:** restores the appearance defaults. Review the result before sending.
Your organization color supplies the starting design. Branded Inbox emails use the group's logo when available, falling back to the organization logo. An explicit logo choice or **None** takes precedence. Check your branding when switching groups.
## Customize a branded email
Choose **Branded** or **Spotlight** to show **Appearance** controls beside the canvas.
* **Theme:** choose Light or Dark.
* **Logo:** choose an image through **Media Hub**, use **App logo**, or select **None**. You can also use the logo control on the canvas.
* **Colors:** adjust the primary color and header, logo, body, and footer backgrounds using their color controls or hex values.
* **Header and footer:** click their text on the canvas to edit it. Spotlight also includes a short heading above the main header.
* **Reset:** restores the appearance defaults. Review the result before sending.
Your organization color supplies the starting design. Branded Inbox emails use the group's logo when available, falling back to the organization logo. An explicit logo choice or **None** takes precedence. Check your branding when switching groups.
 ## Check the audience before sending
Review the recipient count and any per-send limit shown in the confirmation. Limits can differ by your organization and message channel; they are separate from your messaging-credit balance and SMS character count. If the audience exceeds the displayed limit, narrow the recipient selection before sending. Do not assume every group has the same maximum.
## What email costs
Emails you write use your organization's messaging credits, the same balance that pays for texts. Each email address costs **0.1 credit**, so 10 emails use 1 credit. This covers Inbox emails, the email copies of announcements, and automation **Send an Email** actions, counting every address including CC and BCC. Automatic notifications, such as booking confirmations and receipts, stay free.
Check your balance and each send in **Settings → Communication → Credits**. See [How credits work](/inbox/sms-credits).
## Email and your business mailbox
Choosing a logo or editing the header does not connect a Gmail or Google Workspace mailbox, change domain authentication, or create a new sender address. If you need [coach@yourbusiness.com](mailto:coach@yourbusiness.com), follow [Professional Email](/inbox/professional-email).
To write a new email, use **Create New → Email**. The **Email** channel in the Inbox rail holds emails you have already sent; it is not where you start one.
For an update that should also appear in the athlete app, use [Announcements](/inbox/announcements). Email is a direct send, not a newsletter campaign builder with mailing-list management and open tracking.
## Find emails you've sent
Every email sent from **Create New → Email** is saved in the Inbox under **Channels → Email**, and also appears under **All**. Each row shows the subject, who it went to (a name, "12 members", or "2 email addresses"), a preview, and the send time.
Open a row to see the email as it was sent: a From / To / Sent header, each recipient (members by name, typed addresses as entered) with a marker on any address that wasn't delivered, and the body. The record is read-only. You can archive and restore sent emails like announcements, and they never count as unread.
Everyone on your staff can see the organization's sent emails. Recipients don't see this record in their own CoachIQ Inbox; they received the email itself.
Emails sent before September 23, 2026 are not listed. Inbox search does not include sent emails yet, and they do not appear on a client's profile Messages tab.
## Troubleshooting
* **Can't see appearance controls:** choose Branded or Spotlight instead of Blank.
* **Wrong logo:** check the current group, then choose App logo or a specific image. A previous explicit choice takes precedence over the default.
* **Starter copy replaced your writing:** the starter options replace subject and message. Review both before sending.
* **Not enough credits to send this email:** open **Settings → Communication → Credits**, check the balance, and add credits before trying again. For an automation email, check its execution log for the failed action.
* **Recipient has not received it:** open the sent email under **Channels → Email** and review that address and its delivery status. Ask them to check spam or junk. A successful send action does not guarantee inbox placement. Contact support with the recipient and send time if needed.
## Related articles
* [Inbox overview](/inbox/inbox-overview)
* [In-app messages](/inbox/in-app-messages)
* [SMS](/inbox/sms-messages)
* [Announcements](/inbox/announcements)
* [Professional Email](/inbox/professional-email)
This documentation is built and hosted on [Mintlify](https://mintlify.com), a developer documentation platform.
## Check the audience before sending
Review the recipient count and any per-send limit shown in the confirmation. Limits can differ by your organization and message channel; they are separate from your messaging-credit balance and SMS character count. If the audience exceeds the displayed limit, narrow the recipient selection before sending. Do not assume every group has the same maximum.
## What email costs
Emails you write use your organization's messaging credits, the same balance that pays for texts. Each email address costs **0.1 credit**, so 10 emails use 1 credit. This covers Inbox emails, the email copies of announcements, and automation **Send an Email** actions, counting every address including CC and BCC. Automatic notifications, such as booking confirmations and receipts, stay free.
Check your balance and each send in **Settings → Communication → Credits**. See [How credits work](/inbox/sms-credits).
## Email and your business mailbox
Choosing a logo or editing the header does not connect a Gmail or Google Workspace mailbox, change domain authentication, or create a new sender address. If you need [coach@yourbusiness.com](mailto:coach@yourbusiness.com), follow [Professional Email](/inbox/professional-email).
To write a new email, use **Create New → Email**. The **Email** channel in the Inbox rail holds emails you have already sent; it is not where you start one.
For an update that should also appear in the athlete app, use [Announcements](/inbox/announcements). Email is a direct send, not a newsletter campaign builder with mailing-list management and open tracking.
## Find emails you've sent
Every email sent from **Create New → Email** is saved in the Inbox under **Channels → Email**, and also appears under **All**. Each row shows the subject, who it went to (a name, "12 members", or "2 email addresses"), a preview, and the send time.
Open a row to see the email as it was sent: a From / To / Sent header, each recipient (members by name, typed addresses as entered) with a marker on any address that wasn't delivered, and the body. The record is read-only. You can archive and restore sent emails like announcements, and they never count as unread.
Everyone on your staff can see the organization's sent emails. Recipients don't see this record in their own CoachIQ Inbox; they received the email itself.
Emails sent before September 23, 2026 are not listed. Inbox search does not include sent emails yet, and they do not appear on a client's profile Messages tab.
## Troubleshooting
* **Can't see appearance controls:** choose Branded or Spotlight instead of Blank.
* **Wrong logo:** check the current group, then choose App logo or a specific image. A previous explicit choice takes precedence over the default.
* **Starter copy replaced your writing:** the starter options replace subject and message. Review both before sending.
* **Not enough credits to send this email:** open **Settings → Communication → Credits**, check the balance, and add credits before trying again. For an automation email, check its execution log for the failed action.
* **Recipient has not received it:** open the sent email under **Channels → Email** and review that address and its delivery status. Ask them to check spam or junk. A successful send action does not guarantee inbox placement. Contact support with the recipient and send time if needed.
## Related articles
* [Inbox overview](/inbox/inbox-overview)
* [In-app messages](/inbox/in-app-messages)
* [SMS](/inbox/sms-messages)
* [Announcements](/inbox/announcements)
* [Professional Email](/inbox/professional-email)
This documentation is built and hosted on [Mintlify](https://mintlify.com), a developer documentation platform.