> ## Documentation Index
> Fetch the complete documentation index at: https://help.coachiq.io/llms.txt
> Use this file to discover all available pages before exploring further.
# Collecting Payments & Bookings
> Add products and schedulers to your forms so athletes can register, pay, and book — all in one seamless flow.
Forms become powerful when you connect them to payments and scheduling. Instead of collecting info, then sending a payment link, then asking them to book — do it all in one step.
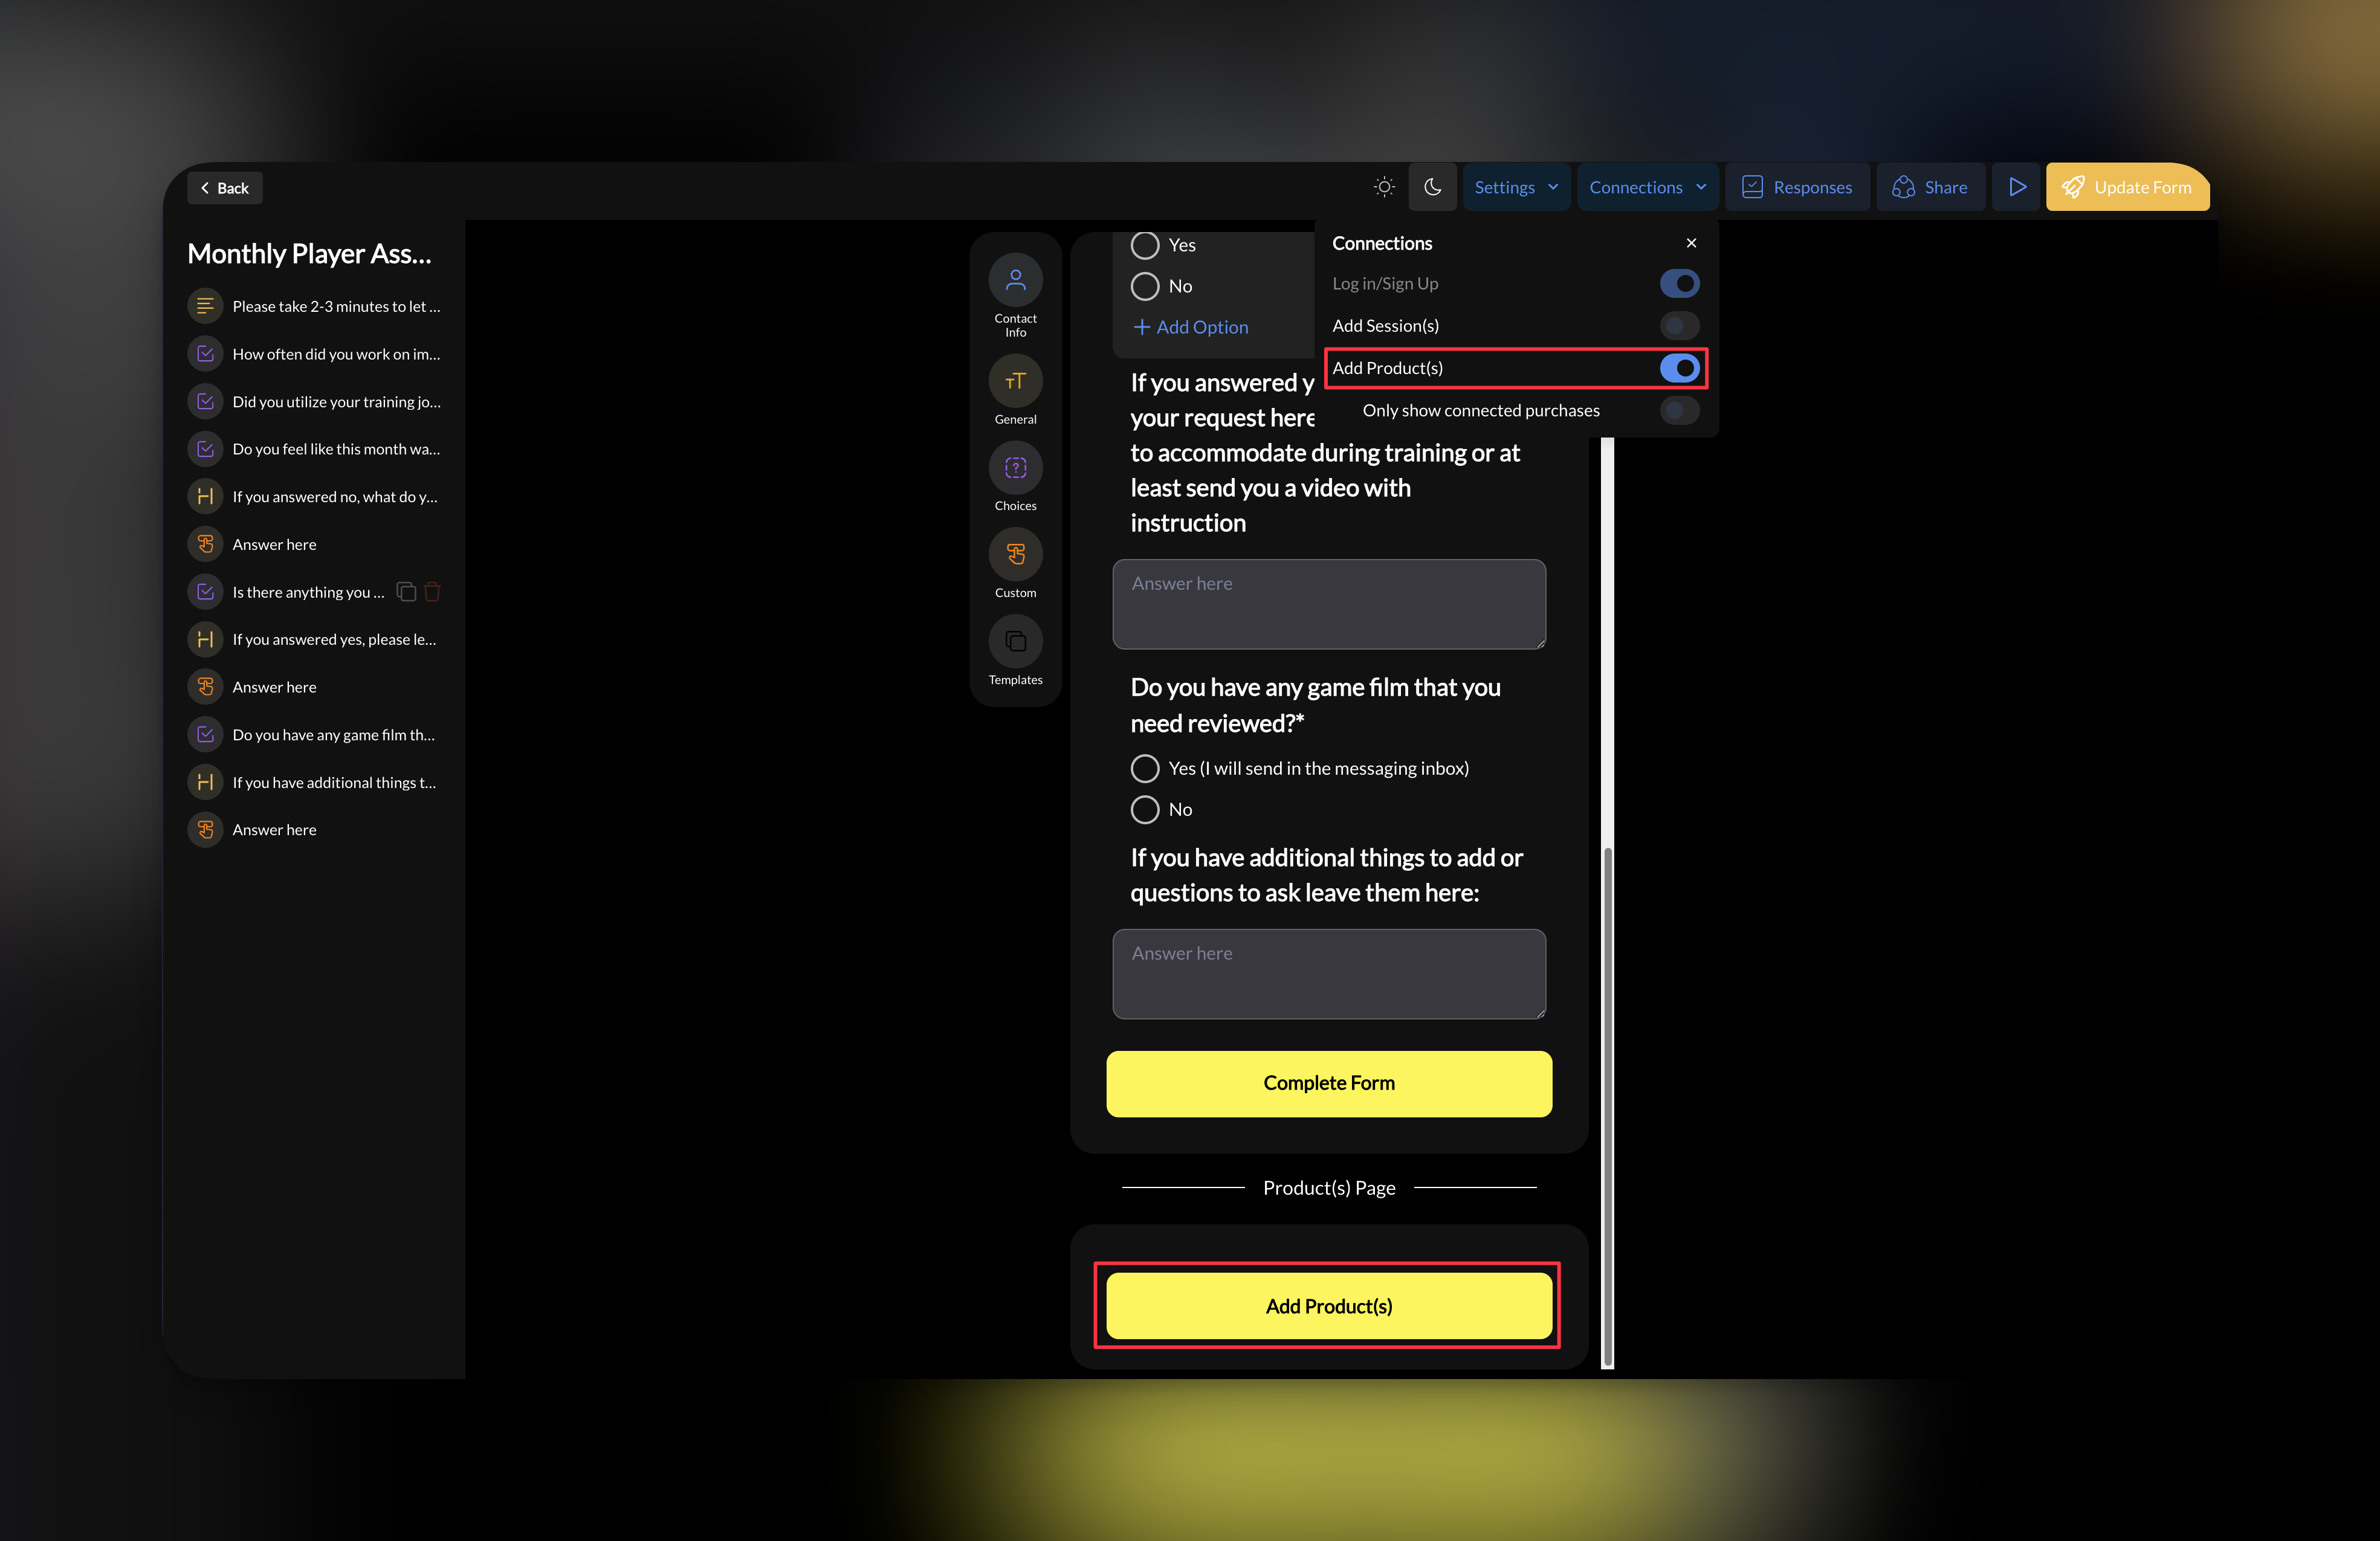
**Where to find connections**: Open any form in the builder → click **Connections** in the top bar
## How connections work
When you add a Product, Scheduler, or Login/Signup to a form, each becomes a separate page in the submission flow:
```
Form Fields → Login/Signup → Payment → Booking → Complete
```
The athlete fills out your questions first, then proceeds through each connected page before finishing.
You control which connections to add. A simple lead form might have none. A camp registration might have all three.
## Adding a product (collect payment)
Use this when you want to collect a fee during form submission — registration fees, deposits, camp payments, or trial session charges.
Go to **Tools → Forms** and click on the form you want to edit.
In the top bar, click **Connections** to open the connections menu.
Choose the product you want to attach. This must be a product you've already created in [Payments → Products](/payments/product-overview).
The product name, price, and description will display to the athlete during checkout.
Click **Update Form** to save. The payment page is now part of your form flow.
 ### What the athlete sees
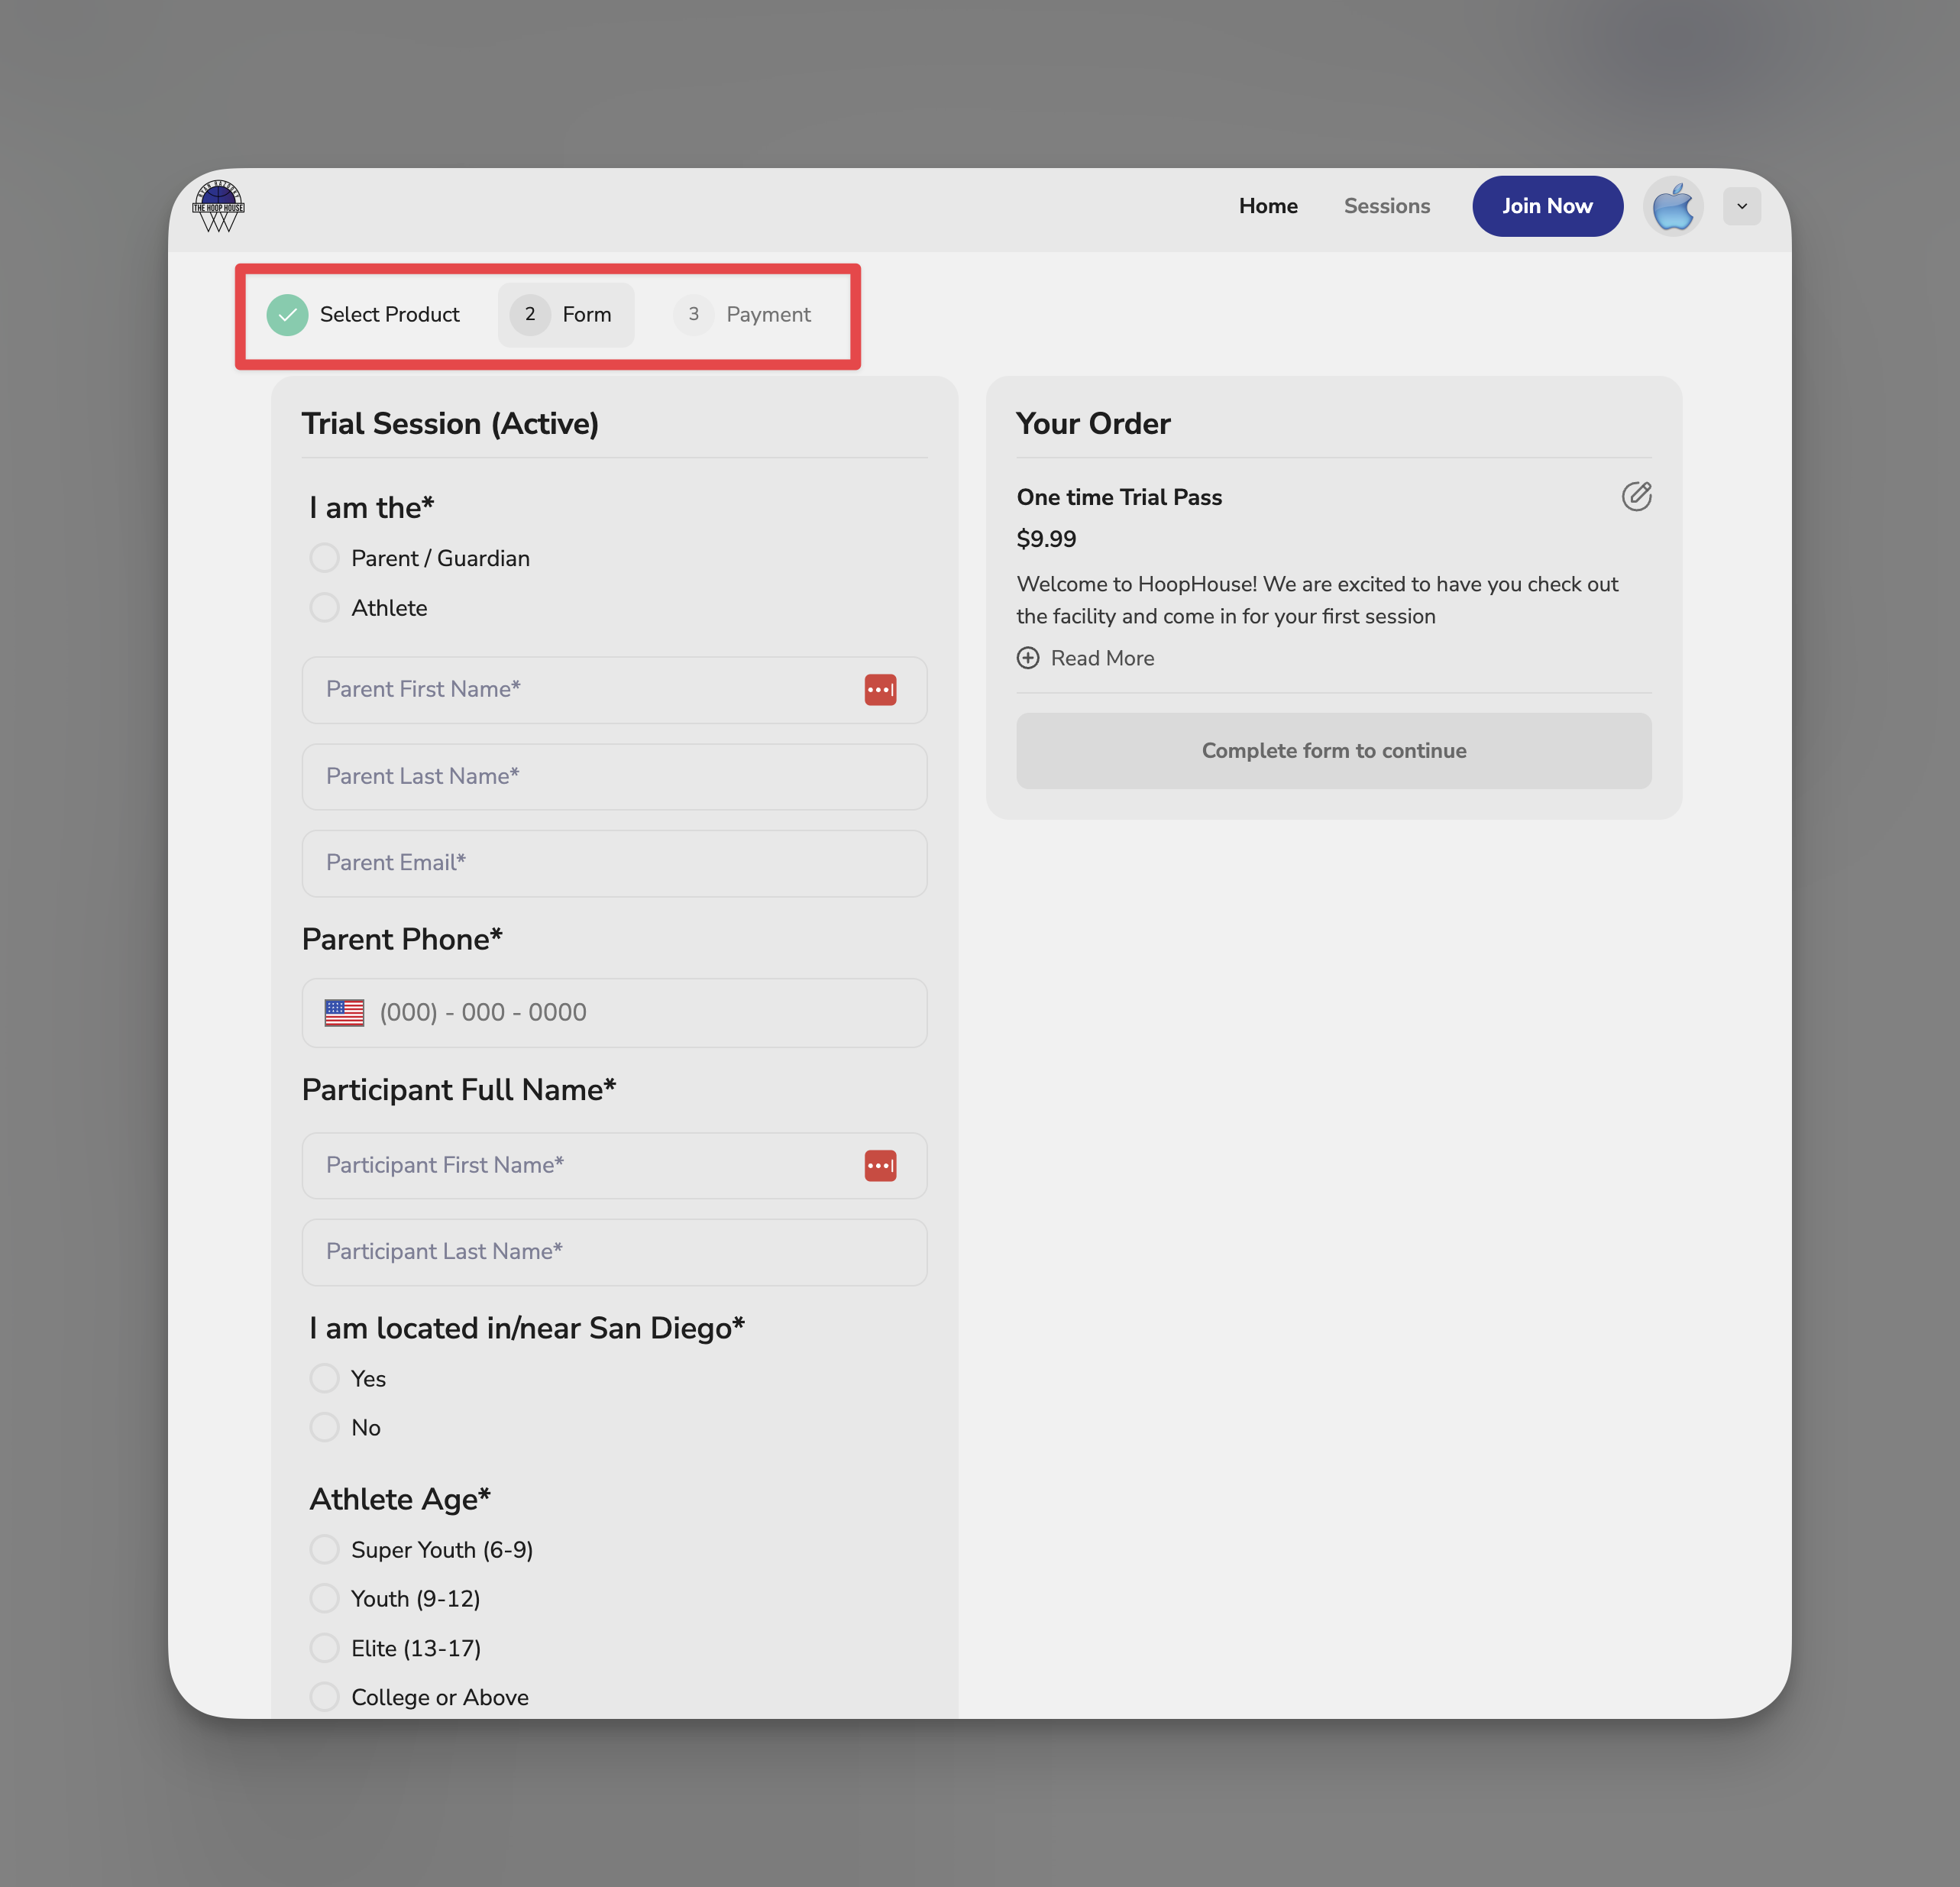
After completing your form fields:
1. They're taken to a payment page
2. They see the product name, description, and price
3. They enter payment details
4. After payment, they continue to the next step (or completion)
**Create a dedicated product for each form use case.** Instead of a generic "Registration Fee", create "Summer Camp 2025 Registration" — clearer for athletes and easier for you to track.
### What the athlete sees
After completing your form fields:
1. They're taken to a payment page
2. They see the product name, description, and price
3. They enter payment details
4. After payment, they continue to the next step (or completion)
**Create a dedicated product for each form use case.** Instead of a generic "Registration Fee", create "Summer Camp 2025 Registration" — clearer for athletes and easier for you to track.
 ## Adding a scheduler (book a session)
Use this when you want athletes to book a session as part of the form flow — common for evaluation bookings, trial sessions, or onboarding.
Go to **Tools → Forms** and click on the form you want to edit.
In the top bar, click **Connections** to open the connections menu.
Choose the scheduler you want to embed. This must be a scheduler you've already created in [Schedule → Schedulers](/scheduling/creating-your-first-scheduler).
Click **Update Form** to save. The booking calendar is now part of your form flow.
### What the athlete sees
After completing previous steps:
1. They see an embedded calendar with your available times
2. They select a date and time
3. After booking, they continue to completion
## Requiring login/signup
Use this when you want form submissions tied to athlete profiles in your [People list](/people/overview).
In your form builder, click **Connections** in the top bar.
Toggle on the login/signup requirement.
Click **Update Form** to save.
### What this enables
| With Login/Signup OFF | With Login/Signup ON |
| --------------------------------------- | -------------------------------------- |
| Anyone can submit anonymously | Athlete must create account or log in |
| Data captured but not linked | Data syncs to their People profile |
| Can't see submission on athlete profile | Form appears in their activity history |
| No identity verification | You know exactly who submitted |
**For waivers, always require login.** You want the signed waiver attached to a specific athlete's profile — not floating anonymously in your responses.
## Common connection combinations
### Lead capture form
**Connections:** None
Just collect info. No payment, no booking, no account required. Keep the barrier low for first contact.
### Trial session registration
**Connections:** Login/Signup + Product (trial fee) + Scheduler
Athlete creates account → pays trial fee → books their session. You get a qualified lead with payment commitment and a booking on your calendar.
### Camp registration
**Connections:** Login/Signup + Product (camp fee)
Athlete creates account → pays camp fee. No scheduling needed since camp dates are fixed. Their registration is tied to their profile.
### New athlete onboarding
**Connections:** Login/Signup + Scheduler
Athlete creates account → books first evaluation. No payment at this stage — you'll charge after the eval or via a separate product.
### Waiver collection
**Connections:** Login/Signup only
Athlete creates account → completes waiver. The signed waiver attaches to their profile. No payment or booking needed.
## Viewing connected transactions and bookings
### Payments
When an athlete pays via a form:
* Transaction appears in **Payments → Transactions**
* Shows the product, amount, athlete, and timestamp
* Links to the form submission
### Bookings
When an athlete books via a form:
* Session appears on your **Calendar**
* Shows in the athlete's booking history
* Links to the form submission
### Form responses
All submissions (with or without connections) appear in your form's **Responses** tab.
## Tips for connected forms
You can only connect existing products. Build your registration fee or camp product first in [Payments → Products](/payments/product-overview), then add it to your form.
Same logic — you can only connect existing schedulers. Set up your availability and scheduler first.
Before sharing, submit your own form. Go through every page — fields, login, payment (use test mode if available), and booking. Experience what your athletes will experience.
Each connection adds a page. If your form already has 15 fields plus payment plus booking, that's a lot of steps. Consider what's truly essential.
Anonymous submissions work, but you lose the profile connection. For anything beyond casual lead capture, require login.
## What you can't do
* **Make payment optional** — If a product is connected, payment is required to submit
* **Add multiple products** — One product per form
* **Add multiple schedulers** — One scheduler per form
* **Skip connection pages** — Athletes must complete each connected step in order
## Next steps
Get your link, embed on your website, and configure what happens after submission
View submissions, export data, and trigger automated actions
## Related articles
Learn about the products you can connect to forms for payment
Create a product to attach to your registration or camp form
Set up a scheduler to embed in your form booking flow
See how login/signup connects form data to athlete profiles
## Adding a scheduler (book a session)
Use this when you want athletes to book a session as part of the form flow — common for evaluation bookings, trial sessions, or onboarding.
Go to **Tools → Forms** and click on the form you want to edit.
In the top bar, click **Connections** to open the connections menu.
Choose the scheduler you want to embed. This must be a scheduler you've already created in [Schedule → Schedulers](/scheduling/creating-your-first-scheduler).
Click **Update Form** to save. The booking calendar is now part of your form flow.
### What the athlete sees
After completing previous steps:
1. They see an embedded calendar with your available times
2. They select a date and time
3. After booking, they continue to completion
## Requiring login/signup
Use this when you want form submissions tied to athlete profiles in your [People list](/people/overview).
In your form builder, click **Connections** in the top bar.
Toggle on the login/signup requirement.
Click **Update Form** to save.
### What this enables
| With Login/Signup OFF | With Login/Signup ON |
| --------------------------------------- | -------------------------------------- |
| Anyone can submit anonymously | Athlete must create account or log in |
| Data captured but not linked | Data syncs to their People profile |
| Can't see submission on athlete profile | Form appears in their activity history |
| No identity verification | You know exactly who submitted |
**For waivers, always require login.** You want the signed waiver attached to a specific athlete's profile — not floating anonymously in your responses.
## Common connection combinations
### Lead capture form
**Connections:** None
Just collect info. No payment, no booking, no account required. Keep the barrier low for first contact.
### Trial session registration
**Connections:** Login/Signup + Product (trial fee) + Scheduler
Athlete creates account → pays trial fee → books their session. You get a qualified lead with payment commitment and a booking on your calendar.
### Camp registration
**Connections:** Login/Signup + Product (camp fee)
Athlete creates account → pays camp fee. No scheduling needed since camp dates are fixed. Their registration is tied to their profile.
### New athlete onboarding
**Connections:** Login/Signup + Scheduler
Athlete creates account → books first evaluation. No payment at this stage — you'll charge after the eval or via a separate product.
### Waiver collection
**Connections:** Login/Signup only
Athlete creates account → completes waiver. The signed waiver attaches to their profile. No payment or booking needed.
## Viewing connected transactions and bookings
### Payments
When an athlete pays via a form:
* Transaction appears in **Payments → Transactions**
* Shows the product, amount, athlete, and timestamp
* Links to the form submission
### Bookings
When an athlete books via a form:
* Session appears on your **Calendar**
* Shows in the athlete's booking history
* Links to the form submission
### Form responses
All submissions (with or without connections) appear in your form's **Responses** tab.
## Tips for connected forms
You can only connect existing products. Build your registration fee or camp product first in [Payments → Products](/payments/product-overview), then add it to your form.
Same logic — you can only connect existing schedulers. Set up your availability and scheduler first.
Before sharing, submit your own form. Go through every page — fields, login, payment (use test mode if available), and booking. Experience what your athletes will experience.
Each connection adds a page. If your form already has 15 fields plus payment plus booking, that's a lot of steps. Consider what's truly essential.
Anonymous submissions work, but you lose the profile connection. For anything beyond casual lead capture, require login.
## What you can't do
* **Make payment optional** — If a product is connected, payment is required to submit
* **Add multiple products** — One product per form
* **Add multiple schedulers** — One scheduler per form
* **Skip connection pages** — Athletes must complete each connected step in order
## Next steps
Get your link, embed on your website, and configure what happens after submission
View submissions, export data, and trigger automated actions
## Related articles
Learn about the products you can connect to forms for payment
Create a product to attach to your registration or camp form
Set up a scheduler to embed in your form booking flow
See how login/signup connects form data to athlete profiles