> ## Documentation Index
> Fetch the complete documentation index at: https://help.coachiq.io/llms.txt
> Use this file to discover all available pages before exploring further.
# Lesson Elements Guide: Media, Text, Quizzes, Forms & More
> Master all six lesson elements in CoachIQ—Media, Text, Button, Quiz, Form, and Upload. Learn how to configure each element to create engaging interactive lessons for athletes.
Every lesson you build in CoachIQ is made up of elements—the building blocks you combine to create interactive training content. This guide covers each of the six elements in detail, including configuration options and best practices.
**Adding elements**: In the Lesson Builder, click on any element icon in the toolbar to add it to your current slide. Each slide can have multiple elements layered on top of each other.
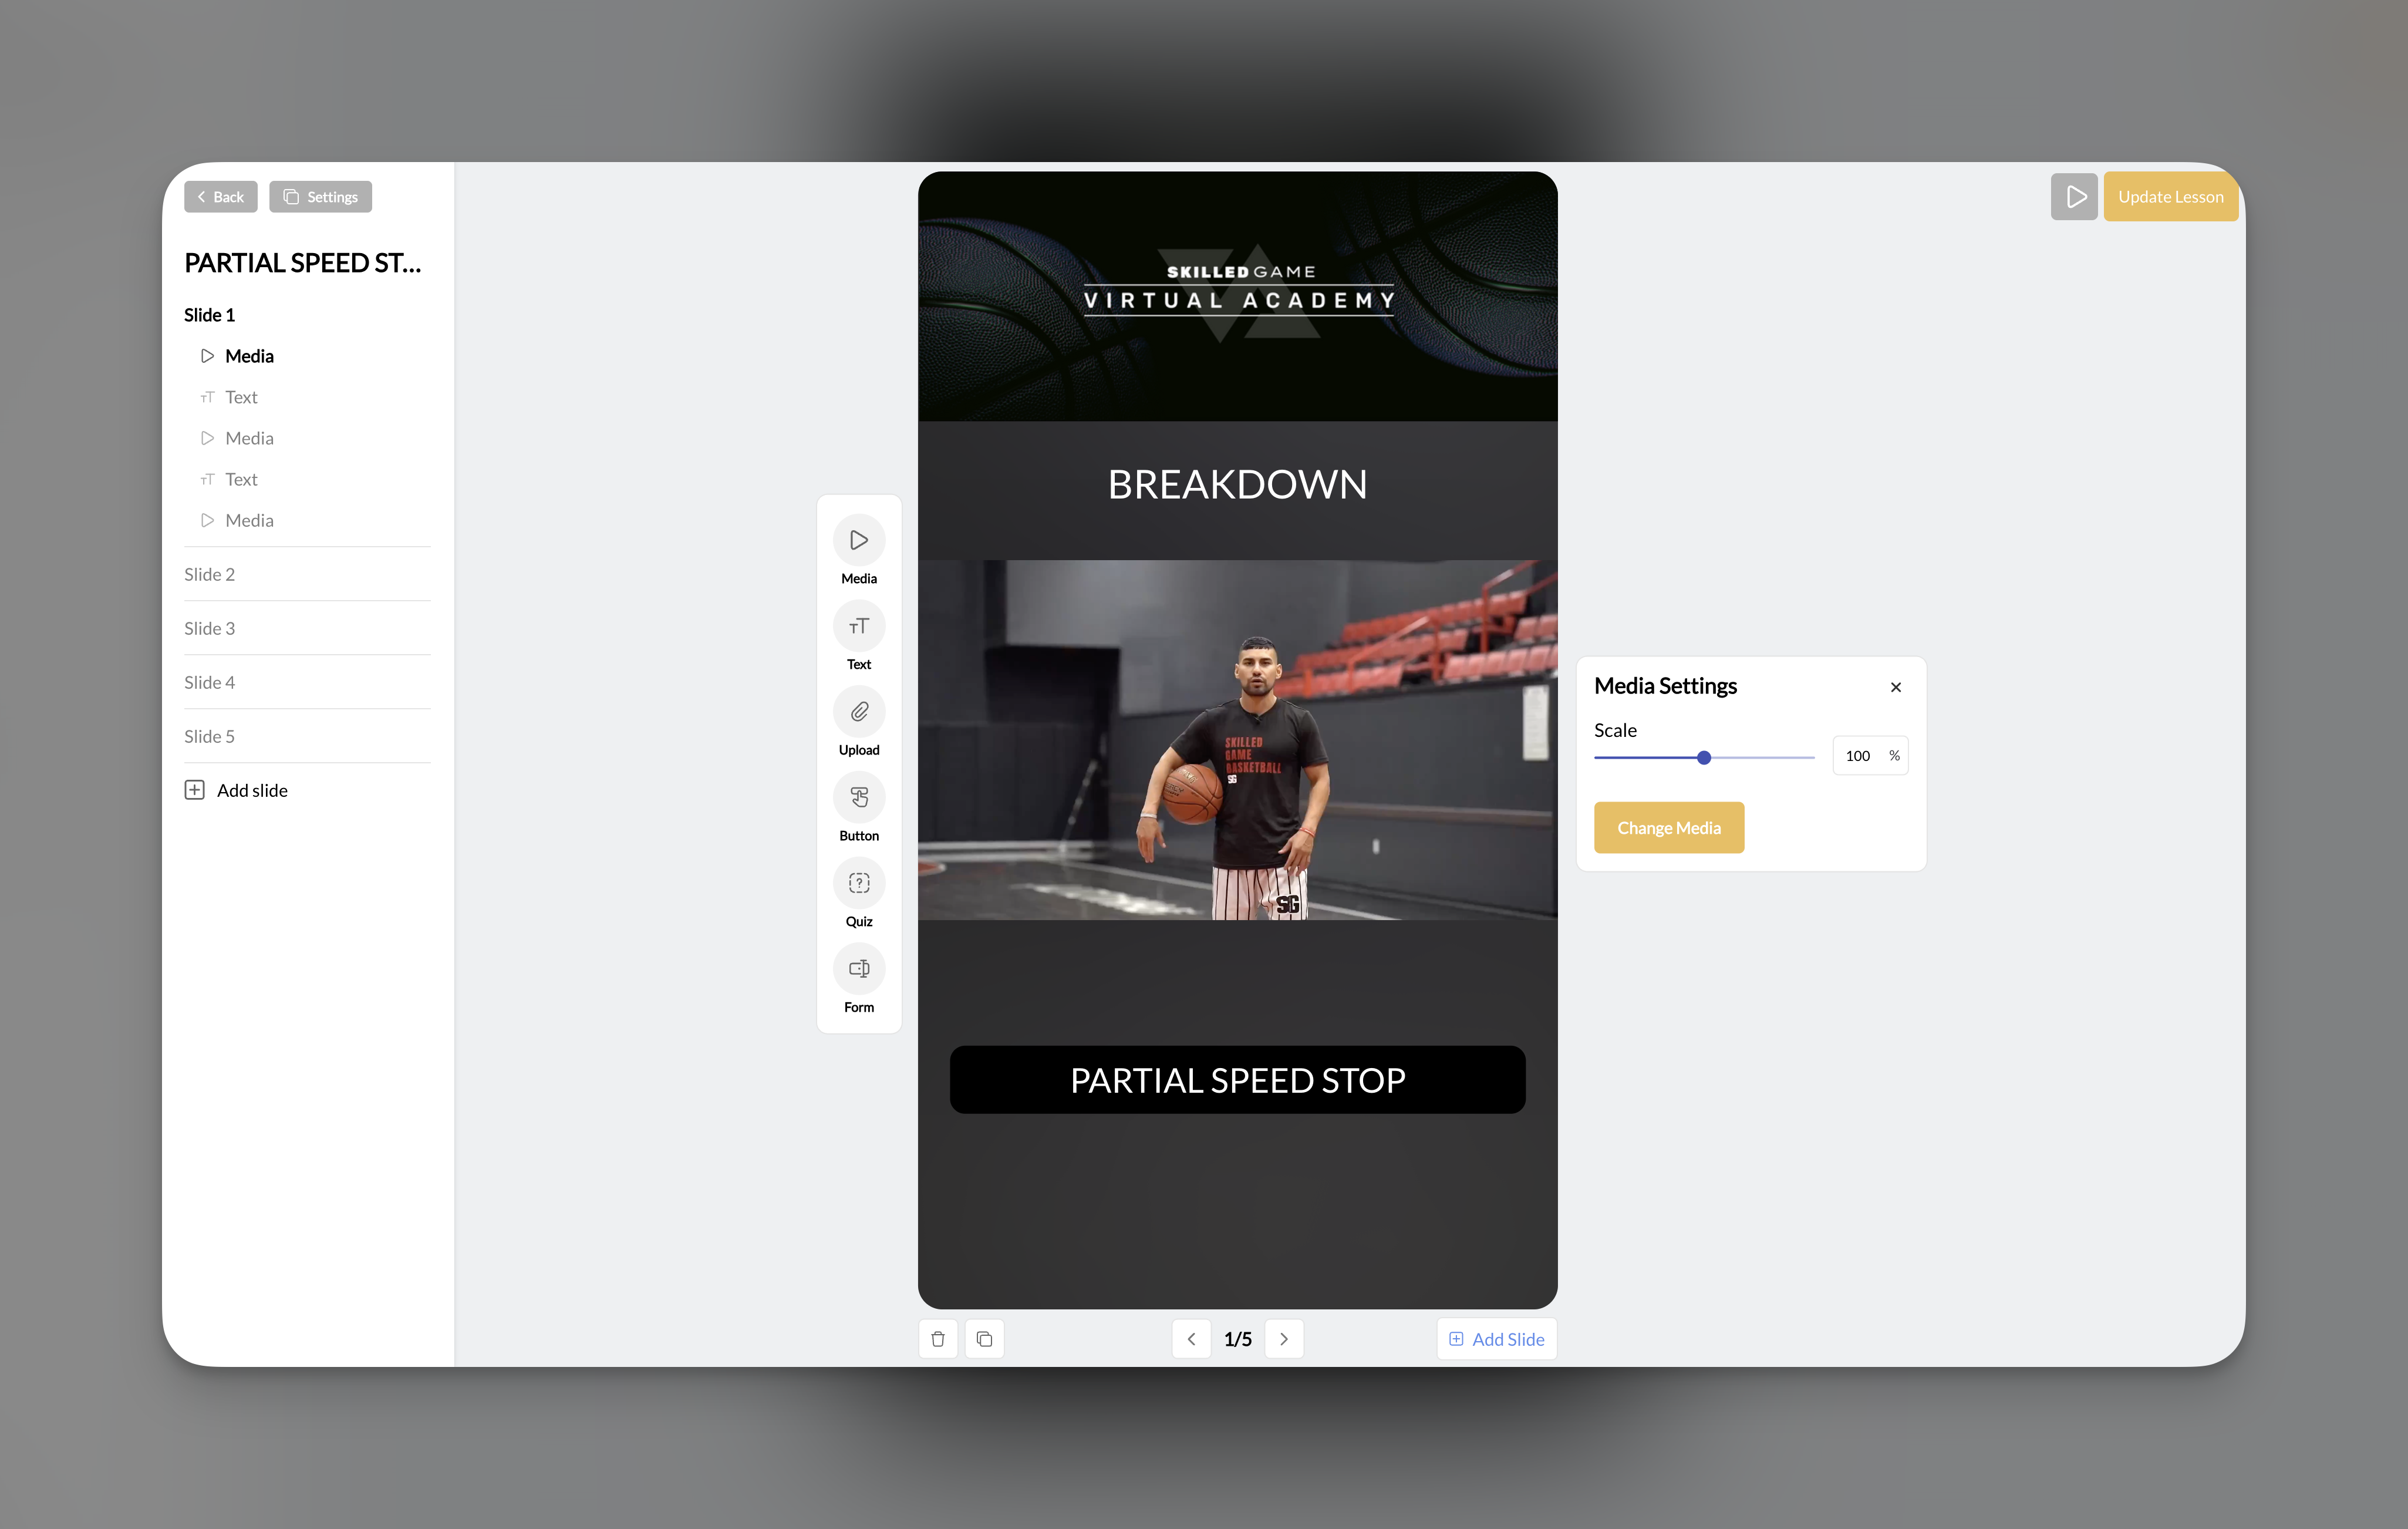 ## Element quick reference
| Element | Icon | What it does | Athlete interaction |
| ---------- | ---- | ---------------------------- | ------------------- |
| **Media** | ▶ | Displays video or image | Watch/view |
| **Text** | TT | Shows text overlay | Read |
| **Button** | Grid | Provides navigation or links | Tap |
| **Quiz** | 🤔 | Multiple choice question | Select answer |
| **Form** | 📋 | Free-text input field | Type response |
| **Upload** | 📎 | File upload prompt | Submit video/image |
***
## Media element
The Media element pulls videos and images from your [Media Hub](/content/media-overview) to display on slides. This is typically the foundation of most slides—start with media, then layer other elements on top.
## Element quick reference
| Element | Icon | What it does | Athlete interaction |
| ---------- | ---- | ---------------------------- | ------------------- |
| **Media** | ▶ | Displays video or image | Watch/view |
| **Text** | TT | Shows text overlay | Read |
| **Button** | Grid | Provides navigation or links | Tap |
| **Quiz** | 🤔 | Multiple choice question | Select answer |
| **Form** | 📋 | Free-text input field | Type response |
| **Upload** | 📎 | File upload prompt | Submit video/image |
***
## Media element
The Media element pulls videos and images from your [Media Hub](/content/media-overview) to display on slides. This is typically the foundation of most slides—start with media, then layer other elements on top.
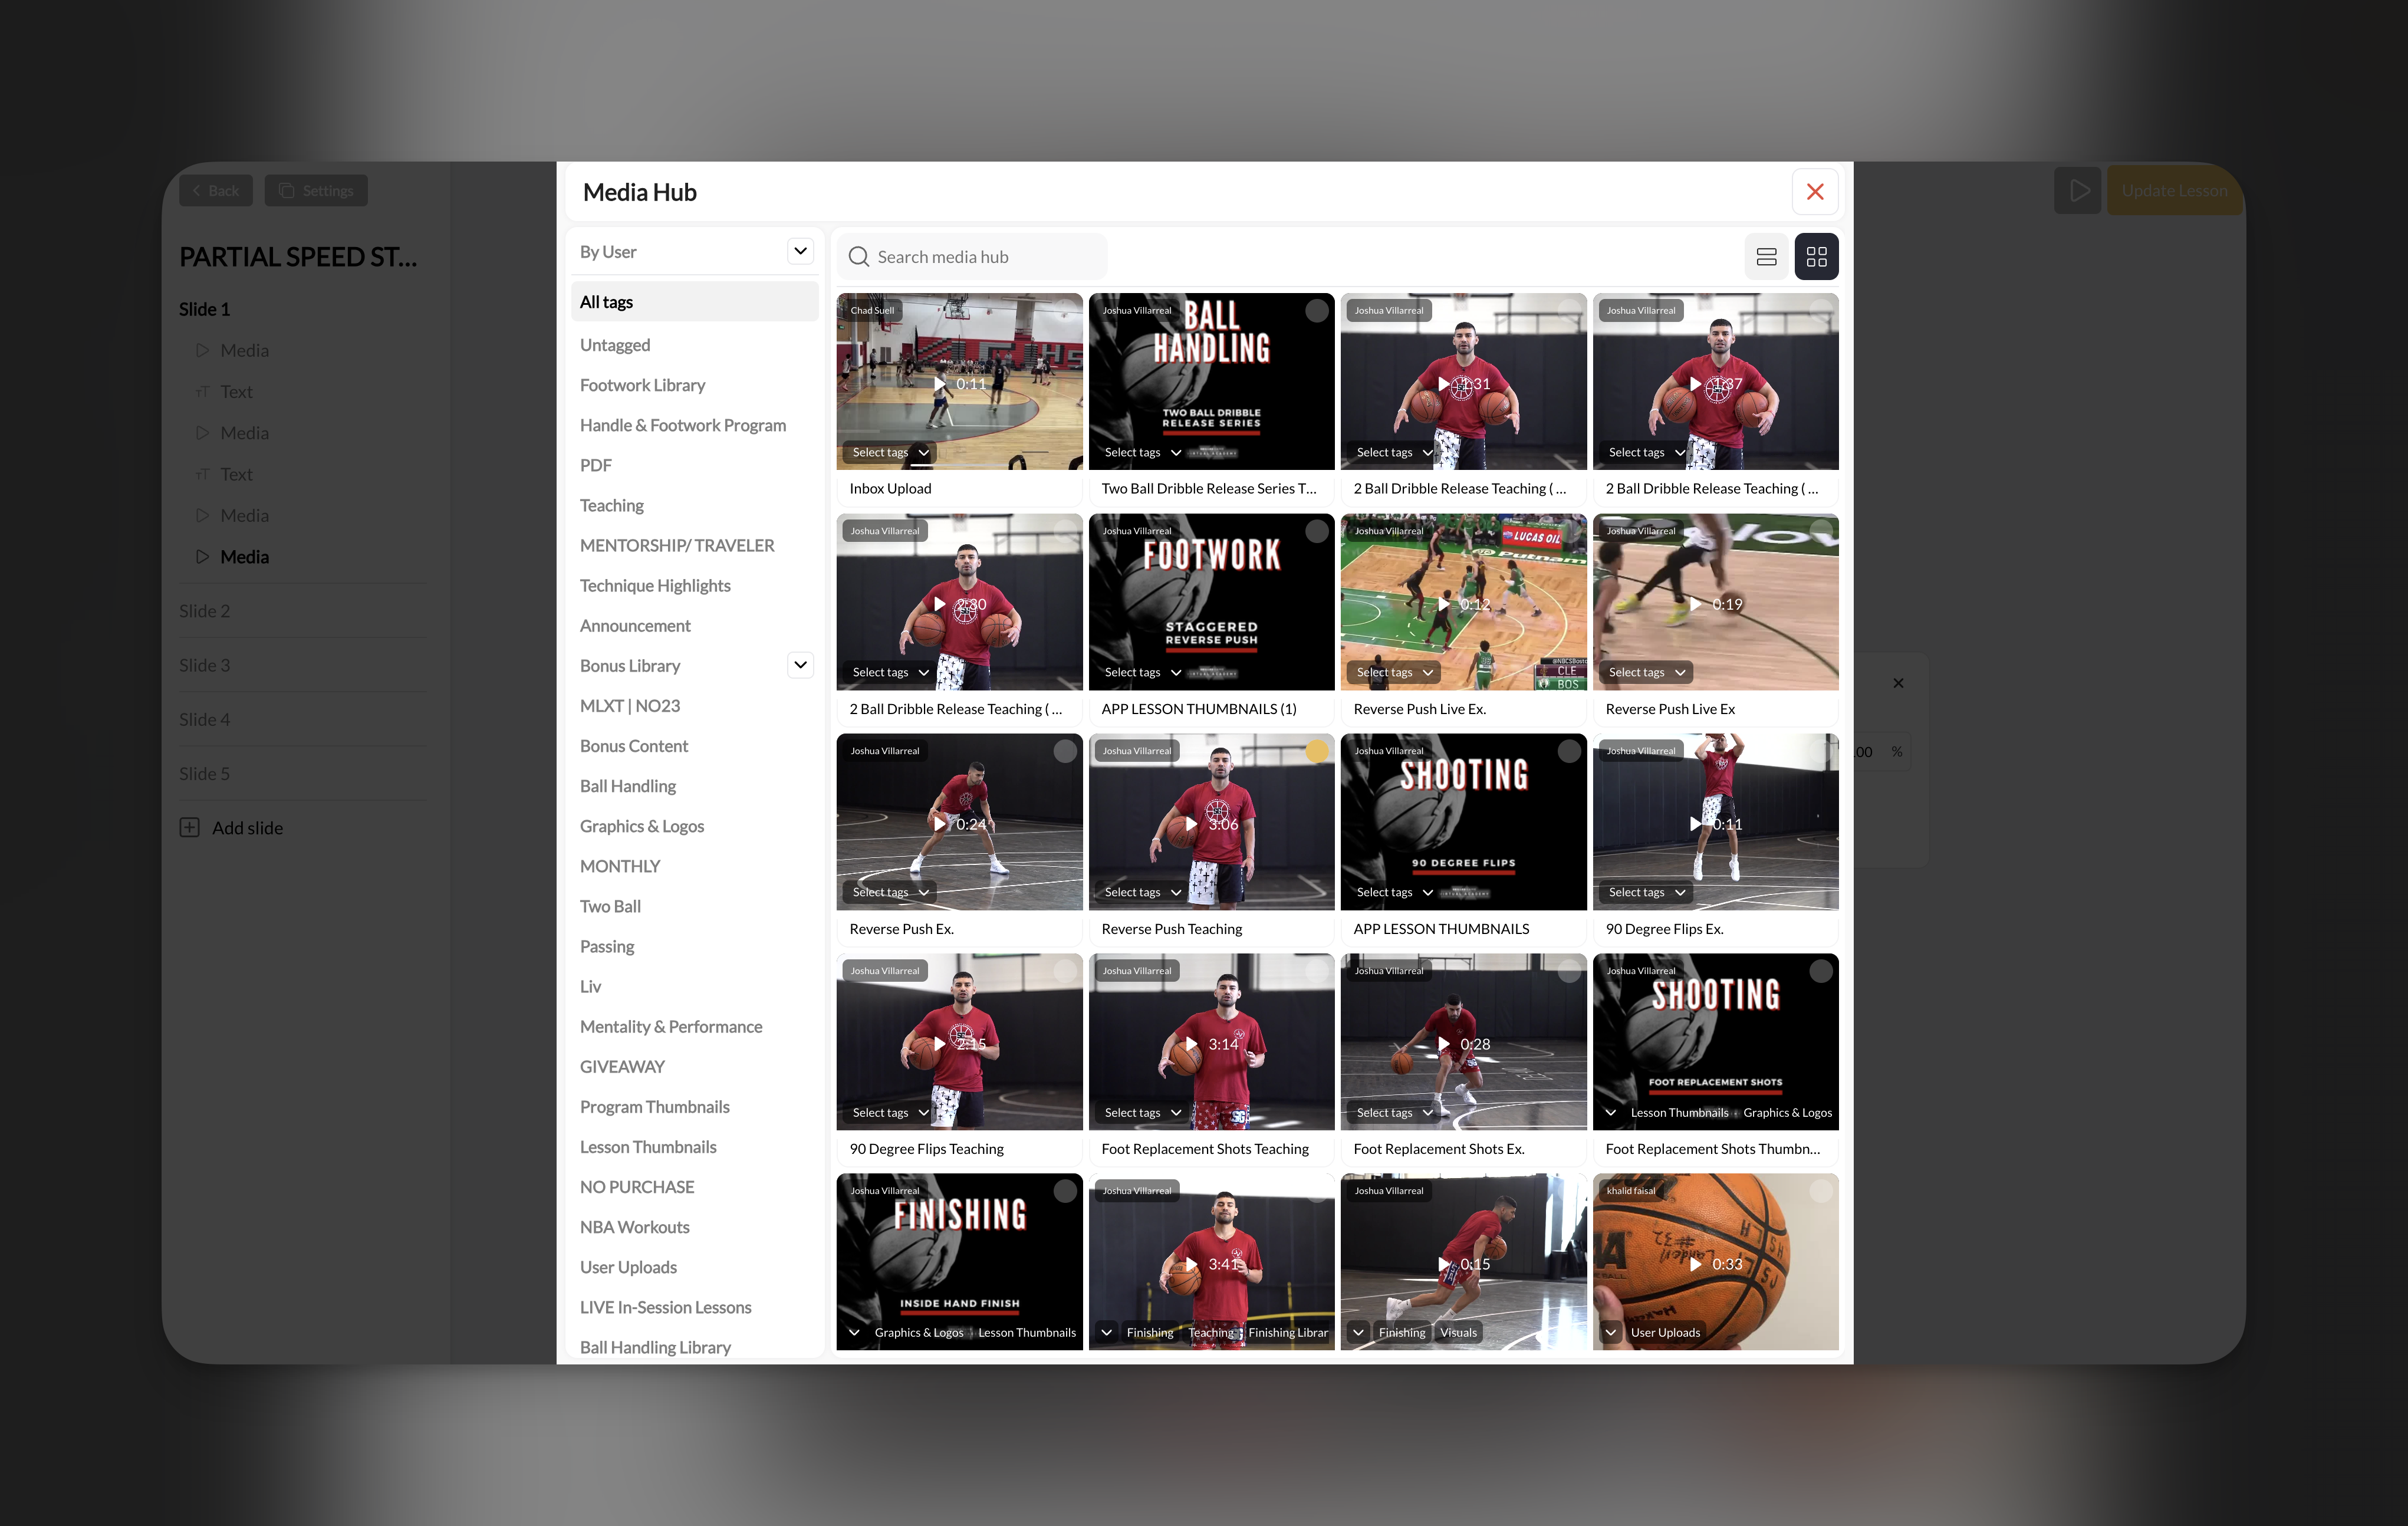 ### How to add media
In the Lesson Builder toolbar, click the **Media** element (▶ icon).
A panel opens showing your Media Hub. Browse or search for the video or image you want.
Click on any media item to add it to your slide. It will appear on the canvas.
### Media settings
Once added, select the media element to access settings in the right panel:
| Setting | What it controls |
| ------------- | ------------------------------ |
| **Scale** | Size of the media on the slide |
| **Placement** | Position on the canvas |
**Pro tip**: For full-screen video backgrounds, scale to 100% and center the placement. Then layer text or buttons on top for a polished look.
### Media best practices
* **Use Media Hub first**: You can only add media that's already in your Media Hub—upload your content there before building lessons
* **Mind the format**: Vertical/portrait videos work best since lessons display in mobile format
* **Keep videos short**: 30-90 second clips per slide work better than long videos spanning multiple minutes
***
## Text element
The Text element adds customizable text overlays to your slides. Use it for instructions, key points, titles, or any written content.
### How to add media
In the Lesson Builder toolbar, click the **Media** element (▶ icon).
A panel opens showing your Media Hub. Browse or search for the video or image you want.
Click on any media item to add it to your slide. It will appear on the canvas.
### Media settings
Once added, select the media element to access settings in the right panel:
| Setting | What it controls |
| ------------- | ------------------------------ |
| **Scale** | Size of the media on the slide |
| **Placement** | Position on the canvas |
**Pro tip**: For full-screen video backgrounds, scale to 100% and center the placement. Then layer text or buttons on top for a polished look.
### Media best practices
* **Use Media Hub first**: You can only add media that's already in your Media Hub—upload your content there before building lessons
* **Mind the format**: Vertical/portrait videos work best since lessons display in mobile format
* **Keep videos short**: 30-90 second clips per slide work better than long videos spanning multiple minutes
***
## Text element
The Text element adds customizable text overlays to your slides. Use it for instructions, key points, titles, or any written content.
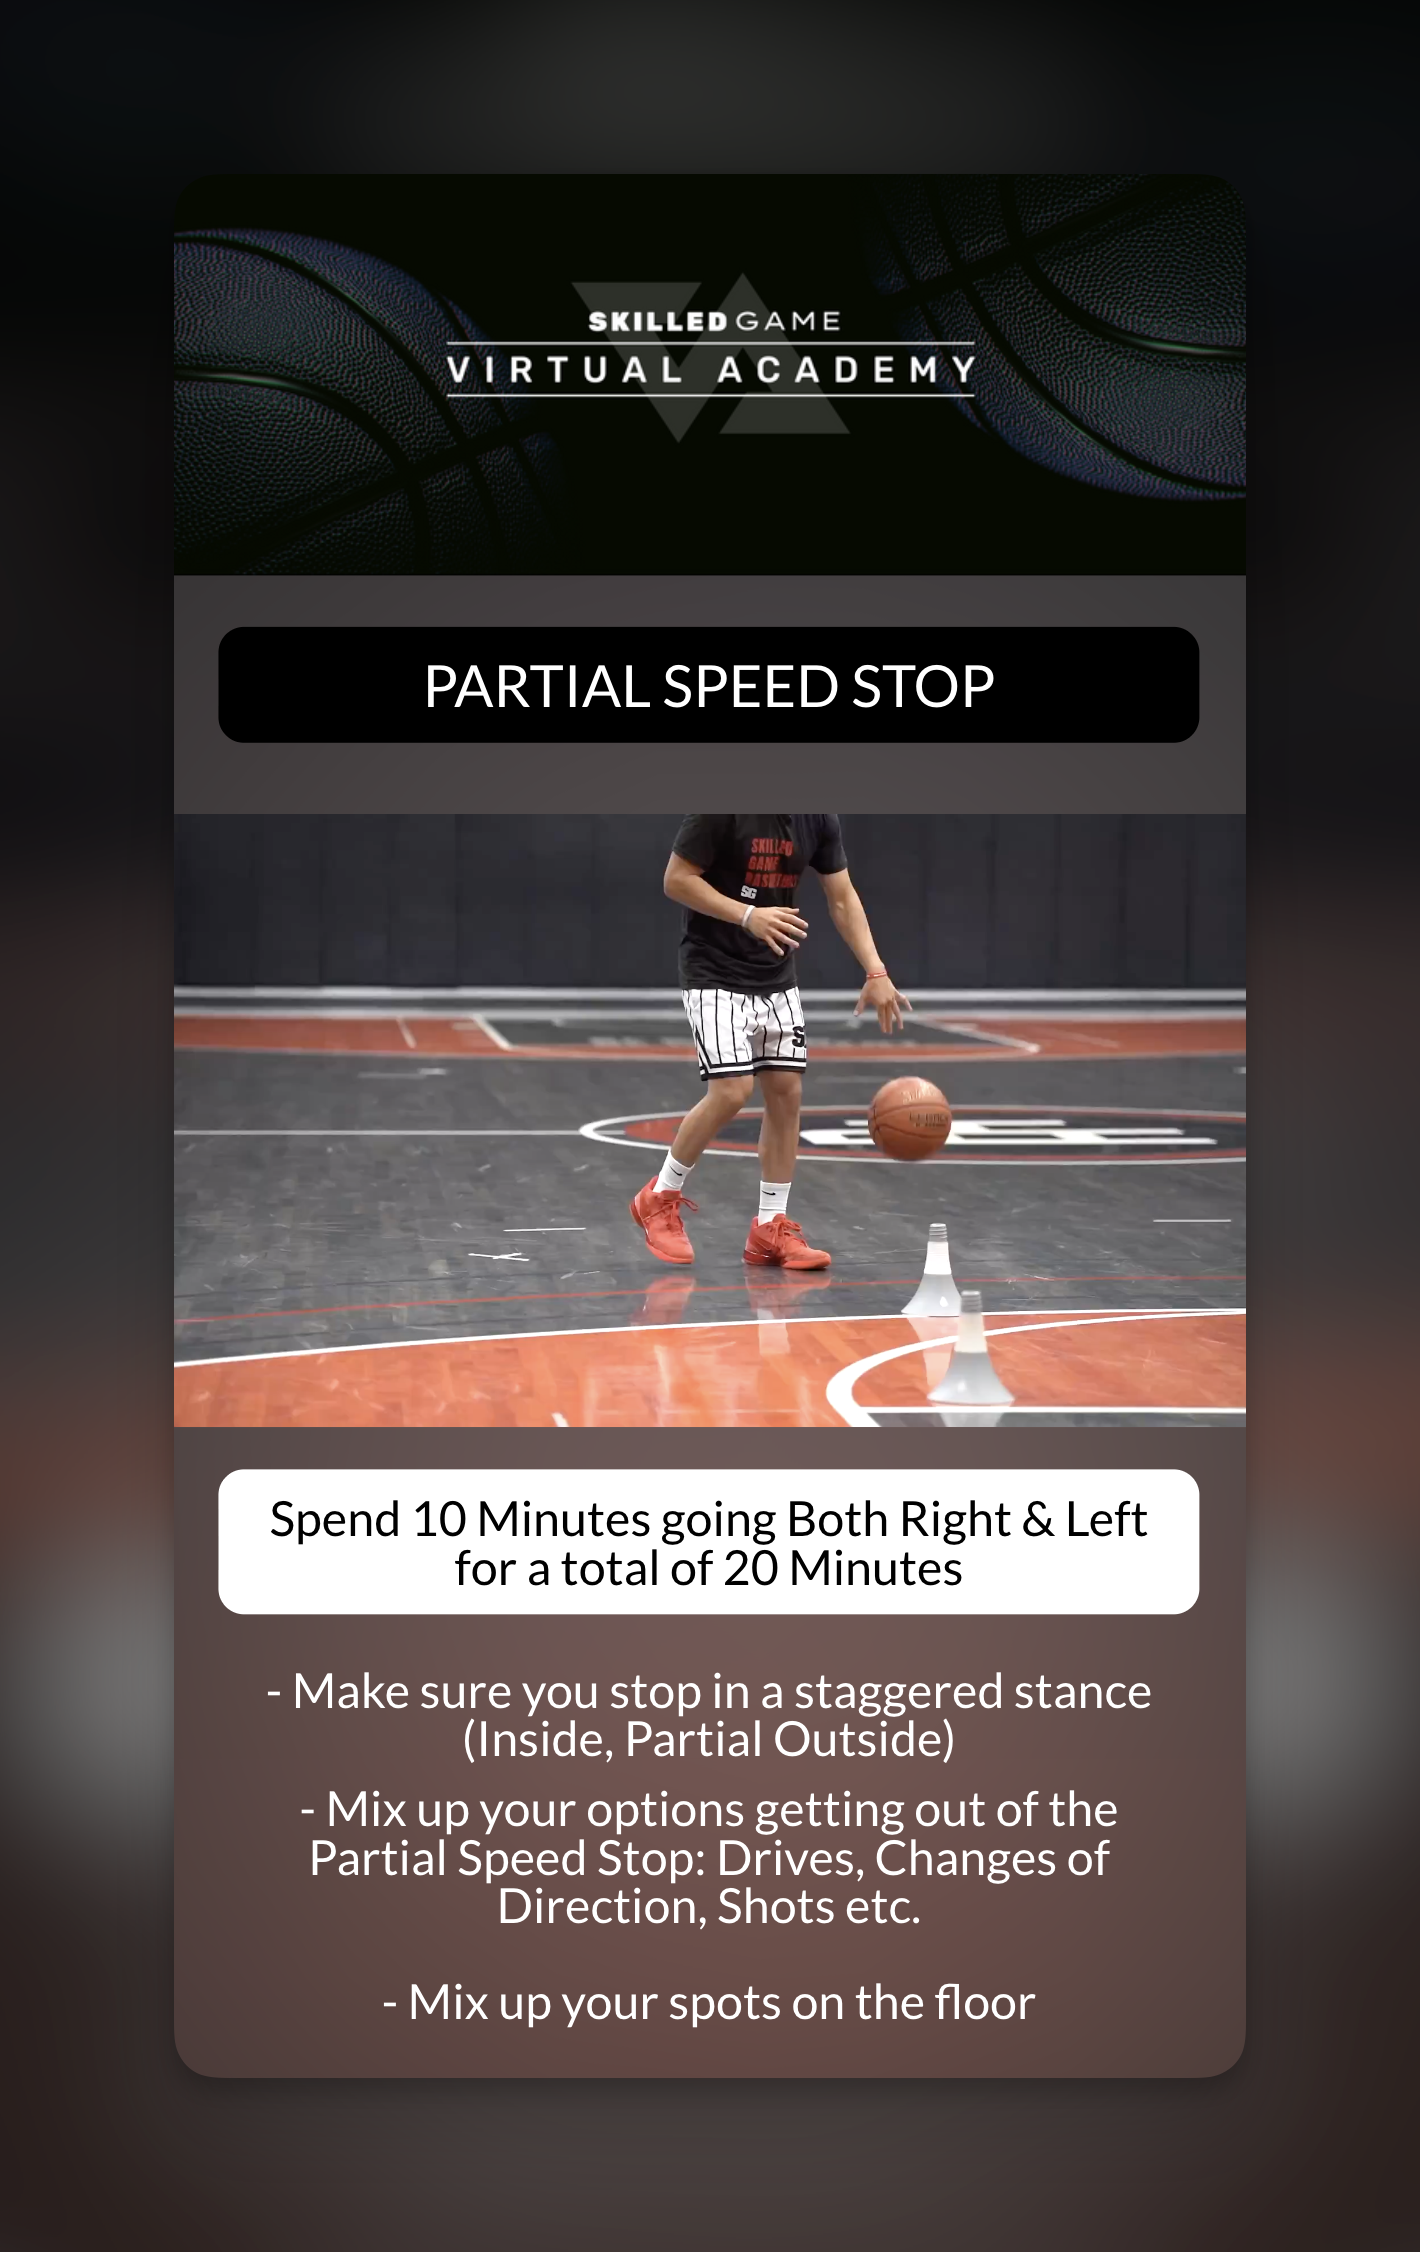 ### How to add text
In the toolbar, click the **Text** element (TT icon).
A text box appears with placeholder text. Click to edit and type your content.
Use the right panel to customize appearance.
### Text settings
| Setting | Options |
| -------------- | --------------------------------------------- |
| **Content** | Your text (edit inline on canvas or in panel) |
| **Font size** | Slider from 0-100% |
| **Text color** | 12-color palette |
| **Background** | 12-color palette + transparent option |
| **Width** | Slider to control text box width |
### Text color options
Both text color and background offer the same 12-color palette:
* White
* Black
* Gray
* Red
* Orange
* Yellow
* Green
* Teal
* Blue
* Indigo
* Purple
* Pink
### Text best practices
* **High contrast**: Use light text on dark backgrounds (or vice versa) for readability
* **Keep it short**: Athletes are swiping through quickly—limit text to key points
* **Use backgrounds**: A semi-transparent background helps text stand out over video/images
* **Position thoughtfully**: Place text where it won't cover important parts of underlying media
***
## Button element
The Button element creates tappable buttons that can navigate between slides, open external links, or provide downloadable files.
### How to add a button
In the toolbar, click the **Button** element (grid icon).
Choose what happens when athletes tap the button.
Customize colors to match your brand.
### Button actions
| Action | What it does | When to use |
| ------------------------- | ---------------------------------------- | --------------------------------------------------------- |
| **Take to next slide** | Advances to the next slide in the lesson | Default navigation, ensuring athletes acknowledge content |
| **Add web link** | Opens an external URL | Link to your website, YouTube, or external resources |
| **Add downloadable link** | Provides a file download | Share PDFs, worksheets, or other downloadable resources |
### Button settings
| Setting | Options |
| -------------------- | ----------------------------------------------------------------- |
| **Button text** | What the button says (e.g., "Next", "Download PDF", "Watch More") |
| **Action** | Next slide, web link, or downloadable link |
| **Text color** | 12-color palette |
| **Background color** | 12-color palette |
### Button best practices
* **Use for pacing**: Adding a "Next" button (instead of just swipe) ensures athletes consciously move forward
* **Clear labels**: Use action-oriented text like "Download Workout PDF" instead of just "Download"
* **Consistent styling**: Keep button colors consistent throughout your lessons
* **Test links**: Always preview your lesson to make sure external links and downloads work
**Downloadable files**: The downloadable link option accepts any file type—PDFs, spreadsheets, documents, etc. This is how you share materials that can't be displayed directly in lessons.
***
## Quiz element
The Quiz element adds multiple choice questions to your lessons. Athletes tap to select their answer from the options you provide.
### How to add a quiz
In the toolbar, click the **Quiz** element (🤔 icon).
Enter the question athletes will see.
Add multiple choice options. Click **Add Option** to add more choices.
Choose light or dark theme.
### Quiz settings
| Setting | Options |
| ----------------- | ----------------------------------------------- |
| **Question text** | The question you're asking |
| **Options** | Multiple choice answers (add as many as needed) |
| **Theme** | Light or Dark |
### Important: Quizzes are not graded
CoachIQ quizzes are for **engagement and feedback collection only**—there is no scoring, pass/fail, or correct answer designation. You see what athletes selected, but the system doesn't grade responses.
**What quizzes are good for:**
* Checking understanding (you review responses manually)
* Gathering preferences ("What skill do you want to work on next?")
* Engagement and interaction during lessons
* Collecting data about your athletes
**What quizzes are NOT for:**
* Formal assessments with grades
* Certification requirements with pass/fail
* Automated feedback based on correct/incorrect
### Quiz best practices
* **Keep questions clear**: One question per quiz element
* **Limit options**: 3-5 answer choices works best
* **Use for checkpoints**: Add quizzes after teaching a concept to reinforce learning
* **Review responses**: Check the Program Stats to see how athletes answered
***
## Form element
The Form element adds free-text input fields where athletes can type their own responses. Use it for reflection questions, goal setting, feedback, or any open-ended input.
### How to add a form
In the toolbar, click the **Form** element (📋 icon).
Enter the question or prompt athletes will respond to.
Choose theme and button color.
### Form settings
| Setting | Options |
| ------------------- | ---------------------------------- |
| **Question/prompt** | The text asking athletes for input |
| **Theme** | Light or Dark |
| **Button color** | Color of the Submit button |
### Form vs Quiz: When to use each
| Use Form when... | Use Quiz when... |
| ------------------------------------- | ------------------------------------- |
| You want open-ended responses | You want specific answer choices |
| Athletes should reflect or explain | You're checking factual understanding |
| Collecting goals, feedback, questions | Gathering preferences between options |
| Response length varies | Quick, simple interaction |
### Form best practices
* **Ask specific questions**: "What's one thing you'll focus on this week?" is better than "Any thoughts?"
* **Set expectations**: Let athletes know roughly how much you expect (a sentence vs a paragraph)
* **Use for accountability**: Ask athletes to commit to goals or reflect on progress
* **Review responses**: Check Program Stats regularly to read what athletes submit
***
## Upload element
The Upload element lets athletes submit their own videos, images, or files. This is powerful for remote coaching, form checks, and drill assignments.
**Important distinction**: The Upload element is for **ATHLETE uploads**, not coach uploads. If you want to add your own video to a slide, use the Media element instead.
### How to add text
In the toolbar, click the **Text** element (TT icon).
A text box appears with placeholder text. Click to edit and type your content.
Use the right panel to customize appearance.
### Text settings
| Setting | Options |
| -------------- | --------------------------------------------- |
| **Content** | Your text (edit inline on canvas or in panel) |
| **Font size** | Slider from 0-100% |
| **Text color** | 12-color palette |
| **Background** | 12-color palette + transparent option |
| **Width** | Slider to control text box width |
### Text color options
Both text color and background offer the same 12-color palette:
* White
* Black
* Gray
* Red
* Orange
* Yellow
* Green
* Teal
* Blue
* Indigo
* Purple
* Pink
### Text best practices
* **High contrast**: Use light text on dark backgrounds (or vice versa) for readability
* **Keep it short**: Athletes are swiping through quickly—limit text to key points
* **Use backgrounds**: A semi-transparent background helps text stand out over video/images
* **Position thoughtfully**: Place text where it won't cover important parts of underlying media
***
## Button element
The Button element creates tappable buttons that can navigate between slides, open external links, or provide downloadable files.
### How to add a button
In the toolbar, click the **Button** element (grid icon).
Choose what happens when athletes tap the button.
Customize colors to match your brand.
### Button actions
| Action | What it does | When to use |
| ------------------------- | ---------------------------------------- | --------------------------------------------------------- |
| **Take to next slide** | Advances to the next slide in the lesson | Default navigation, ensuring athletes acknowledge content |
| **Add web link** | Opens an external URL | Link to your website, YouTube, or external resources |
| **Add downloadable link** | Provides a file download | Share PDFs, worksheets, or other downloadable resources |
### Button settings
| Setting | Options |
| -------------------- | ----------------------------------------------------------------- |
| **Button text** | What the button says (e.g., "Next", "Download PDF", "Watch More") |
| **Action** | Next slide, web link, or downloadable link |
| **Text color** | 12-color palette |
| **Background color** | 12-color palette |
### Button best practices
* **Use for pacing**: Adding a "Next" button (instead of just swipe) ensures athletes consciously move forward
* **Clear labels**: Use action-oriented text like "Download Workout PDF" instead of just "Download"
* **Consistent styling**: Keep button colors consistent throughout your lessons
* **Test links**: Always preview your lesson to make sure external links and downloads work
**Downloadable files**: The downloadable link option accepts any file type—PDFs, spreadsheets, documents, etc. This is how you share materials that can't be displayed directly in lessons.
***
## Quiz element
The Quiz element adds multiple choice questions to your lessons. Athletes tap to select their answer from the options you provide.
### How to add a quiz
In the toolbar, click the **Quiz** element (🤔 icon).
Enter the question athletes will see.
Add multiple choice options. Click **Add Option** to add more choices.
Choose light or dark theme.
### Quiz settings
| Setting | Options |
| ----------------- | ----------------------------------------------- |
| **Question text** | The question you're asking |
| **Options** | Multiple choice answers (add as many as needed) |
| **Theme** | Light or Dark |
### Important: Quizzes are not graded
CoachIQ quizzes are for **engagement and feedback collection only**—there is no scoring, pass/fail, or correct answer designation. You see what athletes selected, but the system doesn't grade responses.
**What quizzes are good for:**
* Checking understanding (you review responses manually)
* Gathering preferences ("What skill do you want to work on next?")
* Engagement and interaction during lessons
* Collecting data about your athletes
**What quizzes are NOT for:**
* Formal assessments with grades
* Certification requirements with pass/fail
* Automated feedback based on correct/incorrect
### Quiz best practices
* **Keep questions clear**: One question per quiz element
* **Limit options**: 3-5 answer choices works best
* **Use for checkpoints**: Add quizzes after teaching a concept to reinforce learning
* **Review responses**: Check the Program Stats to see how athletes answered
***
## Form element
The Form element adds free-text input fields where athletes can type their own responses. Use it for reflection questions, goal setting, feedback, or any open-ended input.
### How to add a form
In the toolbar, click the **Form** element (📋 icon).
Enter the question or prompt athletes will respond to.
Choose theme and button color.
### Form settings
| Setting | Options |
| ------------------- | ---------------------------------- |
| **Question/prompt** | The text asking athletes for input |
| **Theme** | Light or Dark |
| **Button color** | Color of the Submit button |
### Form vs Quiz: When to use each
| Use Form when... | Use Quiz when... |
| ------------------------------------- | ------------------------------------- |
| You want open-ended responses | You want specific answer choices |
| Athletes should reflect or explain | You're checking factual understanding |
| Collecting goals, feedback, questions | Gathering preferences between options |
| Response length varies | Quick, simple interaction |
### Form best practices
* **Ask specific questions**: "What's one thing you'll focus on this week?" is better than "Any thoughts?"
* **Set expectations**: Let athletes know roughly how much you expect (a sentence vs a paragraph)
* **Use for accountability**: Ask athletes to commit to goals or reflect on progress
* **Review responses**: Check Program Stats regularly to read what athletes submit
***
## Upload element
The Upload element lets athletes submit their own videos, images, or files. This is powerful for remote coaching, form checks, and drill assignments.
**Important distinction**: The Upload element is for **ATHLETE uploads**, not coach uploads. If you want to add your own video to a slide, use the Media element instead.
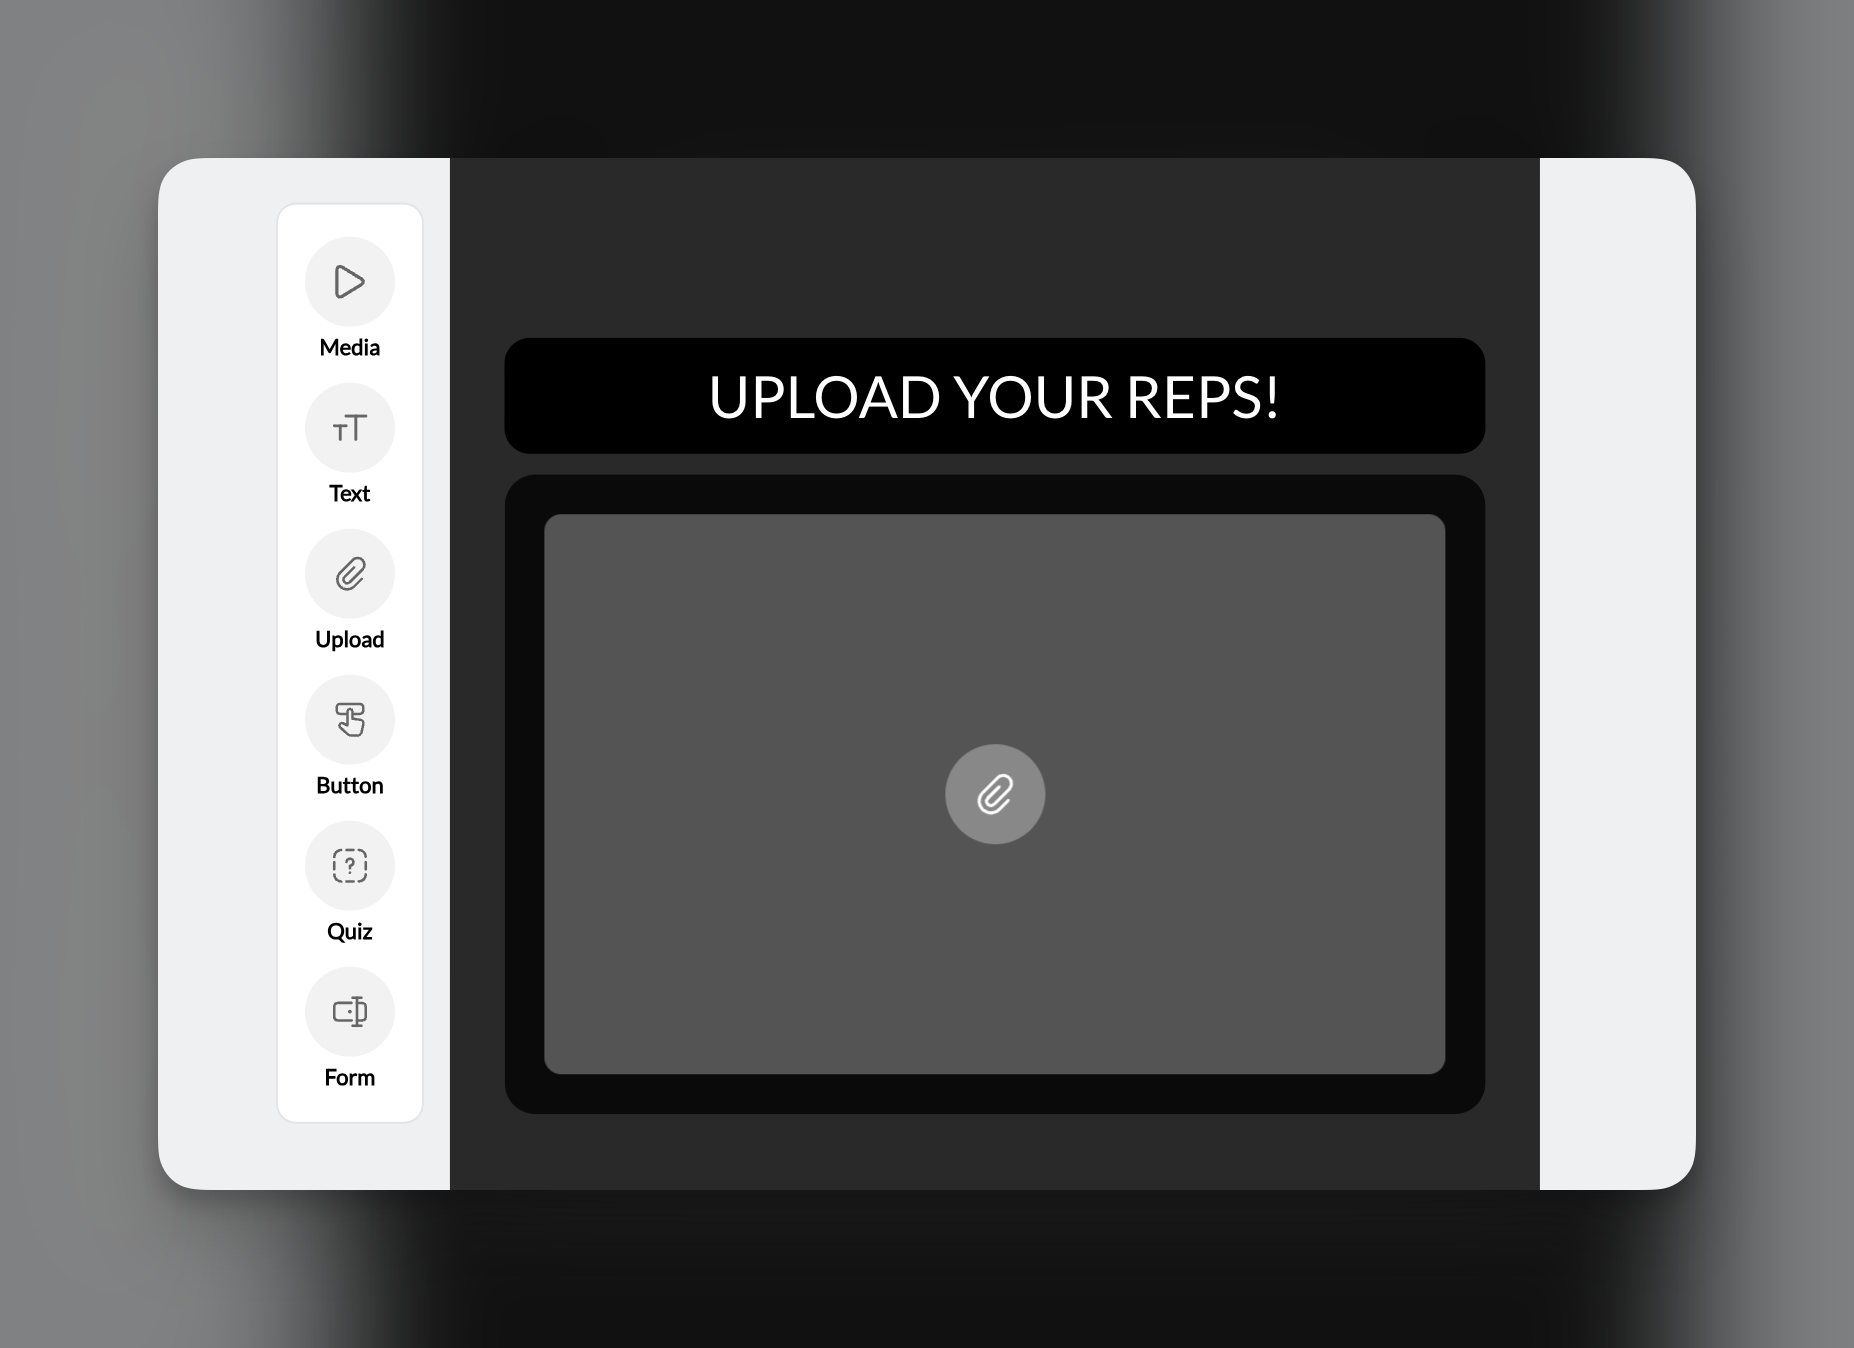 ### How to add an upload prompt
In the toolbar, click the **Upload** element (📎 icon).
Athletes will see a prompt to upload their content.
Choose Light or Dark appearance.
### Upload settings
| Setting | Options |
| --------- | ------------- |
| **Theme** | Light or Dark |
### What athletes can upload
Athletes can upload:
* Videos (from their camera roll or recorded in-app)
* Images/photos
* Other file types
### Upload use cases
Show an example of correct form, then ask athletes to upload a video of themselves performing the movement. Review their submissions and provide feedback.
Assign a drill and have athletes upload video evidence that they completed it. Great for accountability in remote training.
For fitness coaching, have athletes submit progress photos at regular intervals throughout a program.
Ask athletes to film themselves practicing a skill from your lesson, then submit for review.
### Upload best practices
* **Explain what you want**: Add a Text element above the Upload explaining what athletes should submit
* **Show an example first**: Use a Media element to demonstrate what you're looking for before asking for uploads
* **Check submissions regularly**: Athletes expect feedback—review uploads in Program Stats and respond
* **Set expectations**: Let athletes know how you'll use their uploads (review, feedback, etc.)
***
## Where element responses are collected
All interactive elements (Quiz, Form, Upload) collect responses at the **[Program](/content/programs-overview) level**, not the individual lesson level.
To view responses:
1. Open the Program containing your lesson
2. Click the **Stats** button in the top bar
3. View all submissions organized by lesson/checkpoint
This means if you use the same lesson in multiple programs, responses are tracked separately for each program.
***
## Layering multiple elements on one slide
Each slide can have unlimited elements layered on top of each other. Common patterns:
**Video + Text + Button:**
1. Media element (video) as background
2. Text element with key instruction overlay
3. Button element at bottom for "Next"
**Image + Quiz:**
1. Media element (image showing a scenario)
2. Quiz element asking about what they see
**Text + Form:**
1. Text element explaining the reflection prompt
2. Form element for athlete response
**Reorder elements**: In the left sidebar, you can drag elements within a slide to change their stacking order. Elements lower in the list appear on top.
***
## Frequently asked questions about lesson elements
No. CoachIQ quizzes don't have correct/incorrect answers or scoring. They're for engagement and data collection. You can review responses manually to see what athletes selected.
Use the Button element with the "Add downloadable link" action. Upload your PDF and athletes can download it when they tap the button.
Currently, athletes can proceed through lessons without uploading. If you require submissions, consider adding a text note explaining that uploads are expected.
There's no limit. However, keep slides focused—too many elements can feel cluttered. If you need lots of content, spread it across multiple slides.
Yes. Drag elements up/down in the left sidebar to change their stacking order. Elements lower in the list appear visually on top.
Athletes can upload videos, images, and other common file types. There's no strict restriction, but video and image uploads are most common.
## Next steps
Put these elements to work—build your first interactive lesson.
Package your lessons into programs athletes can access.
## Related articles
Get videos and images into Media Hub so you can use them in lesson elements.
Configure pricing and access for programs that contain your lessons.
Control how athletes discover and access your lesson content.
Build standalone forms for collecting information outside of lessons.
### How to add an upload prompt
In the toolbar, click the **Upload** element (📎 icon).
Athletes will see a prompt to upload their content.
Choose Light or Dark appearance.
### Upload settings
| Setting | Options |
| --------- | ------------- |
| **Theme** | Light or Dark |
### What athletes can upload
Athletes can upload:
* Videos (from their camera roll or recorded in-app)
* Images/photos
* Other file types
### Upload use cases
Show an example of correct form, then ask athletes to upload a video of themselves performing the movement. Review their submissions and provide feedback.
Assign a drill and have athletes upload video evidence that they completed it. Great for accountability in remote training.
For fitness coaching, have athletes submit progress photos at regular intervals throughout a program.
Ask athletes to film themselves practicing a skill from your lesson, then submit for review.
### Upload best practices
* **Explain what you want**: Add a Text element above the Upload explaining what athletes should submit
* **Show an example first**: Use a Media element to demonstrate what you're looking for before asking for uploads
* **Check submissions regularly**: Athletes expect feedback—review uploads in Program Stats and respond
* **Set expectations**: Let athletes know how you'll use their uploads (review, feedback, etc.)
***
## Where element responses are collected
All interactive elements (Quiz, Form, Upload) collect responses at the **[Program](/content/programs-overview) level**, not the individual lesson level.
To view responses:
1. Open the Program containing your lesson
2. Click the **Stats** button in the top bar
3. View all submissions organized by lesson/checkpoint
This means if you use the same lesson in multiple programs, responses are tracked separately for each program.
***
## Layering multiple elements on one slide
Each slide can have unlimited elements layered on top of each other. Common patterns:
**Video + Text + Button:**
1. Media element (video) as background
2. Text element with key instruction overlay
3. Button element at bottom for "Next"
**Image + Quiz:**
1. Media element (image showing a scenario)
2. Quiz element asking about what they see
**Text + Form:**
1. Text element explaining the reflection prompt
2. Form element for athlete response
**Reorder elements**: In the left sidebar, you can drag elements within a slide to change their stacking order. Elements lower in the list appear on top.
***
## Frequently asked questions about lesson elements
No. CoachIQ quizzes don't have correct/incorrect answers or scoring. They're for engagement and data collection. You can review responses manually to see what athletes selected.
Use the Button element with the "Add downloadable link" action. Upload your PDF and athletes can download it when they tap the button.
Currently, athletes can proceed through lessons without uploading. If you require submissions, consider adding a text note explaining that uploads are expected.
There's no limit. However, keep slides focused—too many elements can feel cluttered. If you need lots of content, spread it across multiple slides.
Yes. Drag elements up/down in the left sidebar to change their stacking order. Elements lower in the list appear visually on top.
Athletes can upload videos, images, and other common file types. There's no strict restriction, but video and image uploads are most common.
## Next steps
Put these elements to work—build your first interactive lesson.
Package your lessons into programs athletes can access.
## Related articles
Get videos and images into Media Hub so you can use them in lesson elements.
Configure pricing and access for programs that contain your lessons.
Control how athletes discover and access your lesson content.
Build standalone forms for collecting information outside of lessons.