> ## Documentation Index
> Fetch the complete documentation index at: https://help.coachiq.io/llms.txt
> Use this file to discover all available pages before exploring further.
# Managing Schedulers in Your Athlete Portal
> Learn how to add, organize, and customize schedulers in your Athlete Portal so athletes can book sessions directly from their app.
**Where to find this**: Dashboard → App Builder → Schedule tab
## What you'll accomplish
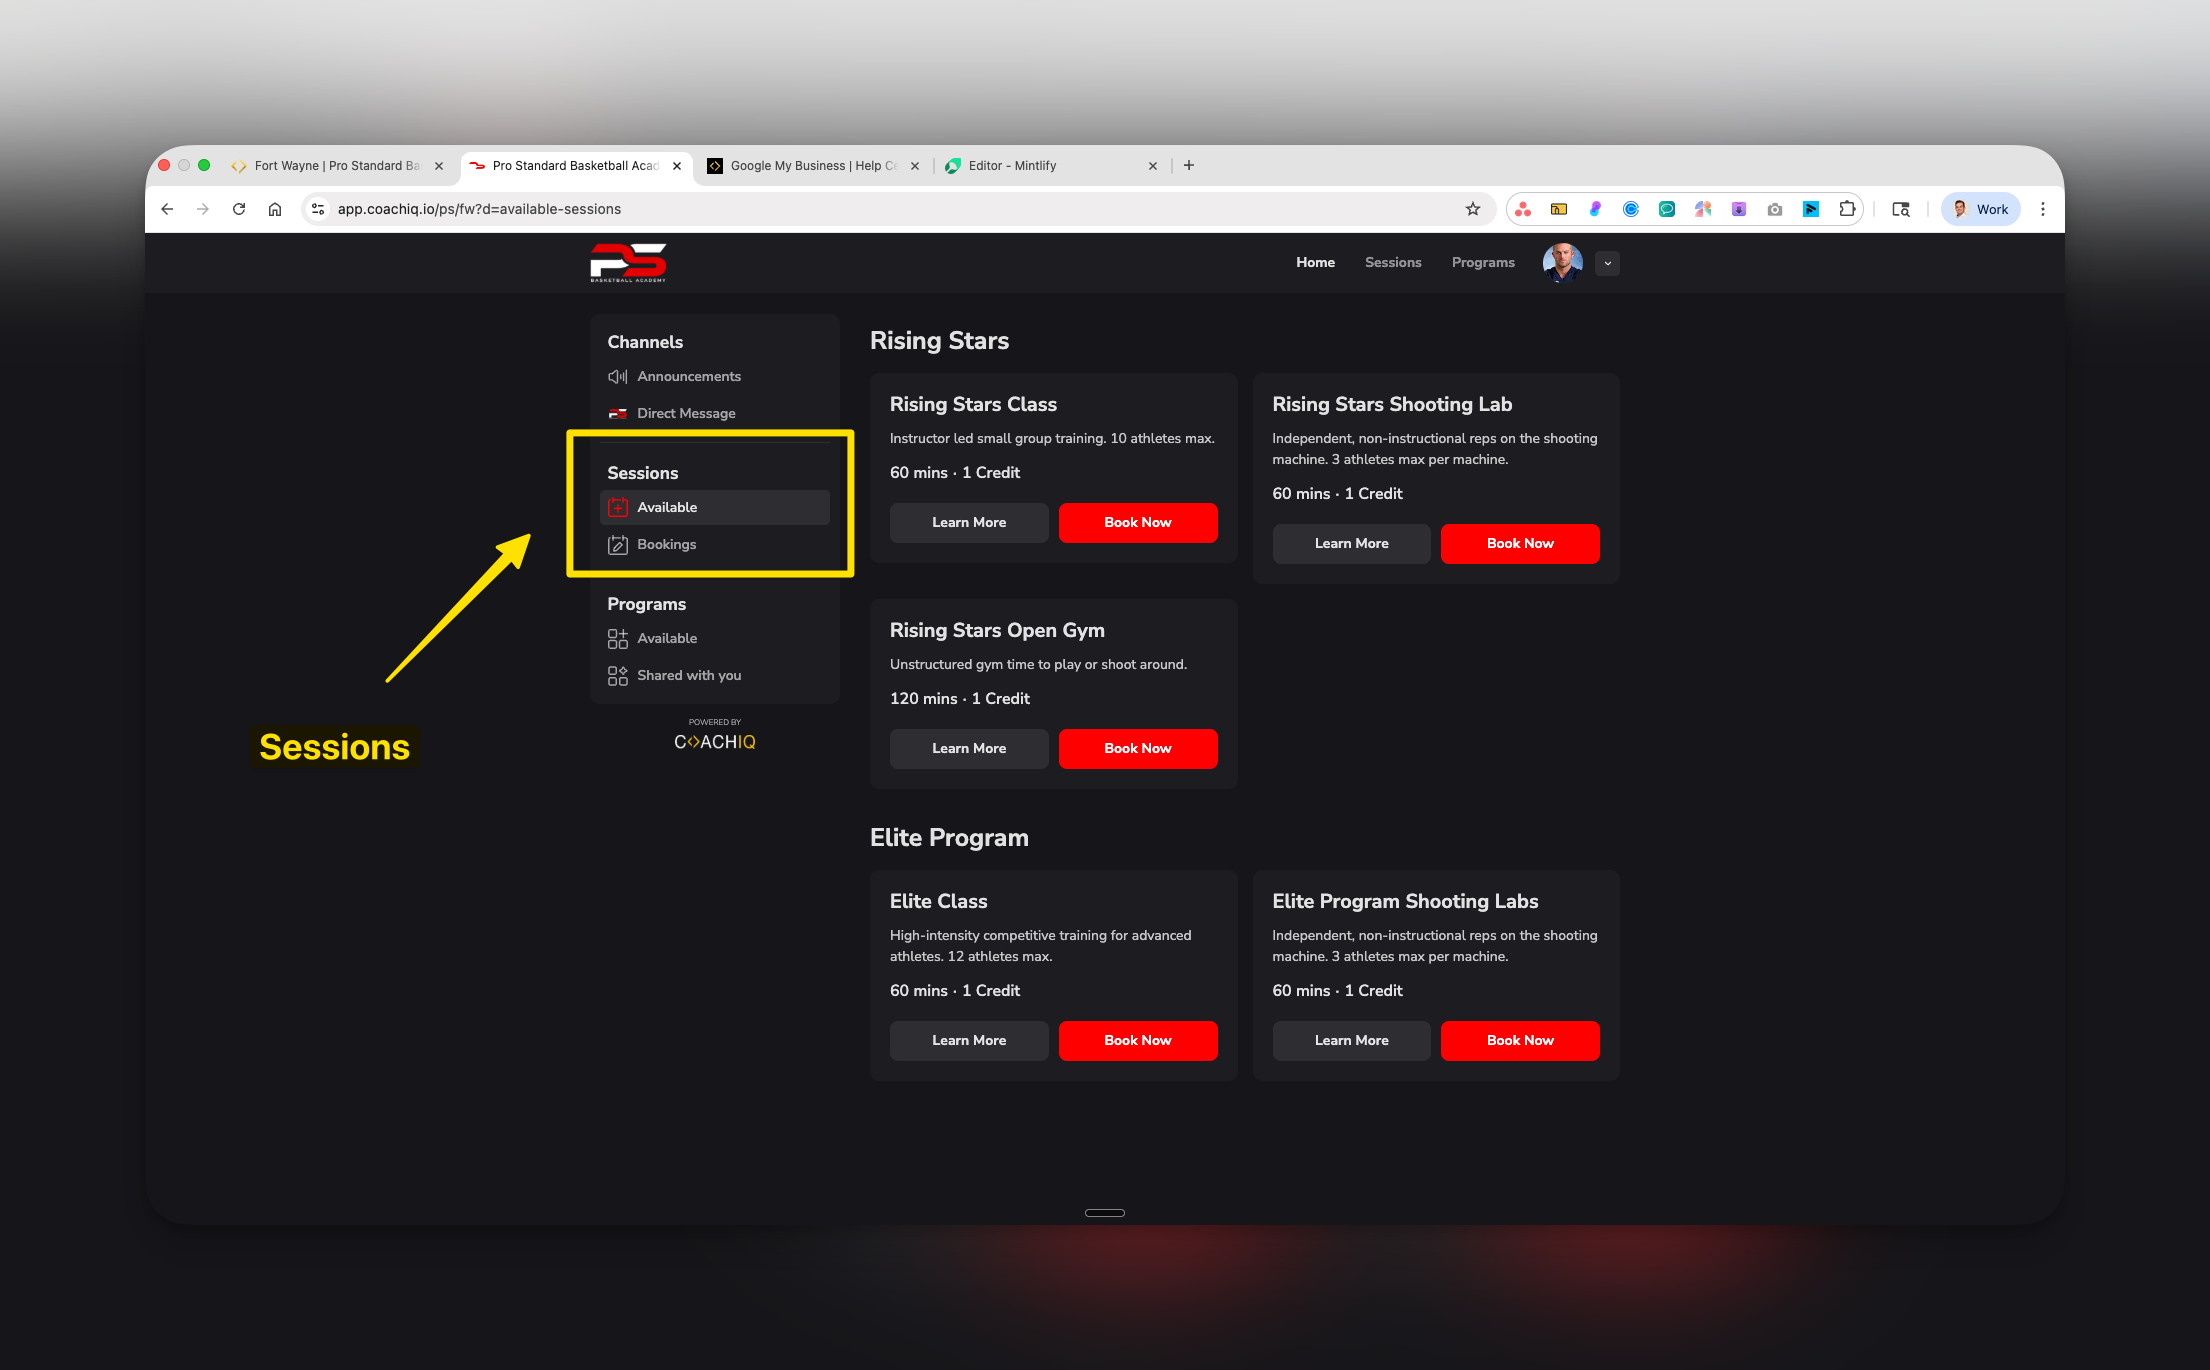
Set up and organize your schedulers so athletes can view available sessions and book directly from their mobile app or web portal. You'll learn how to select which schedulers appear, organize them into sections, and customize how they're displayed to your athletes.
## Before you begin
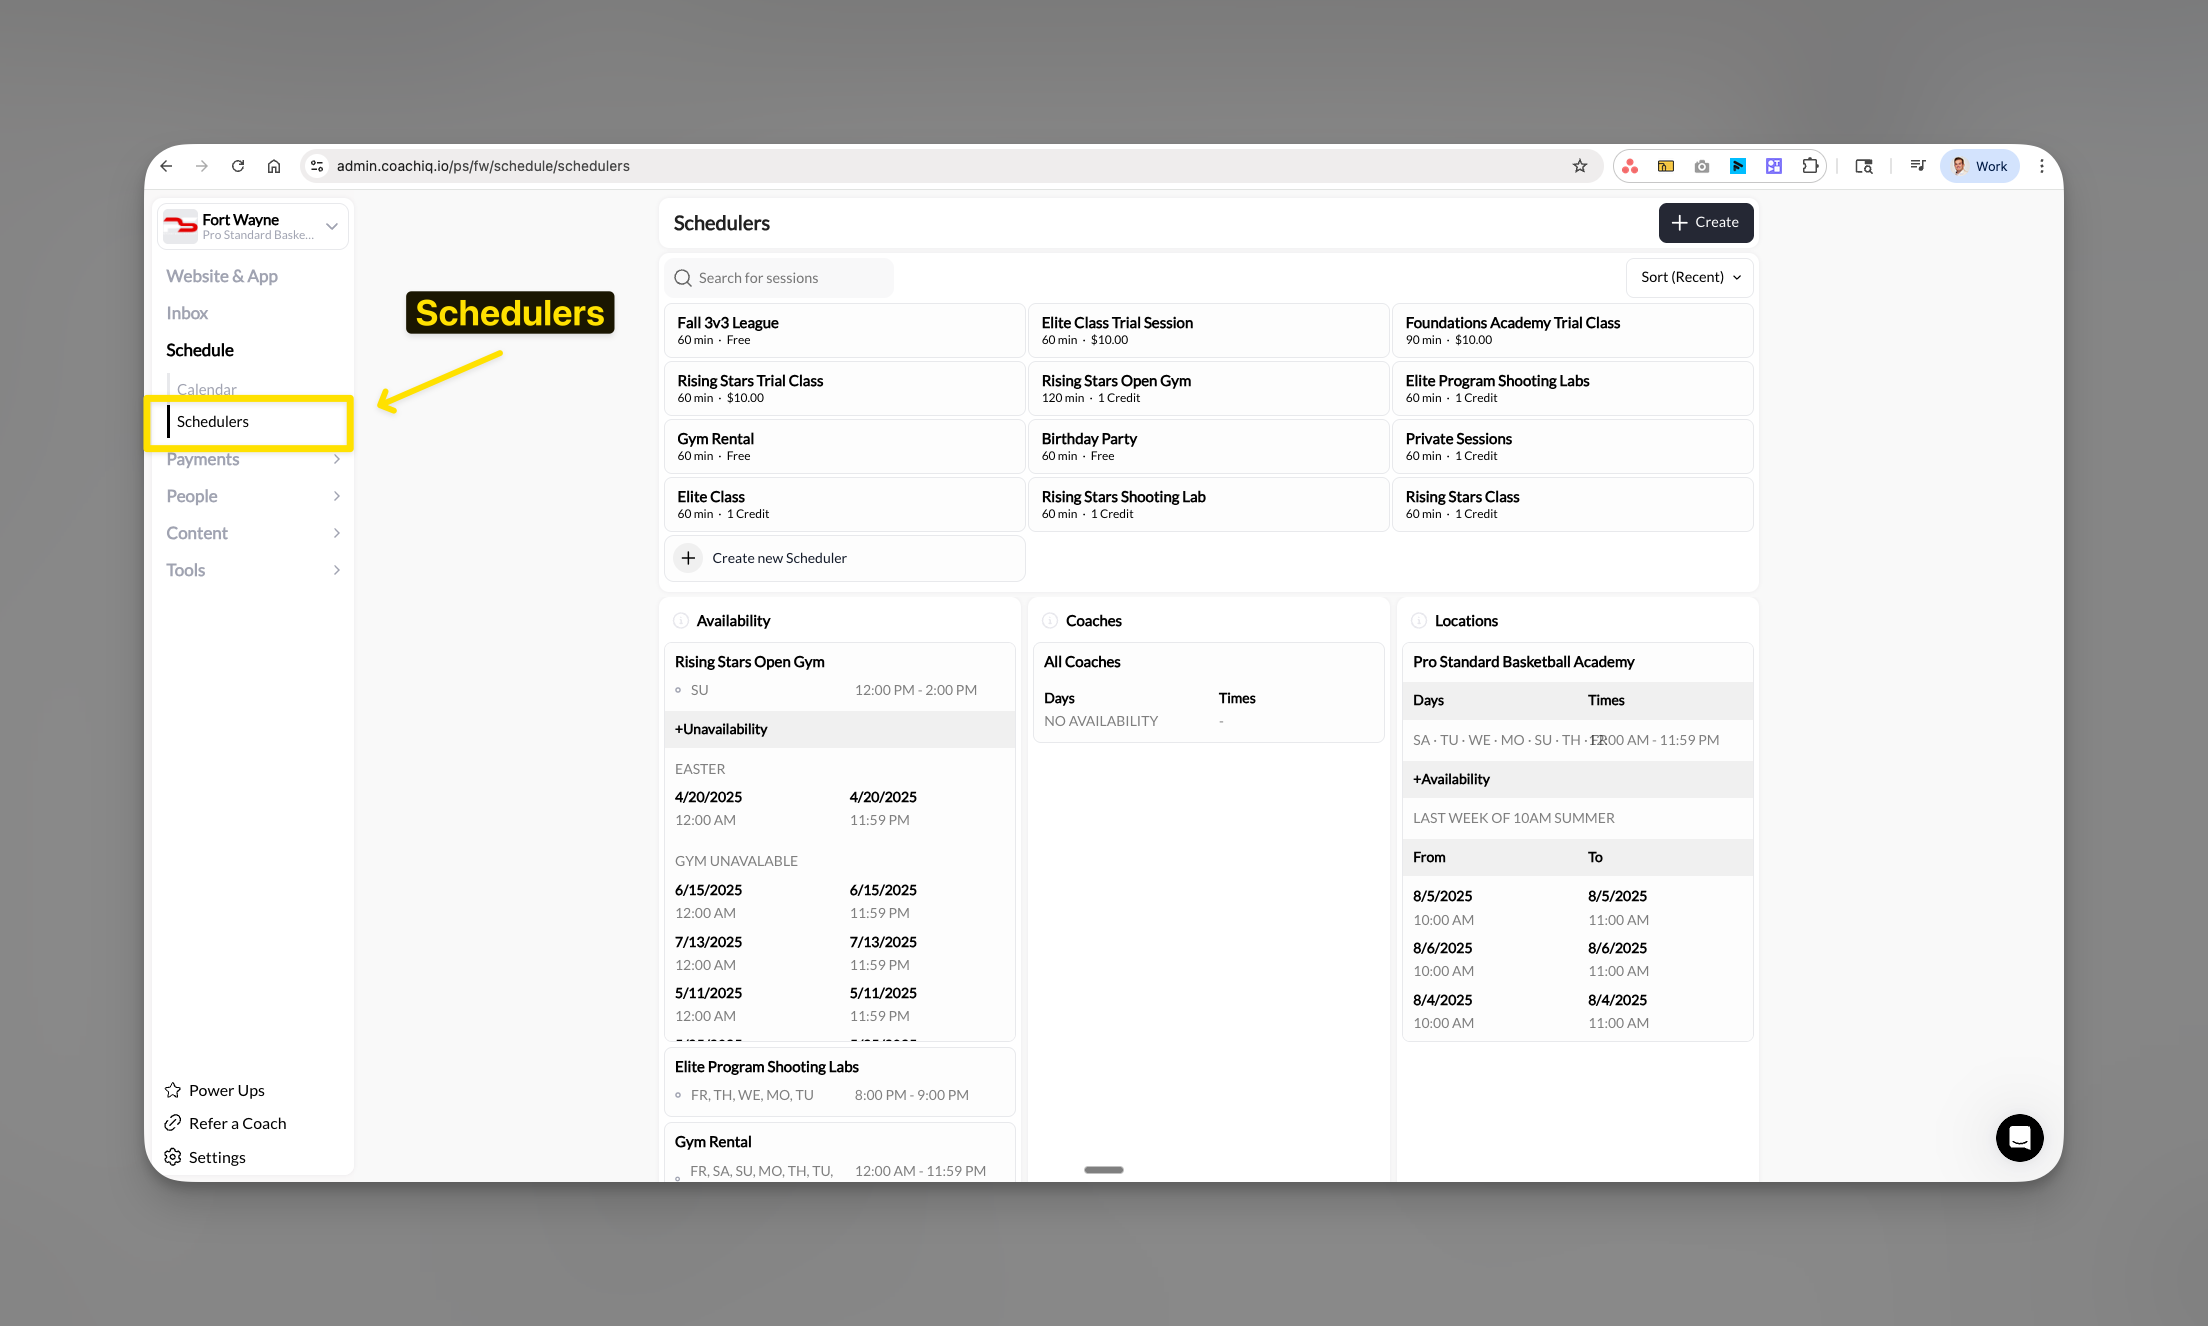 **Required setup**: You must have at least one scheduler created before adding it to the Athlete Portal. If you haven't created any schedulers yet, go to **Schedule → Schedulers** to set up your first one.
## Understanding the Schedule page
The Schedule page in your Athlete Portal is where athletes view and book available sessions. As a coach, you have complete control over:
* Which schedulers athletes can see
* How schedulers are organized into sections
* The titles and descriptions athletes see
* Whether the scheduling feature is available at all
Each scheduler displays its cost (like "1 Credit") which you set when creating the scheduler. This helps athletes understand the booking cost before they select a session.
**Required setup**: You must have at least one scheduler created before adding it to the Athlete Portal. If you haven't created any schedulers yet, go to **Schedule → Schedulers** to set up your first one.
## Understanding the Schedule page
The Schedule page in your Athlete Portal is where athletes view and book available sessions. As a coach, you have complete control over:
* Which schedulers athletes can see
* How schedulers are organized into sections
* The titles and descriptions athletes see
* Whether the scheduling feature is available at all
Each scheduler displays its cost (like "1 Credit") which you set when creating the scheduler. This helps athletes understand the booking cost before they select a session.
 ## Accessing your Schedule settings
From your dashboard, click **App** in the left navigation menu, then select **Schedule**.
You'll see any existing sections and schedulers already added to your athlete portal.
Toggle the **Active** switch to control whether athletes can see the Schedule page. When off, the entire scheduling section is hidden from athletes.
## Accessing your Schedule settings
From your dashboard, click **App** in the left navigation menu, then select **Schedule**.
You'll see any existing sections and schedulers already added to your athlete portal.
Toggle the **Active** switch to control whether athletes can see the Schedule page. When off, the entire scheduling section is hidden from athletes.
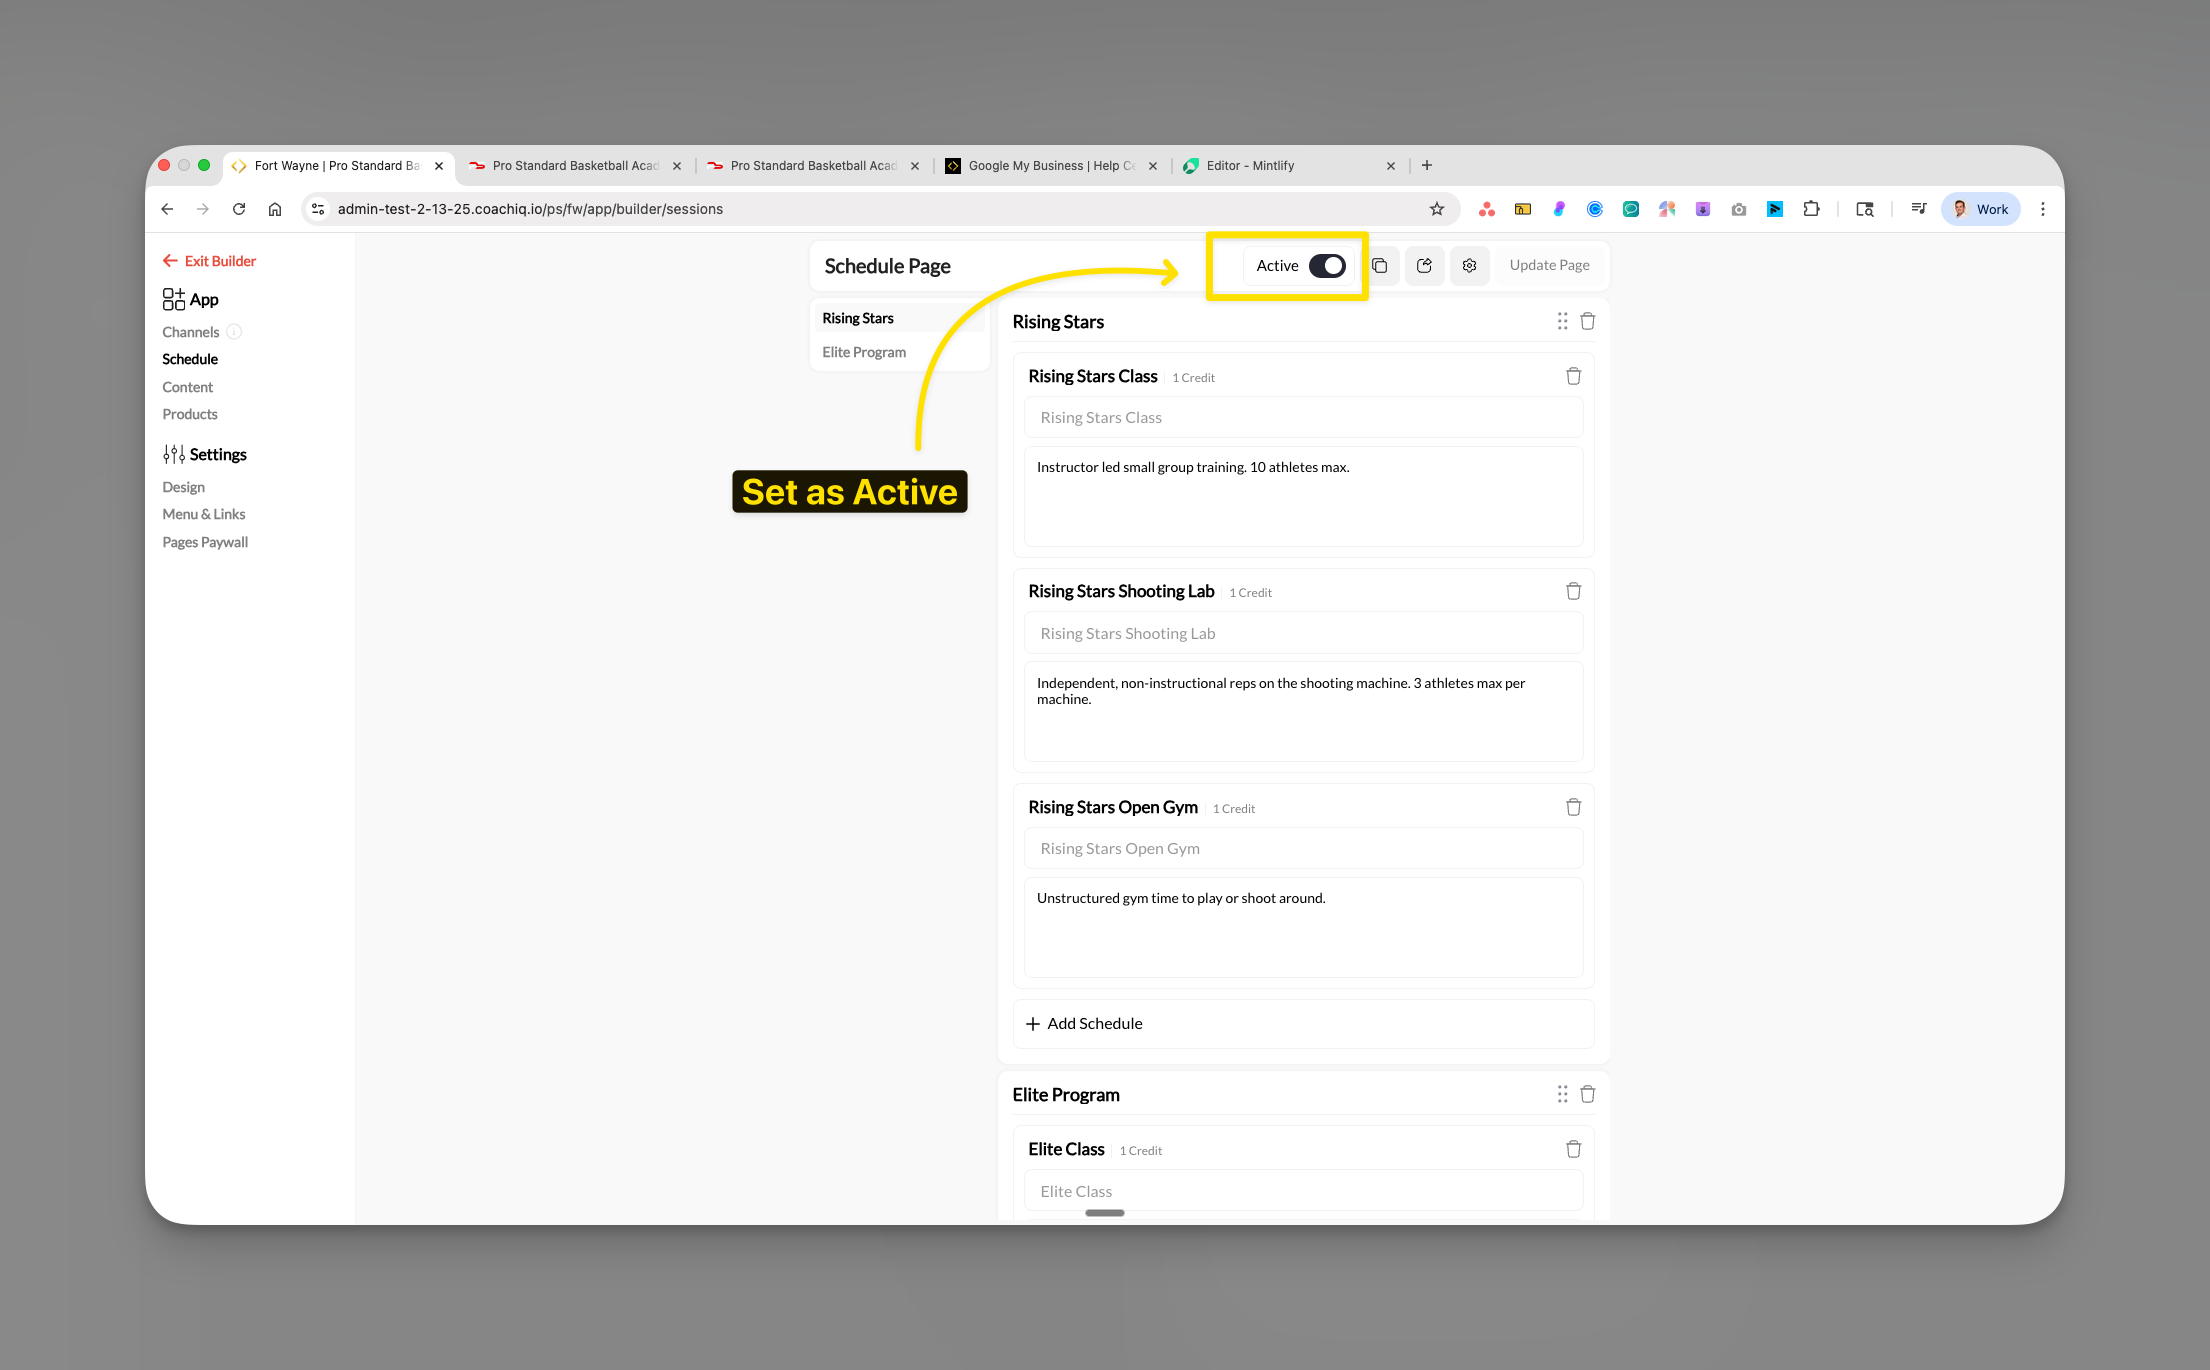 Always hit update page to ensure the updates go live!
## Adding schedulers to your portal
Within any section, click the **+ Add Schedule** button to add a scheduler.
Always hit update page to ensure the updates go live!
## Adding schedulers to your portal
Within any section, click the **+ Add Schedule** button to add a scheduler.
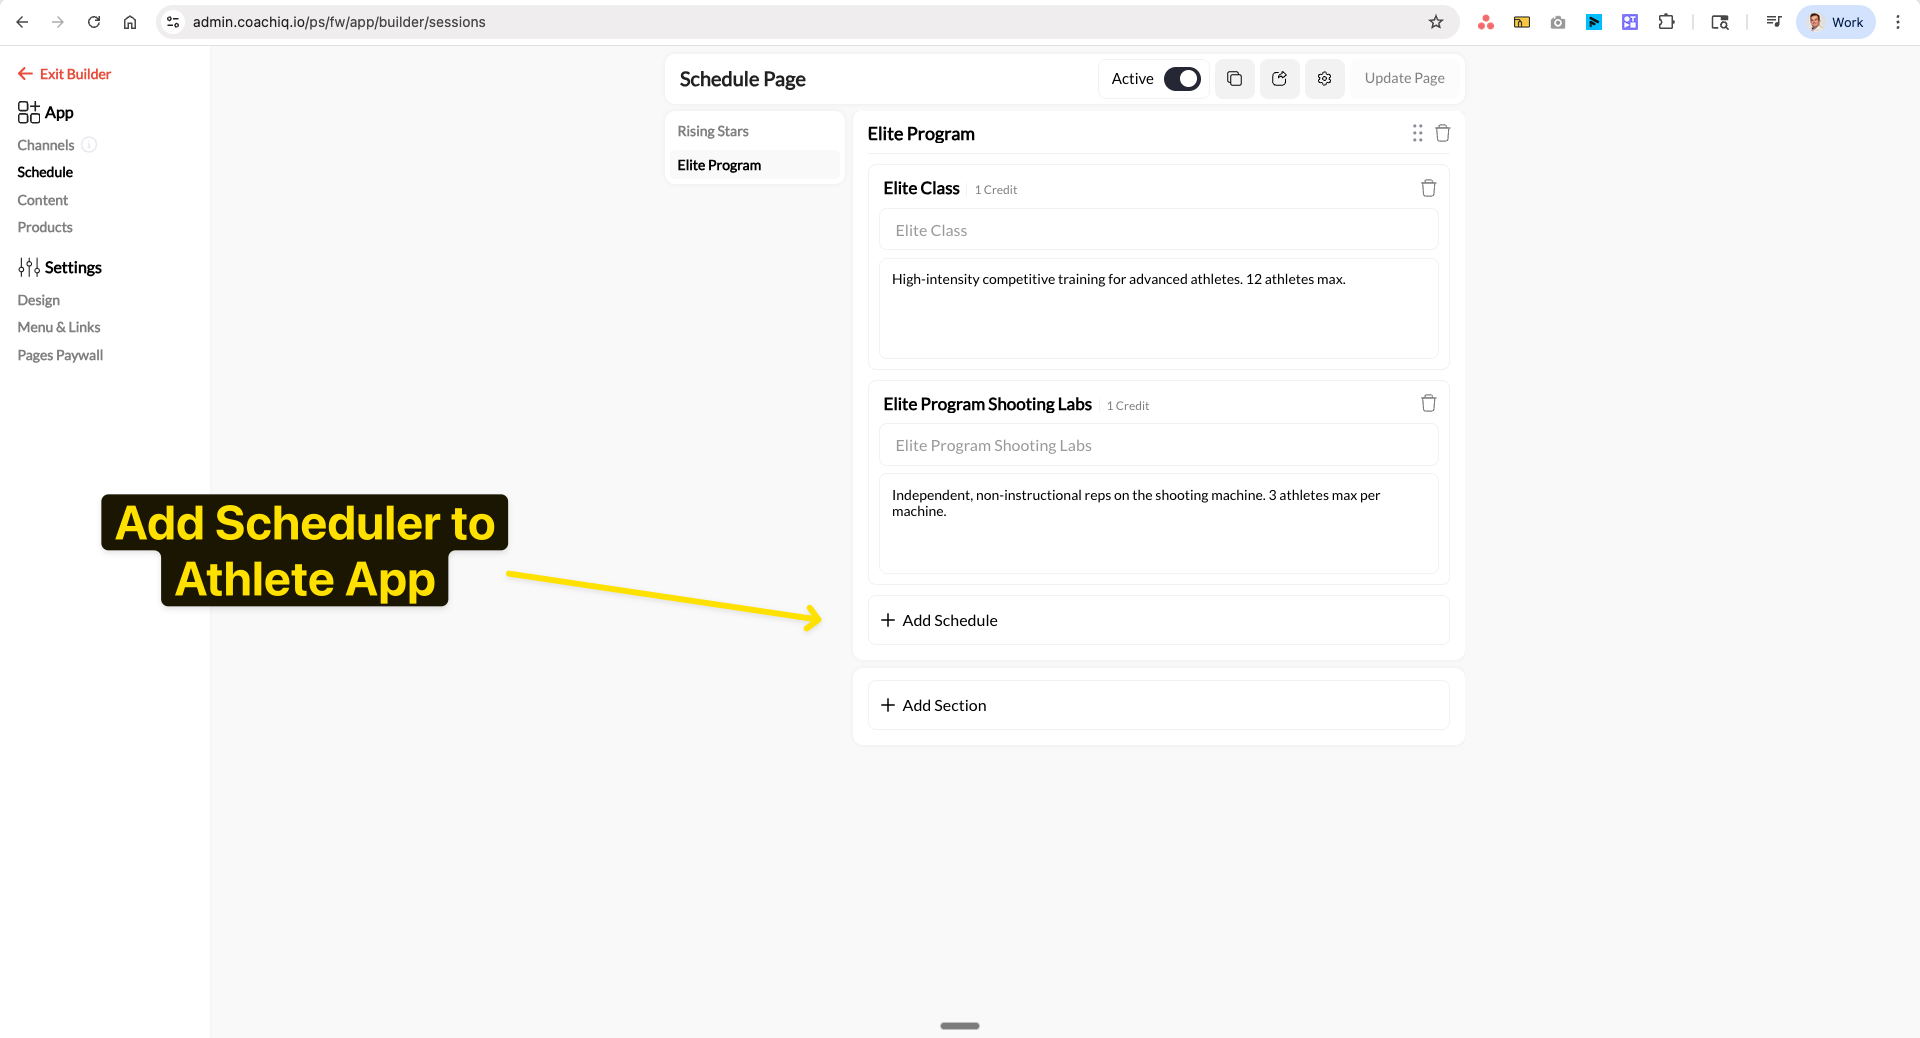 A modal will appear showing all schedulers you've created in the system. Select the scheduler(s) you want to add.
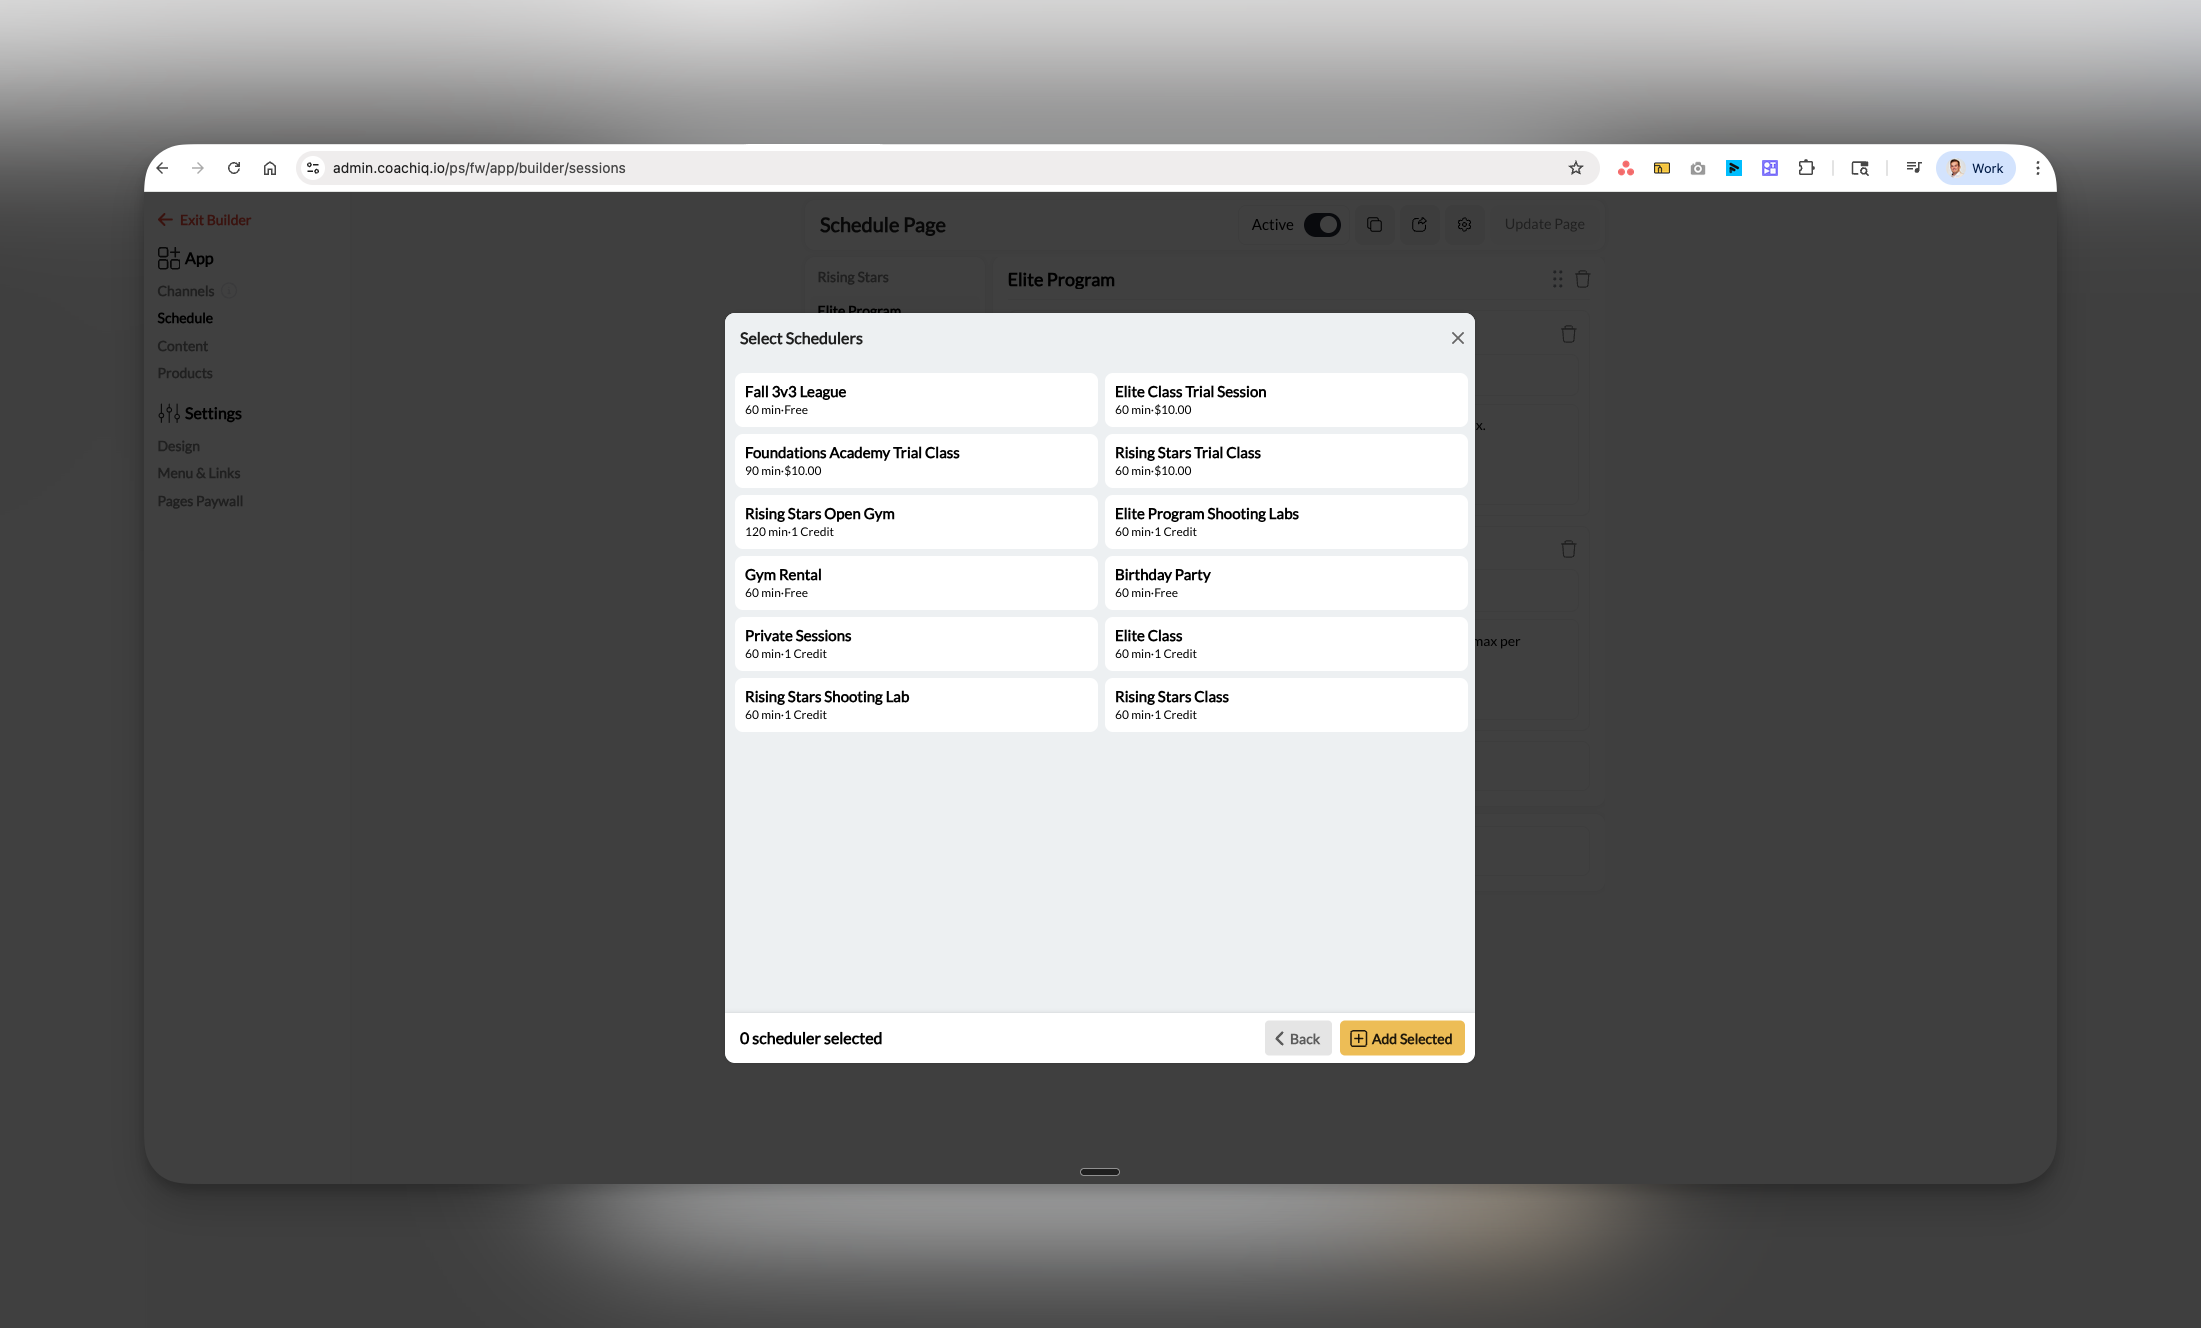 You can select multiple schedulers at once or add them one at a time.
Click **Add Selected** to add the chosen schedulers to your section. They'll appear immediately with their title, description, and credit cost.
## Creating and organizing sections
Sections help you organize schedulers into logical groups like "Elite Program", "Rising Stars", or by location. Athletes always see sections expanded - they cannot collapse them.
Click **+ Add Section** at the bottom of your scheduler list.
You can select multiple schedulers at once or add them one at a time.
Click **Add Selected** to add the chosen schedulers to your section. They'll appear immediately with their title, description, and credit cost.
## Creating and organizing sections
Sections help you organize schedulers into logical groups like "Elite Program", "Rising Stars", or by location. Athletes always see sections expanded - they cannot collapse them.
Click **+ Add Section** at the bottom of your scheduler list.
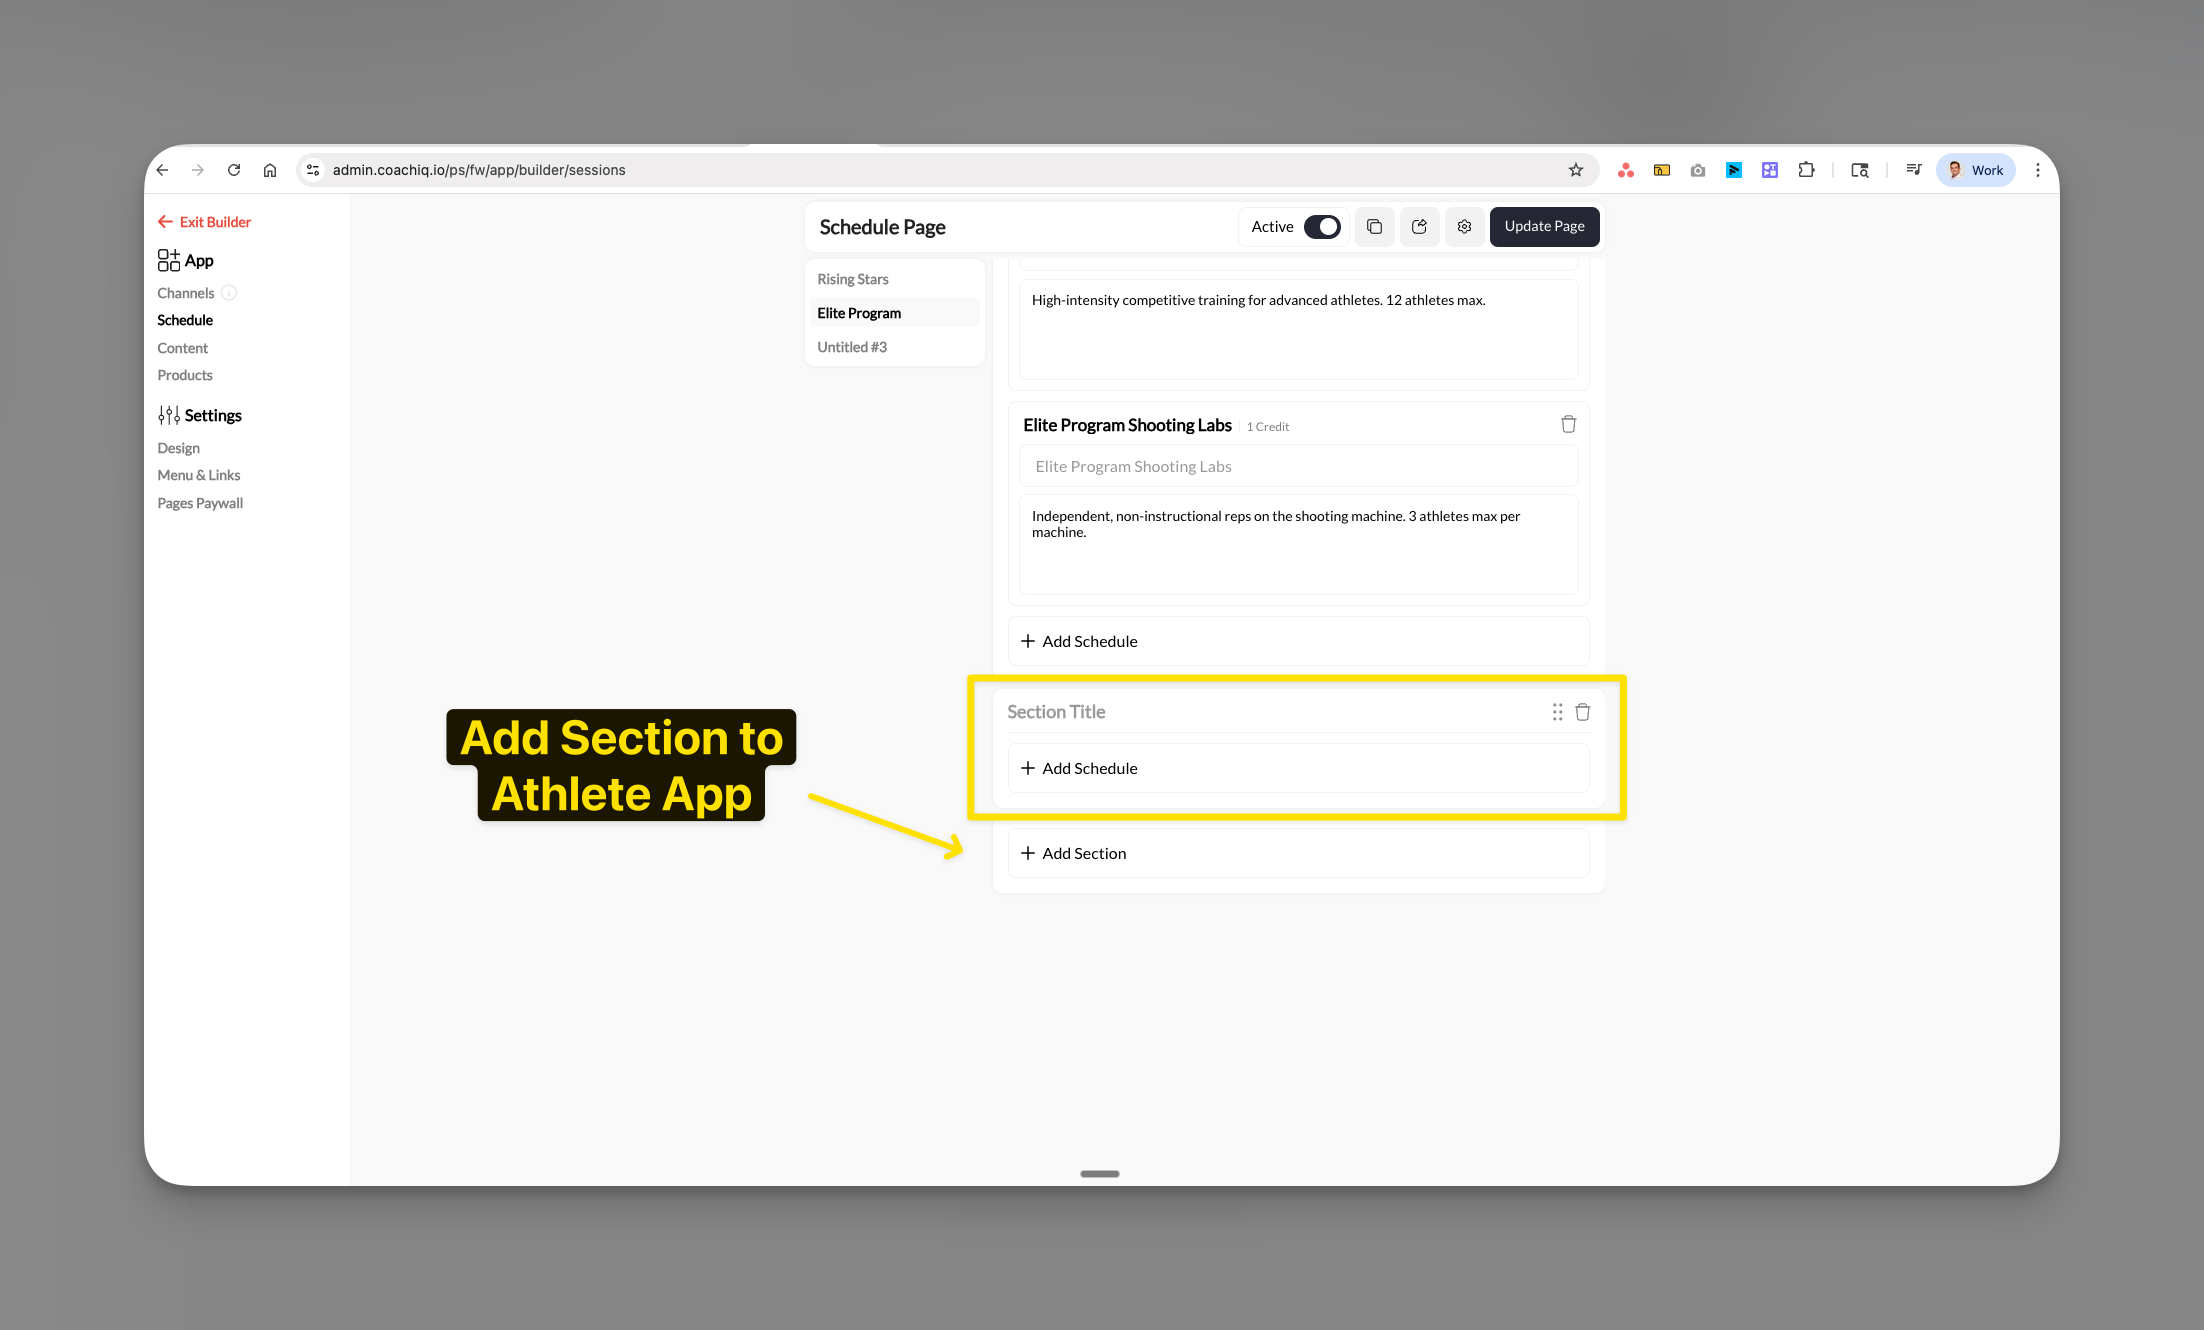 Enter a clear, descriptive title for the section (e.g., "Beginner Classes", "Advanced Training", "Summer Programs").
Click **+ Add Schedule** within your new section to start adding schedulers.
Your section is created and ready for schedulers!
## Customizing scheduler display
Each scheduler can have a custom title and description that athletes see, regardless of the scheduler's original name.
Select any scheduler in your list to open its editing panel.
Enter a clear, descriptive title for the section (e.g., "Beginner Classes", "Advanced Training", "Summer Programs").
Click **+ Add Schedule** within your new section to start adding schedulers.
Your section is created and ready for schedulers!
## Customizing scheduler display
Each scheduler can have a custom title and description that athletes see, regardless of the scheduler's original name.
Select any scheduler in your list to open its editing panel.
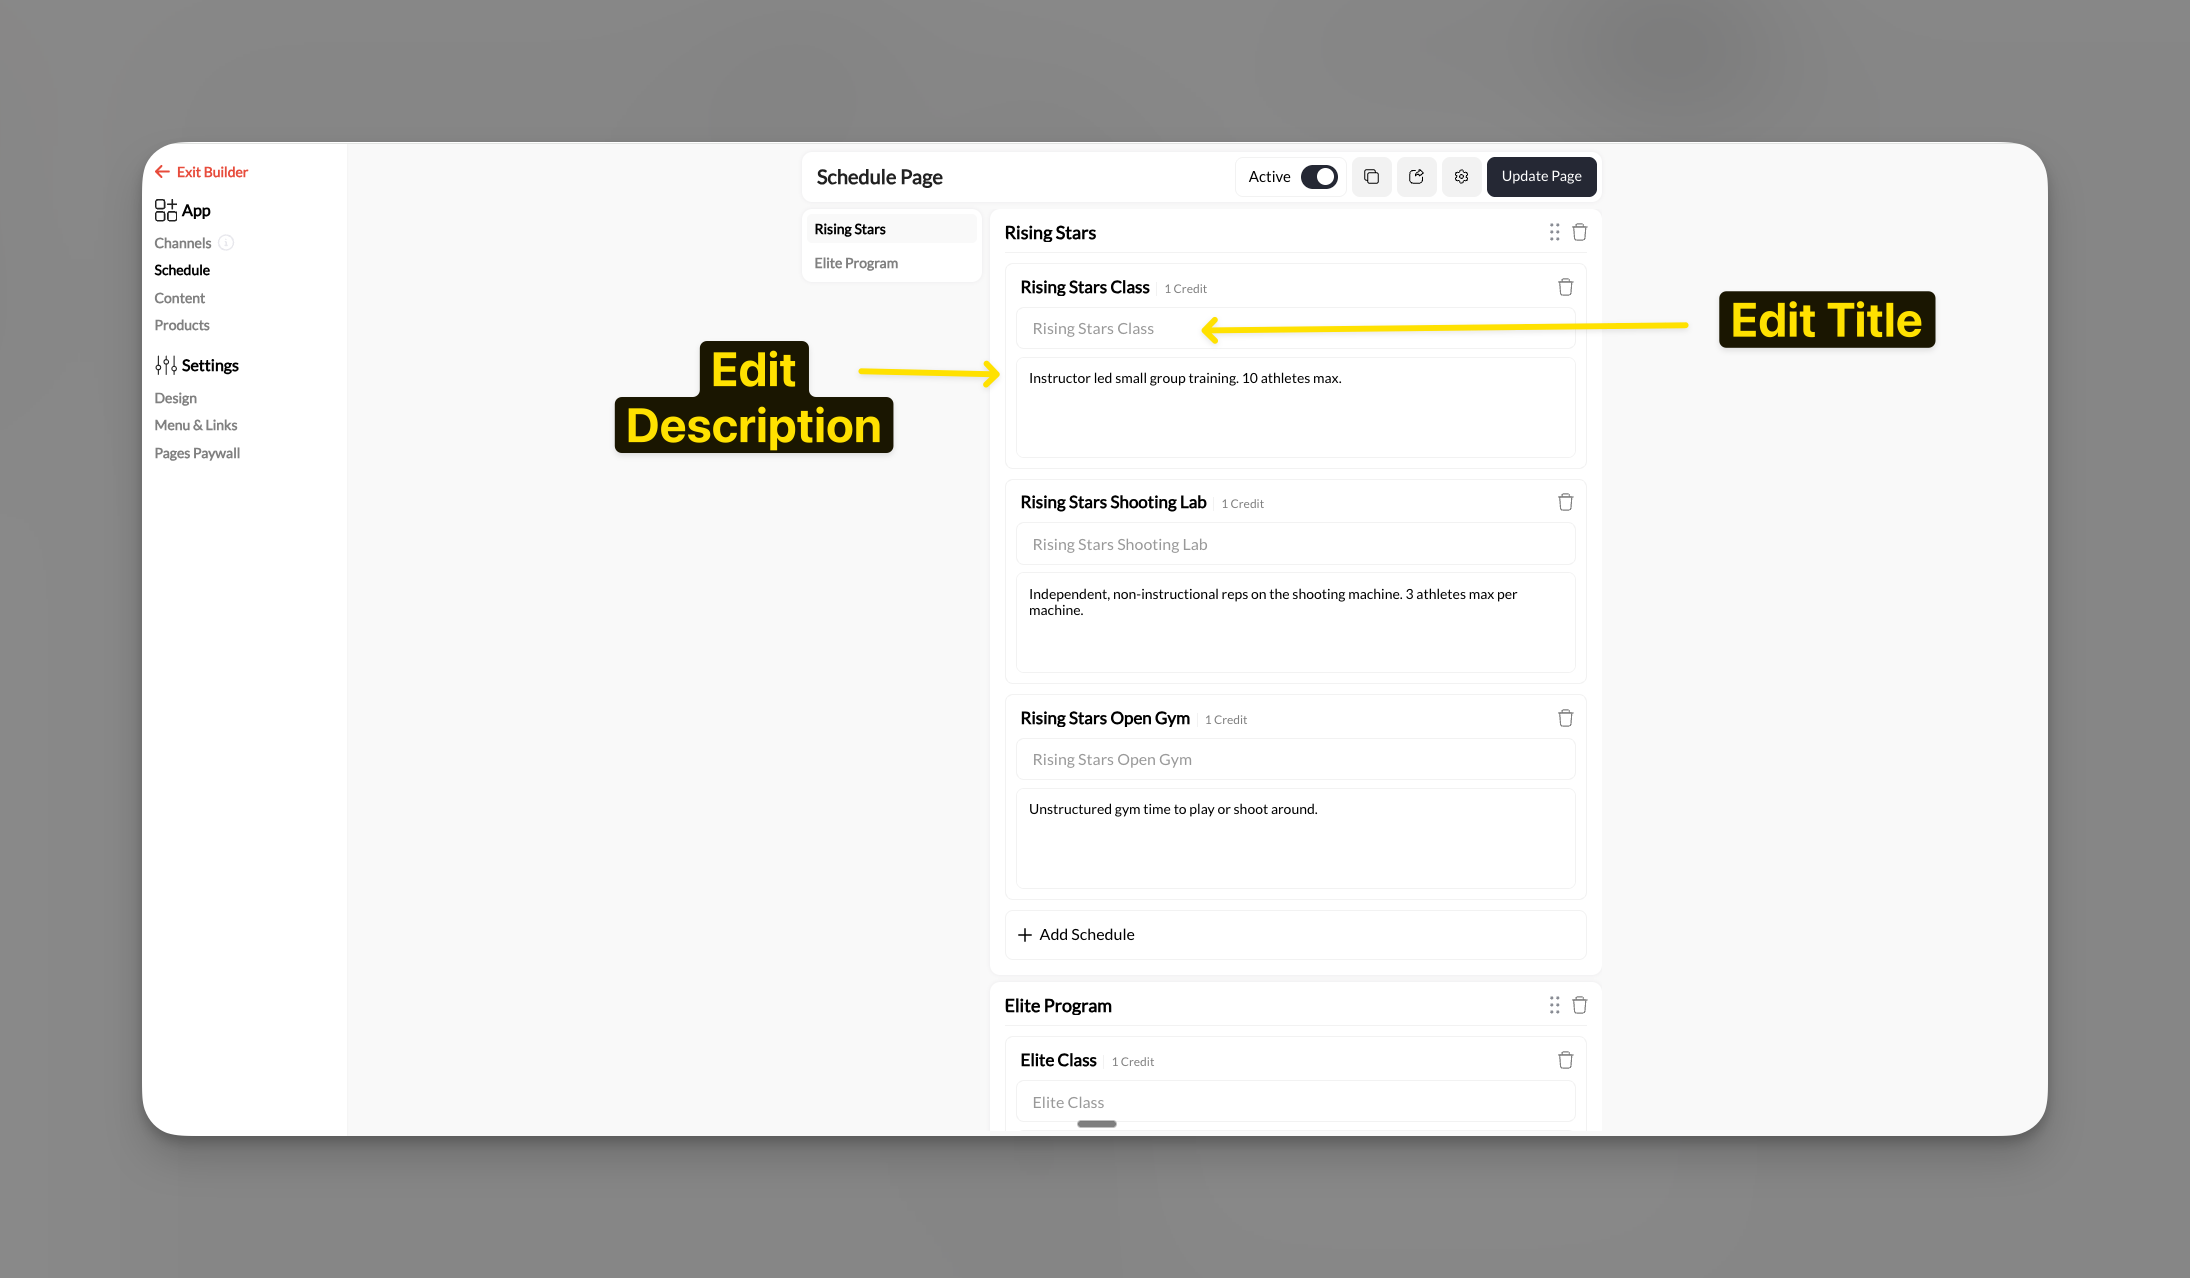 Update the scheduler name that athletes will see. Make it clear and action-oriented.
Add helpful context about the session type, skill level, or what athletes should expect. Keep it concise but informative.
## Reordering and managing sections
Click the dots menu (⋮) next to any section to see management options.
Update the scheduler name that athletes will see. Make it clear and action-oriented.
Add helpful context about the session type, skill level, or what athletes should expect. Keep it concise but informative.
## Reordering and managing sections
Click the dots menu (⋮) next to any section to see management options.
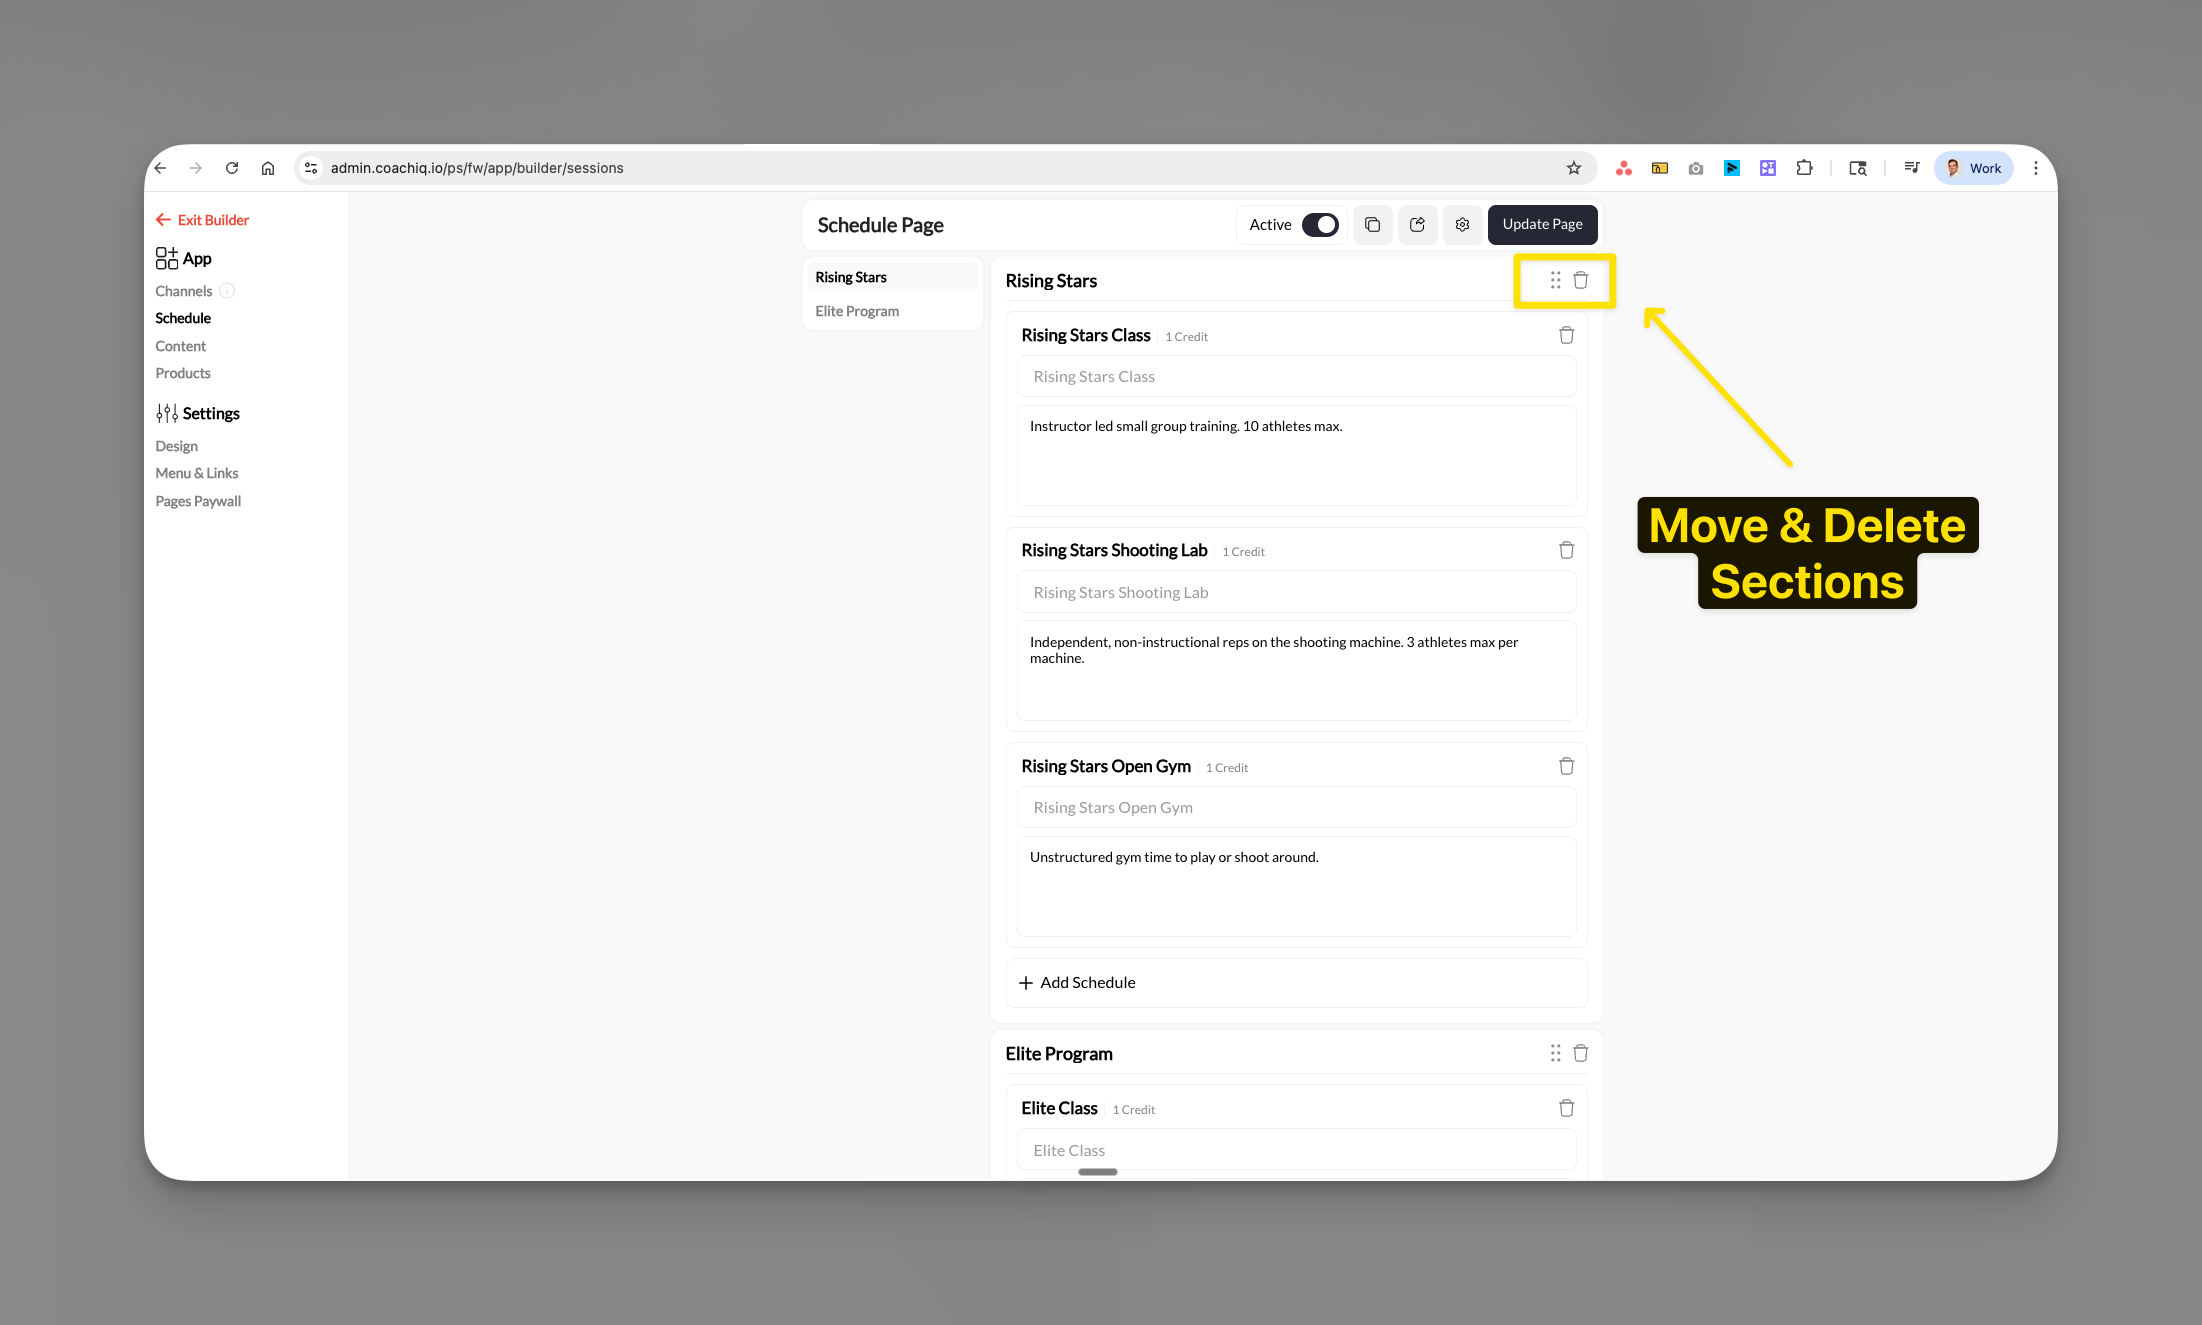 Drag sections up or down to change their display order. Place your most popular or important sections at the top.
Select the delete option to remove an entire section and all its schedulers from the athlete view.
Deleting a section from the Athlete Portal doesn't delete the actual schedulers - it just removes them from athlete view.
## Previewing the athlete experience
Always preview your changes to ensure athletes see exactly what you intend.
Select the preview icon in the top toolbar to see the athlete view.
Drag sections up or down to change their display order. Place your most popular or important sections at the top.
Select the delete option to remove an entire section and all its schedulers from the athlete view.
Deleting a section from the Athlete Portal doesn't delete the actual schedulers - it just removes them from athlete view.
## Previewing the athlete experience
Always preview your changes to ensure athletes see exactly what you intend.
Select the preview icon in the top toolbar to see the athlete view.
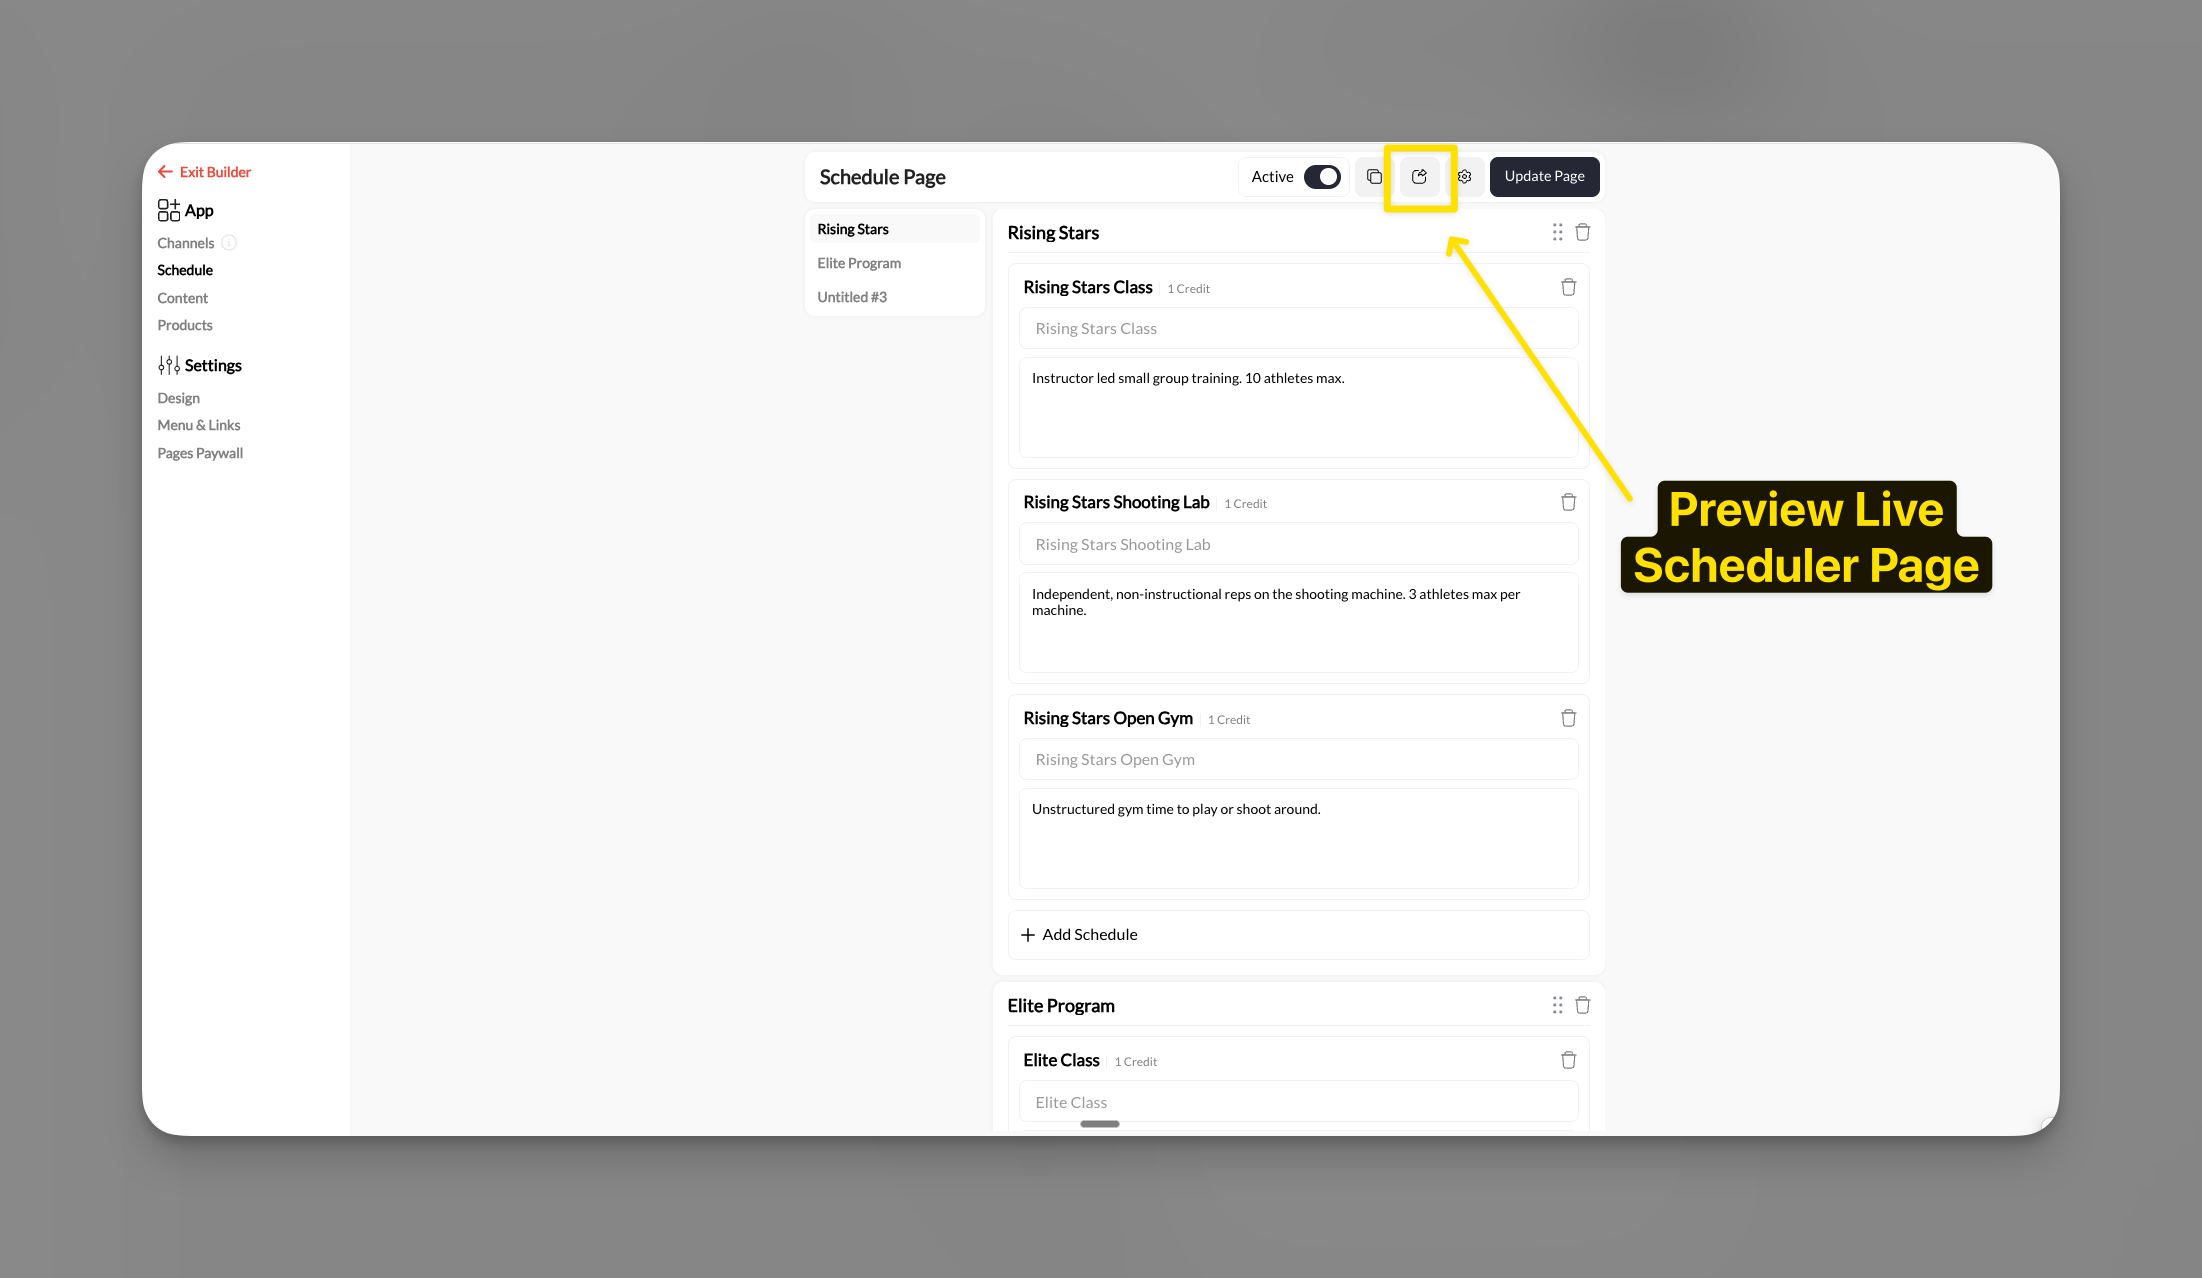 Check that:
* Sections appear in the correct order
* Scheduler titles and descriptions are clear
* Credit costs display correctly
* The overall organization makes sense for athletes
Click through different schedulers to ensure they're properly configured and available for booking.
## Page settings
Use the Settings panel to rename the Schedule tab and update the page URL.
Click the **gear icon** in the top right of the Schedule page to open the Settings panel.
Check that:
* Sections appear in the correct order
* Scheduler titles and descriptions are clear
* Credit costs display correctly
* The overall organization makes sense for athletes
Click through different schedulers to ensure they're properly configured and available for booking.
## Page settings
Use the Settings panel to rename the Schedule tab and update the page URL.
Click the **gear icon** in the top right of the Schedule page to open the Settings panel.
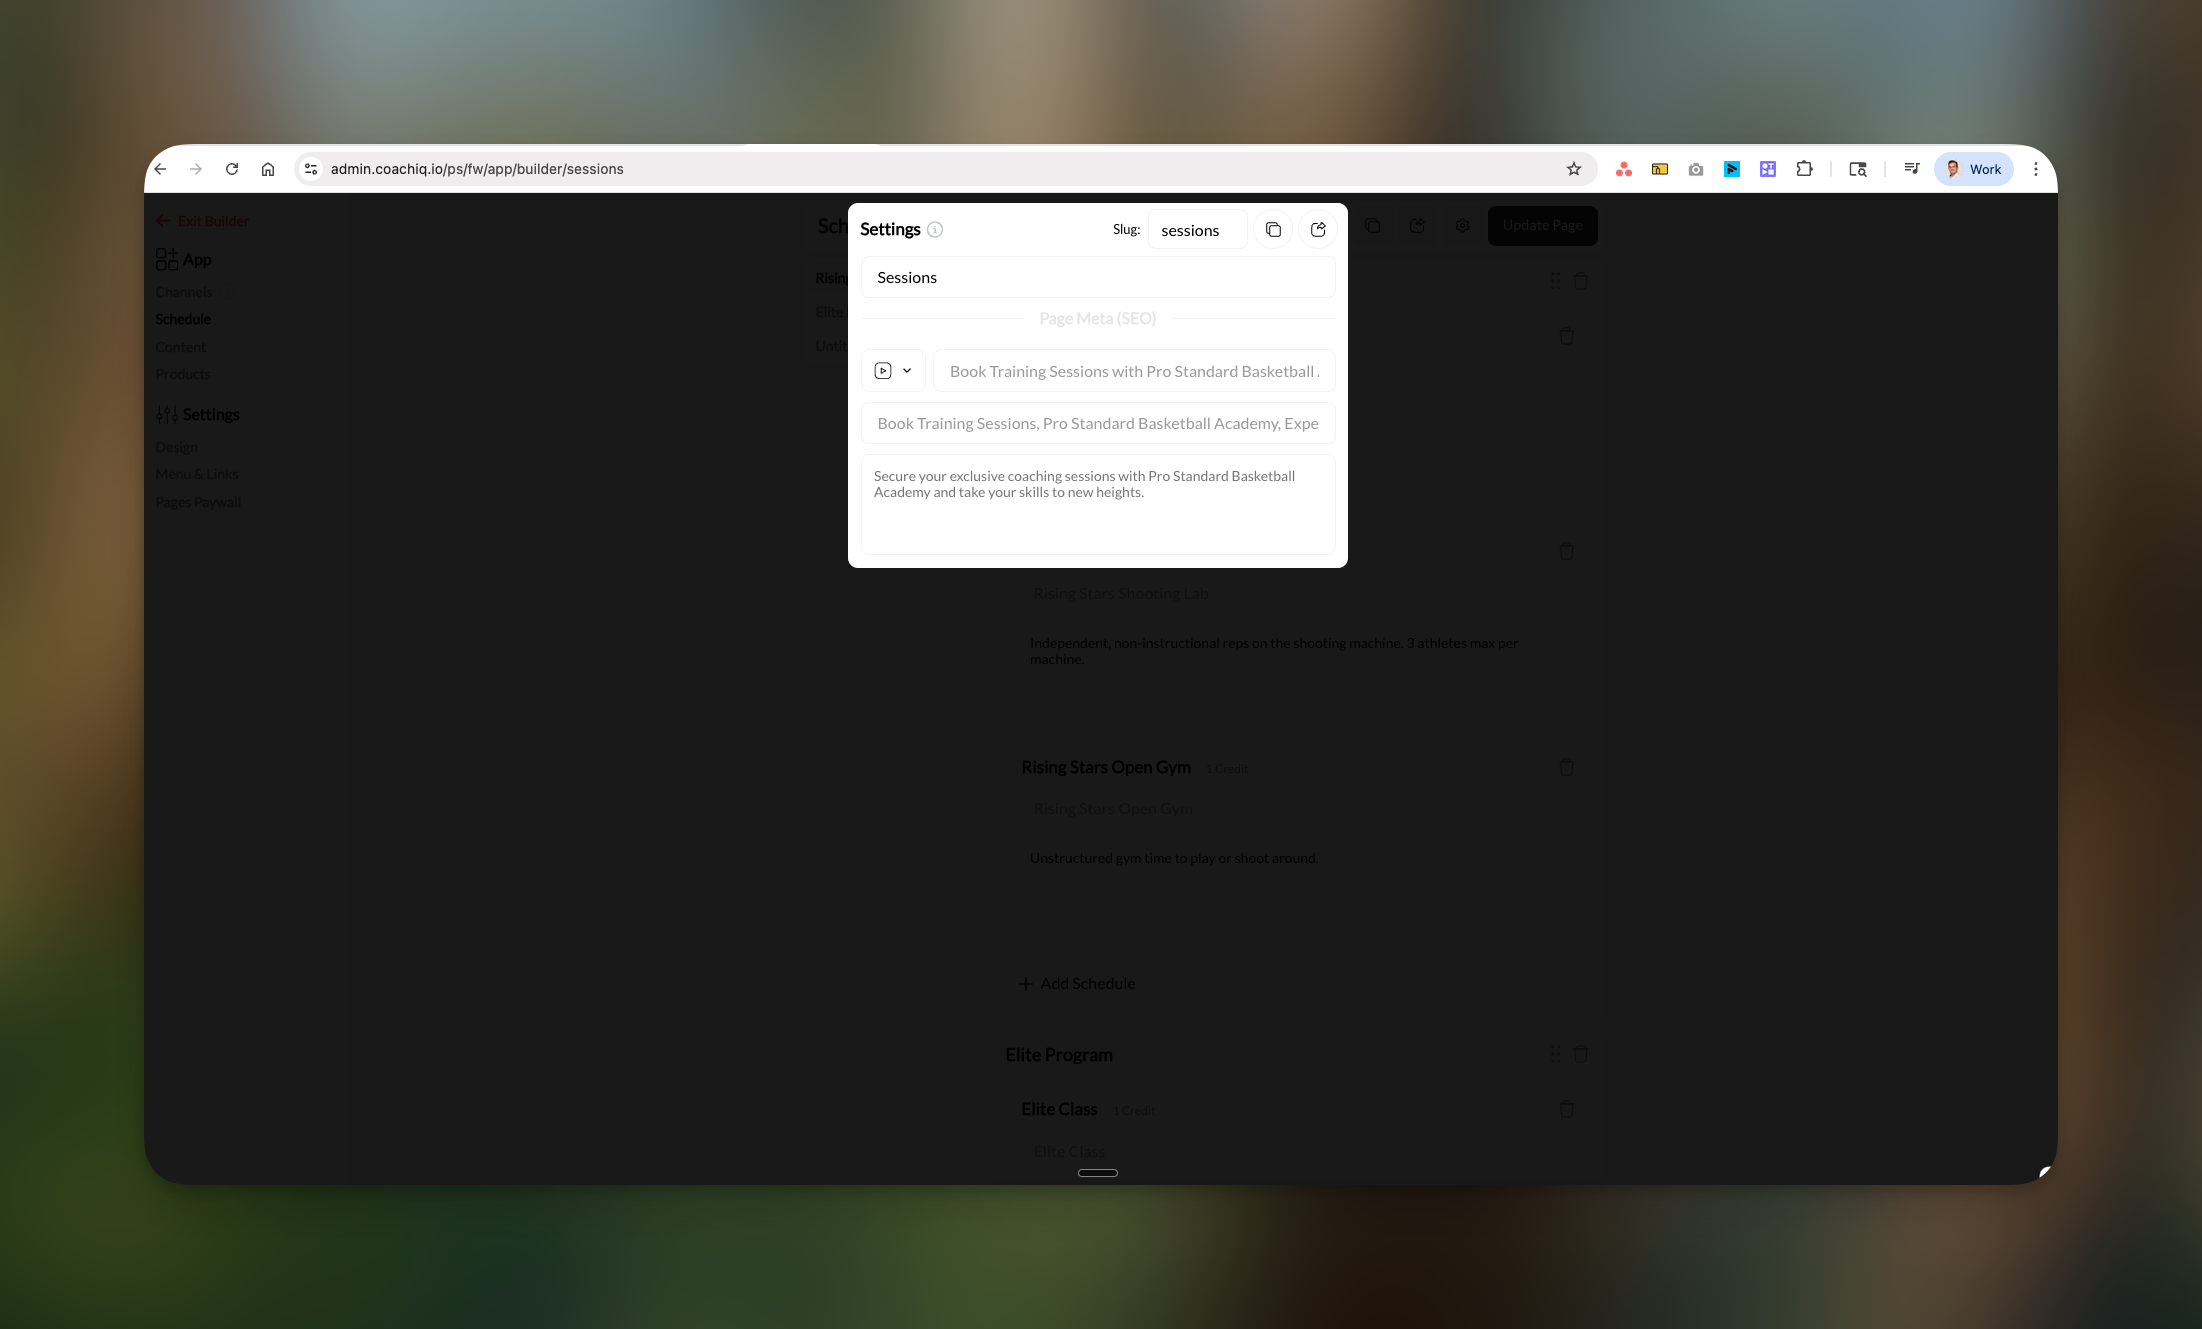 The first field at the top of the Settings panel is the **page display name** — this is what athletes see as the tab name in their portal. Update it to whatever fits your program (e.g., "Book Training", "Reserve a Spot").
The **Slug** field controls the URL path for this page (e.g., `/sessions`, `/schedule`). Update it to match your new name if needed.
Edit the SEO metadata fields (title, keywords, description) that appear when someone shares your schedule page link.
Click **Update Page** to apply all settings.
## Common questions
Schedulers are created in **Schedule → Schedulers** in your main dashboard. The Athlete Portal only controls which existing schedulers are visible to athletes. [Learn how to create schedulers →](/scheduling/creating-your-first-scheduler)
Check that:
1. The Schedule page is set to **Active**
2. The scheduler is added to a section in the Athlete Portal
3. The scheduler has available time slots configured
4. The athlete has the required credits or payment method
The credit amount shown (e.g., "1 Credit") is the cost to book that session. Athletes must have sufficient credits in their account to book. Credits are set when creating the scheduler, not in the Athlete Portal.
Currently, all athletes see the same schedulers. To control access, use the scheduler's internal settings for prerequisites or eligibility requirements.
Yes! All changes to the Athlete Portal update instantly. There's no draft mode or publish button - athletes see updates as soon as you make them.
## Troubleshooting
**Schedulers not appearing in selection modal?** Make sure you've created schedulers in **Schedule → Schedulers** first. The Athlete Portal can only display schedulers that already exist in your system.
### Common issues and solutions
**Athletes can't see the Schedule page:**
* Verify the Active toggle is turned on
* Check that at least one scheduler is added
* Ensure athletes are logged into their accounts
**Credit amounts showing incorrectly:**
* Credits are set in the scheduler configuration, not in the Athlete Portal
* Go to **Schedule → Schedulers** to update credit costs
**Sections appearing in wrong order:**
* Use the dots menu (⋮) to drag and reorder sections
* Changes save automatically
**Scheduler descriptions not updating:**
* Click directly on the scheduler to open edit mode
* Make sure to click outside the field to save changes
## Pro tips
**Organization best practices:**
* Group schedulers by program level (Beginner, Intermediate, Advanced)
* Or organize by location if you have multiple facilities
* Keep section titles short and clear
* Place your most popular schedulers at the top
**Writing effective descriptions:**
* Include skill level requirements
* Mention any equipment needed
* Specify age groups if relevant
* Keep descriptions under 2 sentences
**Testing your setup:**
* Always preview after making changes
* Test with a demo athlete account if possible
* Check mobile and desktop views
* Verify credit requirements are clear
## Related articles
* [Creating Your First Scheduler](/scheduling/creating-your-first-scheduler)
* [Setting Credit Prices for Sessions](/scheduling/credit-system-overview)
* [Managing Scheduler Availability](/scheduling/create-your-availability)
* [Understanding the Athlete Portal](/athlete-portal/understanding-your-athlete-portal)
* [Athlete Portal Access Control](/athlete-portal/paywall-settings)
The first field at the top of the Settings panel is the **page display name** — this is what athletes see as the tab name in their portal. Update it to whatever fits your program (e.g., "Book Training", "Reserve a Spot").
The **Slug** field controls the URL path for this page (e.g., `/sessions`, `/schedule`). Update it to match your new name if needed.
Edit the SEO metadata fields (title, keywords, description) that appear when someone shares your schedule page link.
Click **Update Page** to apply all settings.
## Common questions
Schedulers are created in **Schedule → Schedulers** in your main dashboard. The Athlete Portal only controls which existing schedulers are visible to athletes. [Learn how to create schedulers →](/scheduling/creating-your-first-scheduler)
Check that:
1. The Schedule page is set to **Active**
2. The scheduler is added to a section in the Athlete Portal
3. The scheduler has available time slots configured
4. The athlete has the required credits or payment method
The credit amount shown (e.g., "1 Credit") is the cost to book that session. Athletes must have sufficient credits in their account to book. Credits are set when creating the scheduler, not in the Athlete Portal.
Currently, all athletes see the same schedulers. To control access, use the scheduler's internal settings for prerequisites or eligibility requirements.
Yes! All changes to the Athlete Portal update instantly. There's no draft mode or publish button - athletes see updates as soon as you make them.
## Troubleshooting
**Schedulers not appearing in selection modal?** Make sure you've created schedulers in **Schedule → Schedulers** first. The Athlete Portal can only display schedulers that already exist in your system.
### Common issues and solutions
**Athletes can't see the Schedule page:**
* Verify the Active toggle is turned on
* Check that at least one scheduler is added
* Ensure athletes are logged into their accounts
**Credit amounts showing incorrectly:**
* Credits are set in the scheduler configuration, not in the Athlete Portal
* Go to **Schedule → Schedulers** to update credit costs
**Sections appearing in wrong order:**
* Use the dots menu (⋮) to drag and reorder sections
* Changes save automatically
**Scheduler descriptions not updating:**
* Click directly on the scheduler to open edit mode
* Make sure to click outside the field to save changes
## Pro tips
**Organization best practices:**
* Group schedulers by program level (Beginner, Intermediate, Advanced)
* Or organize by location if you have multiple facilities
* Keep section titles short and clear
* Place your most popular schedulers at the top
**Writing effective descriptions:**
* Include skill level requirements
* Mention any equipment needed
* Specify age groups if relevant
* Keep descriptions under 2 sentences
**Testing your setup:**
* Always preview after making changes
* Test with a demo athlete account if possible
* Check mobile and desktop views
* Verify credit requirements are clear
## Related articles
* [Creating Your First Scheduler](/scheduling/creating-your-first-scheduler)
* [Setting Credit Prices for Sessions](/scheduling/credit-system-overview)
* [Managing Scheduler Availability](/scheduling/create-your-availability)
* [Understanding the Athlete Portal](/athlete-portal/understanding-your-athlete-portal)
* [Athlete Portal Access Control](/athlete-portal/paywall-settings)